Adding a flexfield to a page
In this recipe, we are going to show how we can create a descriptive flexfield (DFF) and then display the flexfield on the screen. Again, we need to gather some information about the page and find out if a flexfield is available for a particular region. We will then configure a segment on the DFF and show how we can display it on the screen.
How to do it...
To add a flexfield to a page, perform the following steps:
Log in to Oracle with
XXUSERand select the XX Test Manager Self-Service responsibility.Navigate to the Absence Management page.
Click on the Action icon for an employee record.
Click on the Create Absence button and the Enter Absence Details screen will open as shown in the following screenshot:

Scroll down to the bottom of the page and click on the About this Page link.
Click on the Expand All link.
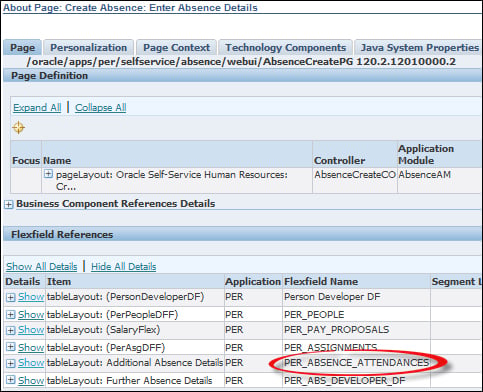
Scroll down to the Flexfield References section and we will see what flexfields are available on this screen.
The following screenshot shows us that the PER_ABSENCE_ATTENDANCES flexfield is available:

Getting the title of a descriptive flexfield
Now, we have the flexfield name and we can add a descriptive flexfield segment to the flexfield. First, we will get the title of the Additional Absence Information DFF. To do this, perform the following steps:
Log in to Oracle with the Application Developer responsibility.
Navigate to Flexfield | Descriptive | Register and the Descriptive Flexfields window will open.
Press the F11 key to enter a query and enter
PER_ABSENCE_ATTENDANCESin the Name field.Press CTRL + F11 to execute the query and the following record should be returned.
We can see that the PER_ABSENCE_ATTENDANCES flexfield is returned from the query. Make a note of the flexfield title Additional Absence Details.

Exit the Descriptive Flexfields screen and navigate to Flexfield | Descriptive | Segments and the Descriptive Flexfields Segments window will open.
Press F11 to enter a query.
When in ENTER-QUERY mode, type
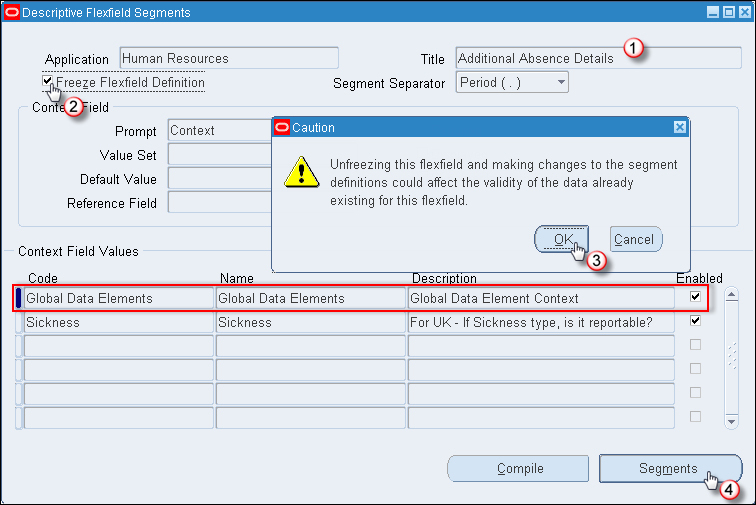
Additional Absence Detailsin the Title field and press Ctrl + F11 to execute the query.If the Freeze Flexfield Definition checkbox is checked, uncheck it.
Click on OK when the warning message appears.
Click on the Segments button for the Global Data Elements record.
The steps taken are summarized in the following screenshot:

Adding a DFF segment
Now, we can create a new DFF segment for the Global Data Elements context as performed in the following steps:
Enter the following data in the Segments Summary screen:
Property
Value
Number
45Name
Test DFFWindow Prompt
Test DFFColumn
ATTRIBUTE20Value Set
Displayed
checked
Required
checked
Click on the Open button.
Enter the following data:
Property
Value
Name
Test DFFDescription
Test DFFEnabled
checked
Displayed
checked
Required
unchecked
Display Size
10Description Size
10Concatenated Description Size
25List of Values
Test DFFWindow
Test DFFWhen you change the Display Size field, click on OK when the warning appears.
Click on Save.
Close the Segments screen.
Close the Segments Summary screen.
Check the Freeze Flexfield Definition checkbox to recompile the flexfield definition.
Click on OK when the warning appears.
Click on Save and OK when a note message appears.
Exit the form.
Enabling a flexfield on a self-service page
Now that we have created a DFF segment, we are going to show the flexfield in the Create Absence screen. To do this, perform the following steps:
Change responsibility to the XX Test Manager Self-Service responsibility.
Navigate to the Absence Management page.
Click the Action icon for an employee record.
Click on the Create Absence button.
Click on the Personalize Page link.
Click on the Complete View radio button.
Click on the Expand All link.
Press Ctrl + F to bring up the search facility on the browser.
Type in
Additionaland scroll down to the Flex: Additional Absence Details record (which will be highlighted from the find).Click on the Personalize icon for the Flex: Additional Absence Details field.
The steps are summarized in the following screenshot:

Click on the Choose Levels Displayed button.
Shift all of the items other than Site back to the Available Levels side.
Click on the Apply button.
Set the Rendered at Site level to true.
Click on the Apply button.
Scroll to the bottom of the page and click on the Return to Application link.
How it works...
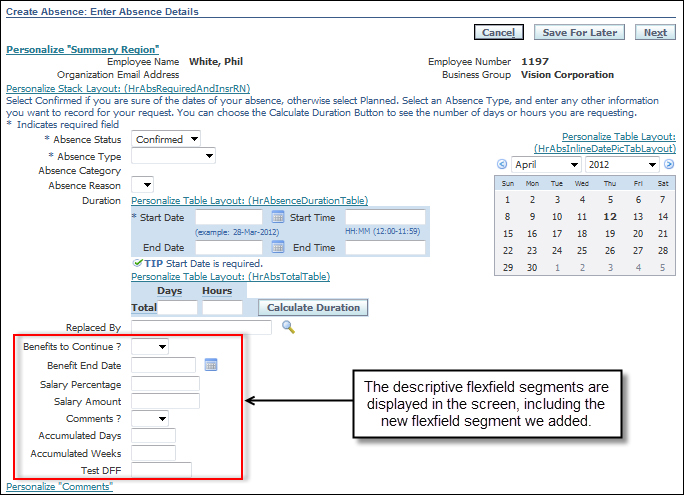
We have now updated the page so that the flexfield is displayed in the Enter Absence Details screen, as shown in the following screenshot:


