Using the PX4 flight control stack
PX4 firmware allows developers to directly simulate the code running on the autopilot board on your Linux system. Additionally, it is possible to modify the autopilot source code and reload the new version on the Pixhawk board. To install the firmware on your system, you will firstly need to download it. Even though it is not mandatory, linking this with the ROS will conveniently place it in your ROS workspace. To download the autopilot code, enter your ROS workspace and use the following command:
git clone https://github.com/PX4/PX4-Autopilot.git --recursive
This repository contains all the necessary files to run the PX4 firmware on a ROS-Gazebo simulation, using different UAV quadrotors equipped with a camera, a depth camera, a laser scanner, and so on. Simulation represents a quick, easy, and safe way to test changes to PX4 code before attempting to fly in the real world. It is also a good way to start flying with PX4 when you have not yet got a vehicle to experiment with.
Note that we used the --recursive option in the clone command to download all the submodules included in the main repository. This means that some parts of the autopilot source code are stored in other, external repositories that are linked by the main one. The clone command may take several minutes. Note that, after the clone command is completed, a new directory called PX4-Autopilot has been created. This folder contains all the files necessary to modify and upload the firmware on the embedded controller (the autopilot) and to simulate source code on different simulators. To link all the necessary elements, the firmware directory is recognized as a ROS package, even though it is not compiled as such. In addition, the name of this package is px4. Note that the name of the directory doesn't necessarily represent the name of the ROS package. So, after you have cloned this directory into your ROS workspace, you can join the firmware folder with the following command:
roscd px4
You are now ready to compile this package and start the simulation. Before doing this, you need to install the following set of dependencies:
sudo apt install python3-pip
pip3 install --user empy
pip3 install --user toml
pip3 install --user numpy
pip3 install --user packaging
sudo apt-get install libgstreamer-plugins-base1.0-dev
pip3 install --user jinja2
To allow ROS/Flight Control Unit (FCU) communication, you should install the mavros package:
sudo apt-get install ros-noeitc-mavros ros-noeitc-mavros-msgs
Now you can install the geographic dataset:
sudo /opt/ros/noetic/lib/mavros/install_geographiclib_datasets.sh
Finally, you can run the following command to compile it:
roscd px4 && make px4_sitl_default
In this case, we used the make command with a specific target. This is the Software in the Loop (SITL) target. This allows us to simulate the firmware source code. As already stated, a simulator allows the PX4 flight code to control a computer-modeled vehicle in a simulated world. After we have launched the simulation, we can interact with this vehicle just as we might with a real vehicle, using ground station software such as QGroundControl, an offboard API, or a radio controller gamepad. Different simulators are supported. The complete list can be found at the following link: https://docs.px4.io/master/en/simulation/. However, we will use Gazebo. To launch the PX4 control code with Gazebo, run the following command from the root directory of the firmware source:
make px4_sitl_default gazebo
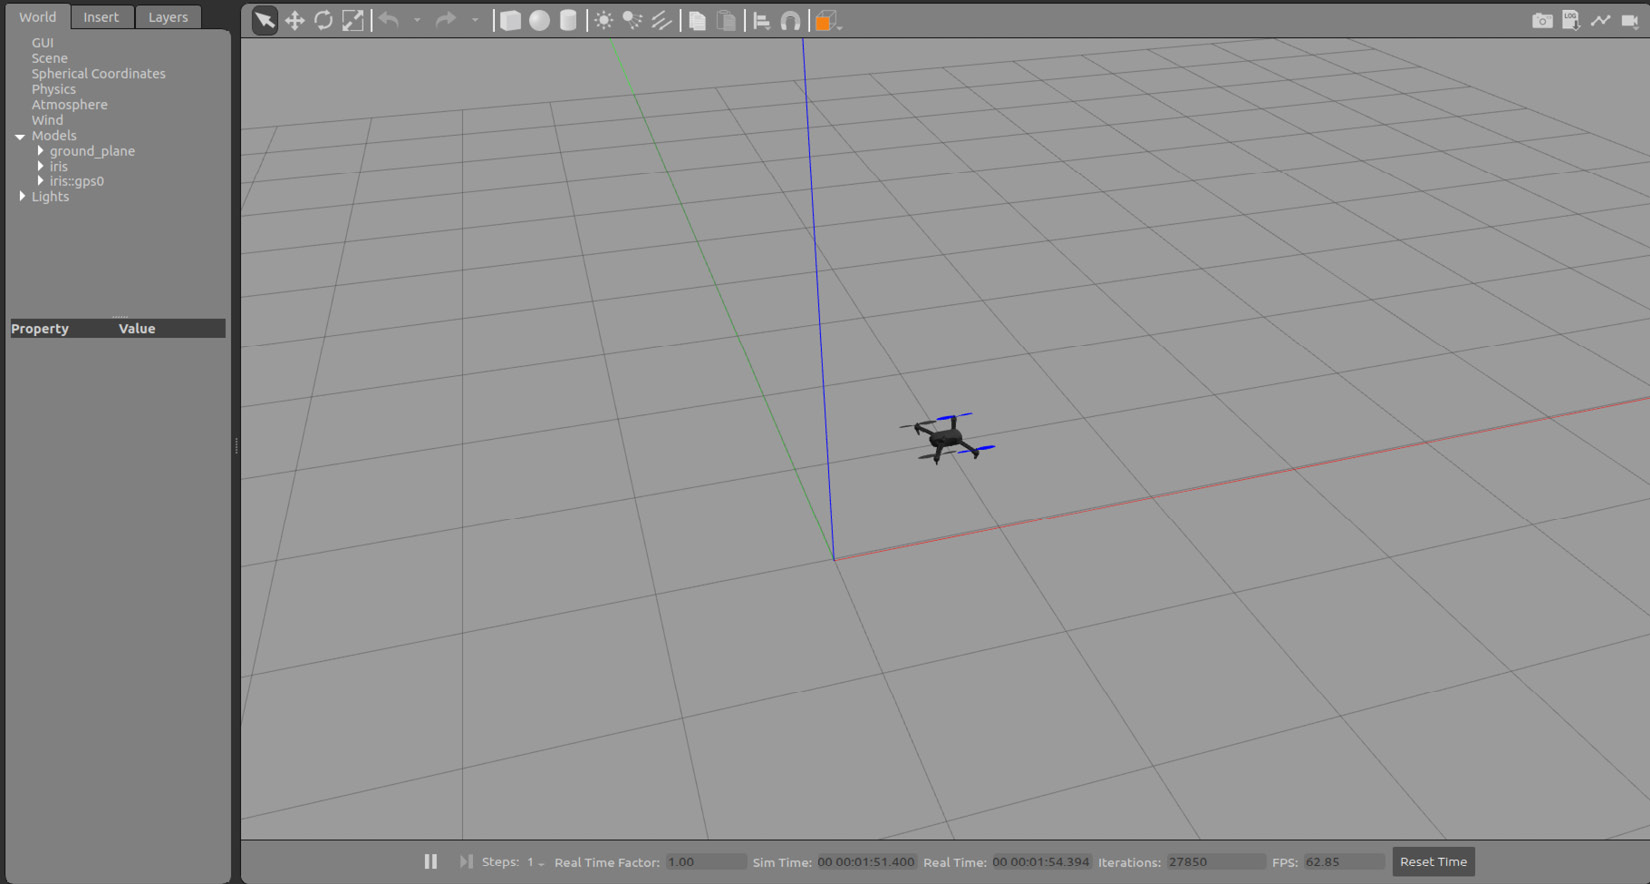
This command will start a new Gazebo scene with a 3DR IRIS quadrotor, as shown in the following figure:

Figure 8.2 – 3DR IRIS quadrotor simulated in Gazebo with the PX4 control stack
Note that this is the standalone version of Gazebo, so there is no link with the ROS yet. You can also choose other targets to be compiled. For example, to compile the firmware for the real Pixhawk, you can use the following command:
make px4_fmu-v2_default
You can interact with the simulator in different ways. The simplest method is by using a ground control station program such as QGroundControl. Using this software, you can take off and land your simulated UAV, and move it around the environment. Using this interface, you can also set some parameters to configure the behavior of the autopilot and tune the controller gains.
The following commands must be used to start QGroundControl:
sudo usermod -a -G dialout $USER
sudo apt-get remove modemmanager -y
sudo apt install gstreamer1.0-plugins-bad gstreamer1.0-libav gstreamer1.0-gl -y
Now download the QGroundControl app, as follows:
wget https://s3-us-west-2.amazonaws.com/qgroundcontrol/latest/QGroundControl.AppImage
chmod +x QGroundControl.AppImage
Finally, start the PX4 simulation (as seen previously) and launch the QGroundControl software:
./QGroundControl.AppImage
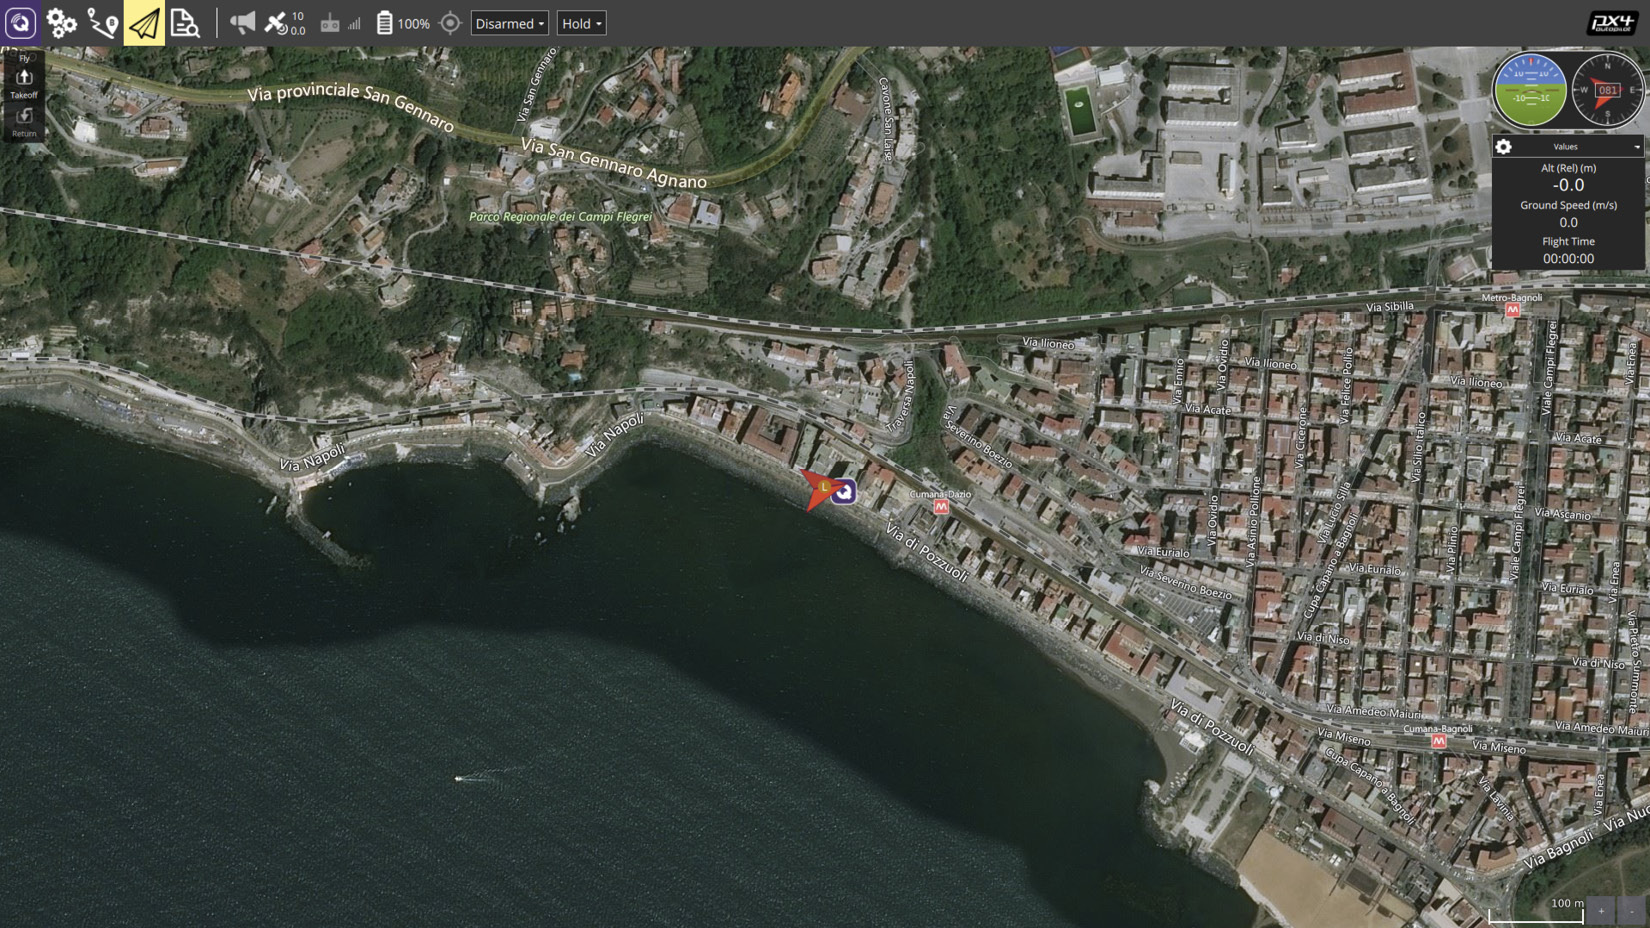
The user interface will be displayed, as depicted in the following figure:

Figure 8.3 – QGroundControl user interface
Note that you will use the same method if you start up a real autopilot connected (wired or wireless) to your laptop. Before we proceed with connecting the PX4 control stack to ROS, we will briefly discuss the PX4 software architecture.
PX4 firmware architecture
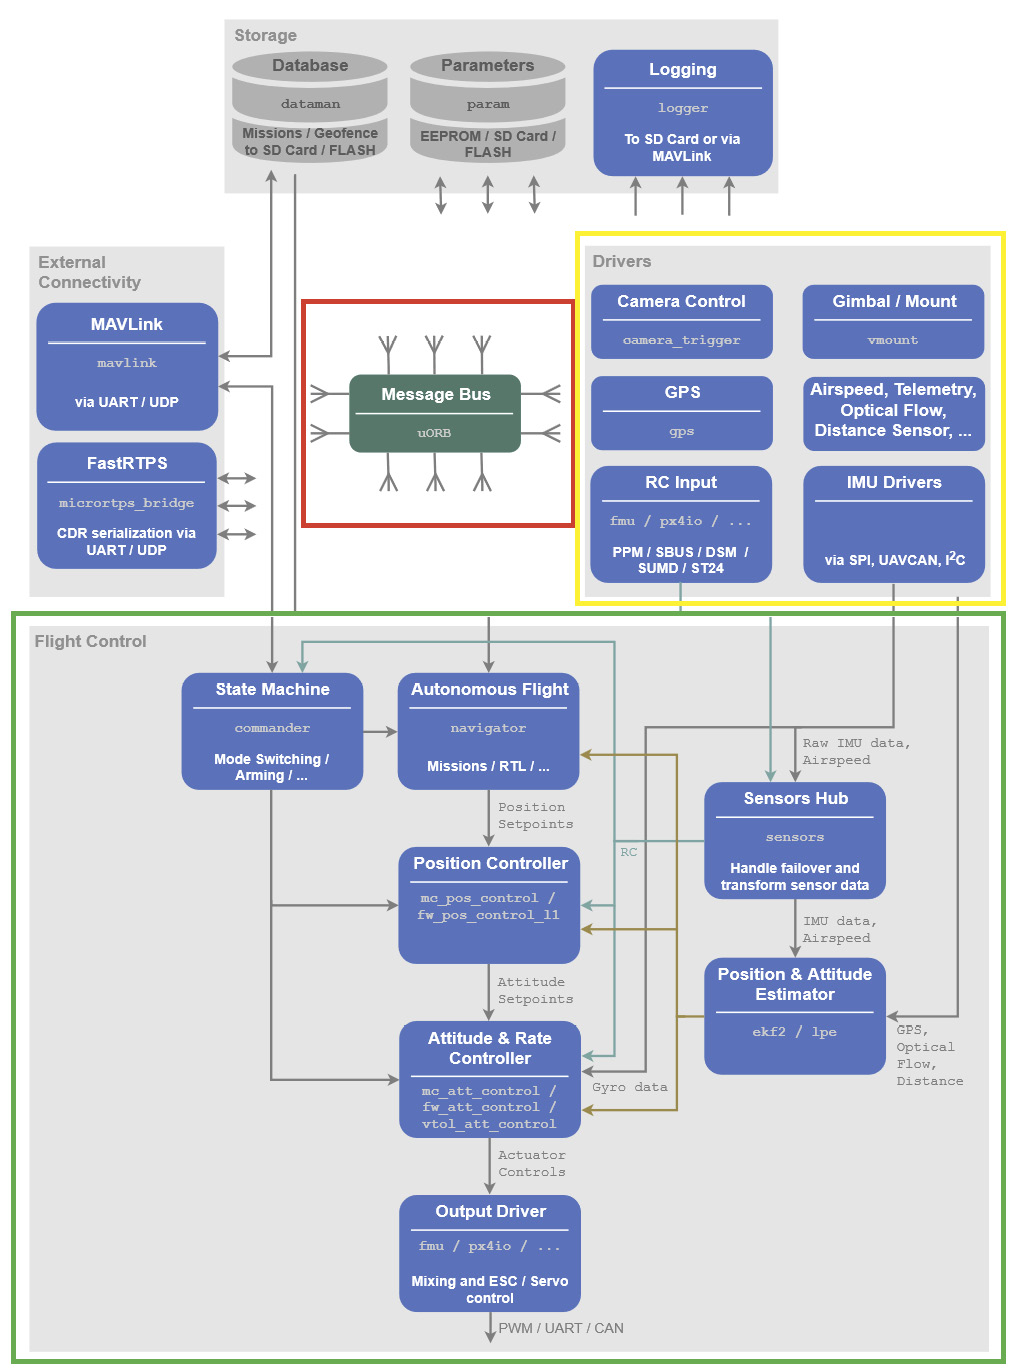
Even though we will not modify the default firmware of the PX4 control stack, it is important to understand how it is organized. The whole system architecture is depicted in the following figure:

Figure 8.4 – PX4 stack modules
The source code of the controller is split into self-contained modules/programs (shown in monospace in Figure 8.4). Each building block corresponds to exactly one module. The modules can be found in the source folder of the firmware's main directory. Like ROS, PX4 software modules communicate with each other through a publish/subscribe message bus named uORB. The use of the publish/subscribe protocol means the following:
- The system is reactive – it is asynchronous and will update instantly when new data is available. All operations and communication are fully parallelized.
- A system component can consume data from anywhere in a thread-safe fashion. The flight stack is a collection of guidance, navigation, and control algorithms for autonomous drones. It includes controllers for fixed-wing, multirotor, and UAV airframes, as well as estimators for attitude and position.
In particular, the main modules of the PX4 software architecture are as follows:
- An estimator: This takes one or more sensor inputs, combines them, and computes a vehicle state (for example, the attitude from IMU sensor data).
- A controller: This is a component that takes a setpoint and measurement, or estimated state (process variable), as input. Its goal is to adjust the value of the process variable so that it matches the setpoint. The output is a correction to eventually reach that setpoint. For example, the position controller takes position setpoints as inputs, the process variable is the current estimated position, and the output takes the form of an attitude and thrust setpoint that moves the vehicle toward the desired position.
- A mixer: This takes motion commands (such as turn right) and translates them into individual motor commands while ensuring that some limits are not exceeded. This translation is specific for a vehicle type and depends on various factors, such as the motor arrangements with respect to the center of gravity, or the vehicle's rotational inertia.
As already stated, all the module source codes are placed in the PX4-Autopilot/src folder. Conversely, everything related to the ROS and Gazebo is confined to the PX4-Autopilot/Tools/sitl_gazebo folder. We are now ready to link the PX4 control stack with ROS.
PX4 SITL
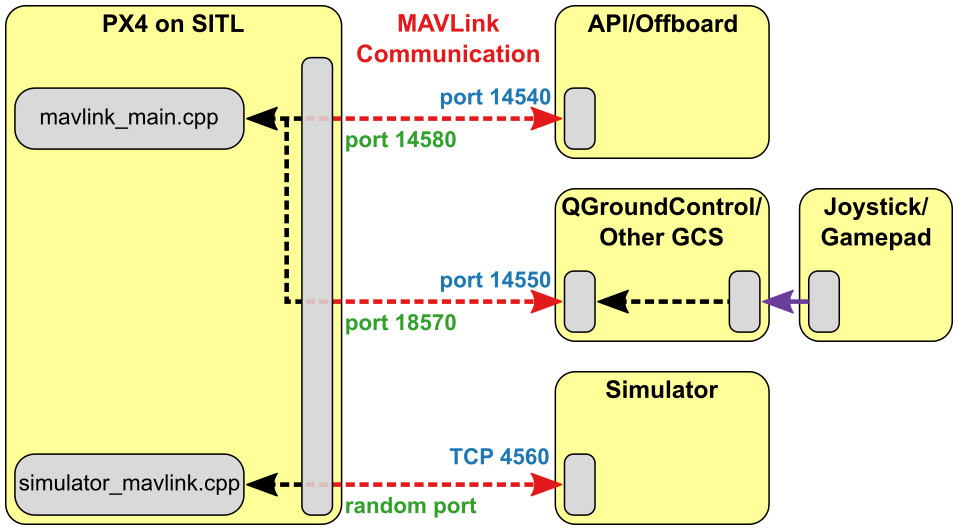
The px4 package already contains useful sources and launch files that can be used to simulate a UAV in the Gazebo ROS framework. The integration of Gazebo ROS with the PX4 control stack is possible thanks to a communication protocol used by a huge number of aerial vehicles. This communication protocol is called mavlink. In this context, the communication between the simulation and the control software is shown in the following figure:

Figure 8.5 – PX4/Gazebo communication schema
The control stack communicates with the simulation scene to receive the sensor data while sending the actuator values to the simulated robot. At the same time, it sends onboard information (UAV attitude, position, GPS, and so on) to an offboard program or a ground control station. Before providing more information on the communication protocol, let's now try to start a simulation embedded into the ROS framework. As before, we will use the SITL tool from the PX4 firmware stack. After compiling the stack in the previous section, we now just need to load a configuration file and then start a launch file. The package already contains all the configuration and launch files needed to start ROS and the communication bridge with the PX4 controller. Before discussing what is going on behind the scenes, let's start by loading the configuration files. First, navigate to the px4 directory:
roscd px4
Then, load the configuration files:
source Tools/setup_gazebo.bash $(pwd) $(pwd)/build/px4_sitl_default
export ROS_PACKAGE_PATH=$ROS_PACKAGE_PATH:$(pwd)
export ROS_PACKAGE_PATH=$ROS_PACKAGE_PATH:$(pwd)/Tools/sitl_gazebo
It would be convenient to add these lines to your .bashrc file. Now, launch the simulation:
roslaunch px4 mavros_posix_sitl.launch
Nothing is changed with respect to the previous execution. A set of ROS topics and services are now available. These can get information from the drone and control its actions. You can use the rostopic list command to see all the topics. For example, if you are interested in the attitude of the UAV, you can view the /mavros/imu/data topic. But what is mavros? mavros establishes the communication between ROS and the PX4 software. In the next section, we will discuss this communication bridge.


