Setting up Amazon SageMaker on your local machine
A common misconception is that you can't use SageMaker outside of the AWS cloud. Obviously, it is a cloud-based service, and its most appealing capabilities require cloud infrastructure to run. However, many developers like to set up their development environment their own way, and SageMaker lets them do that: in this section, you will learn how to install the SageMaker SDK on your local machine or on a local server. In later chapters, you'll learn how to train and deploy models locally.
It's good practice to isolate Python environments in order to avoid dependency hell. Let's see how we can achieve this using two popular projects: virtualenv (https://virtualenv.pypa.io) and Anaconda (https://www.anaconda.com/).
Installing the SageMaker SDK with virtualenv
If you've never worked with virtualenv before, please read this tutorial before proceeding: https://packaging.python.org/guides/installing-using-pip-and-virtual-environments/:
- First, let's create a new environment named
sagemakerand activate it:$ mkdir workdir $ cd workdir $ python3 -m venv sagemaker $ source sagemaker/bin/activate
- Now, let's install
boto3, the SageMaker SDK, and thepandaslibrary (https://pandas.pydata.org/), which is also required:$ pip3 install boto3 sagemaker pandas
- Now, let's quickly check that we can import these SDKs into Python:
$ python3
Python 3.9.5 (default, May  4 2021, 03:29:30)
>>> import boto3
>>> import sagemaker
>>> print(boto3.__version__)
1.17.70
>>> print(sagemaker.__version__)
2.39.1
>>> exit()
The installation looks fine. Your own versions will certainly be newer and that's fine. Now, let's run a quick test with a local Jupyter server (https://jupyter.org/). If Jupyter isn't installed on your machine, you can find instructions at https://jupyter.org/install:
- First, let's create a Jupyter kernel based on our virtual environment:
$ pip3 install jupyter ipykernel
$ python3 -m ipykernel install --user --name=sagemaker
- Then, we can launch Jupyter:
$ jupyter notebook
- Creating a new notebook, we can see that the
sagemakerkernel is available, so let's select it in the New menu, as seen in the following screenshot:
Figure 1.2 – Creating a new notebook
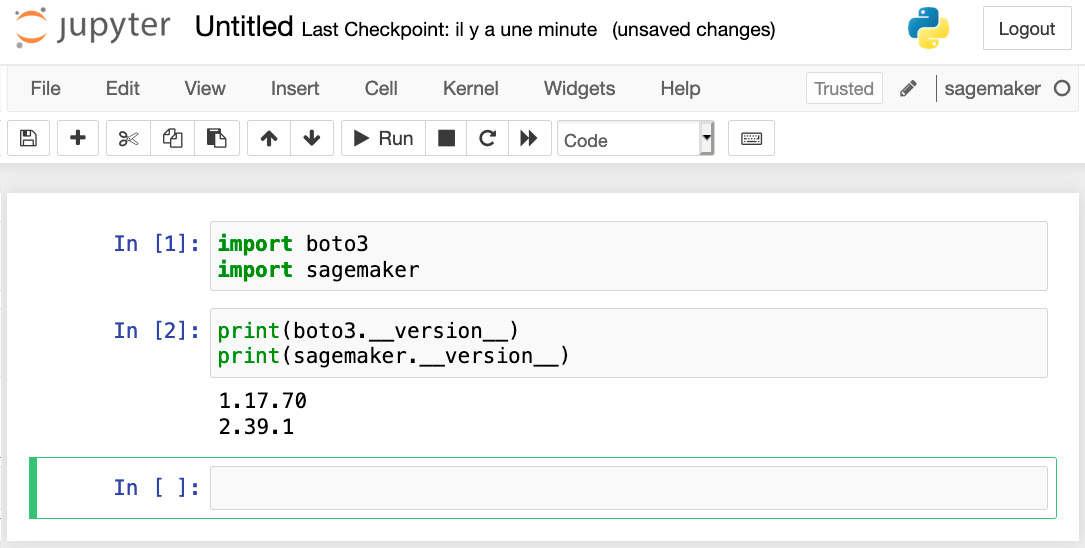
- Finally, we can check that the SDKs are available by importing them and printing their version, as shown in the following screenshot:

Figure 1.3 – Checking the SDK version
This completes the installation with virtualenv. Don't forget to terminate Jupyter, and to deactivate your virtualenv:
$ deactivate
You can also install the SDK using Anaconda.
Installing the SageMaker SDK with Anaconda
Anaconda includes a package manager named conda that lets you create and manage isolated environments. If you've never worked with conda before, you should do the following:
- Install Anaconda: https://docs.anaconda.com/anaconda/install/.
- Read this tutorial: https://docs.conda.io/projects/conda/en/latest/user-guide/getting-started.htmachine learning.
We will get started using the following steps:
- Let's create and activate a new
condaenvironment namedconda-sagemaker:$ conda create -y -n conda-sagemaker $ conda activate conda-sagemaker
- Then, we install
pandas,boto3, and the SageMaker SDK. The latter has to be installed withpipas it's not available as acondapackage:$ conda install -y boto3 pandas $ pip3 install sagemaker
- Now, let's add Jupyter and its dependencies to the environment, and create a new kernel:
$ conda install -y jupyter ipykernel
$ python3 -m ipykernel install --user --name conda-sagemaker
- Then, we can launch Jupyter:
$ jupyter notebook
Check that the
conda-sagemakerkernel is present in the New menu, as is visible in the following screenshot:
Figure 1.4 – Creating a new conda environment
- Just like in the previous section, we can create a notebook using this kernel and check that the SDKs are imported correctly.
This completes the installation with conda. Whether you'd rather use it instead of virtualenv is largely a matter of personal preference. You can definitely run all notebooks in this book and build your own projects with one or the other.
A word about AWS permissions
Amazon Identity and Access Management (IAM) enables you to manage access to AWS services and resources securely (https://aws.amazon.com/iam). Of course, this applies to Amazon SageMaker as well, and you need to make sure that your AWS user has sufficient permissions to invoke the SageMaker API.
IAM permissions
If you're not familiar with IAM at all, please read the following documentation:
https://docs.aws.amazon.com/IAM/latest/UserGuide/introduction.htmachine learning
You can run a quick test by using the AWS CLI on one of the SageMaker APIs, for example, list-endpoints. I'm using the eu-west-1 region here, but feel free to use the region that is nearest to you:
$ aws sagemaker list-endpoints --region eu-west-1
{
    "Endpoints": []
}
If you get an error message complaining about insufficient permissions, you need to update the IAM role attached to your AWS user.
If you own the AWS account in question, you can easily do this yourself in the IAM console by adding the AmazonSageMakerFullAccess managed policy to your role. Note that this policy is extremely permissive: this is fine for a development account, but certainly not for a production account.
If you work with an account where you don't have administrative rights (such as a company-provided account), please contact your IT administrator to add SageMaker permissions to your AWS user.
For more information on SageMaker permissions, please refer to the documentation: https://docs.aws.amazon.com/sagemaker/latest/dg/security-iam.htmachine learning.


