Search icon CANCEL
Subscription
0
Cart icon
Your Cart (0 item)
Close icon
You have no products in your basket yet
Save more on your purchases! discount-offer-chevron-icon
Savings automatically calculated. No voucher code required.
Arrow left icon
Explore Products
Best Sellers
New Releases
Books
Videos
Audiobooks
Learning Hub
Free Learning
Arrow right icon
Arrow up icon
GO TO TOP
DevOps for Salesforce

You're reading from   DevOps for Salesforce Build, test, and streamline data pipelines to simplify development in Salesforce

Arrow left icon
Product type Paperback
Published in Sep 2018
Publisher
ISBN-13 9781788833349
Length 220 pages
Edition 1st Edition
Concepts
Arrow right icon
Authors (3):
Arrow left icon
Mukta Aphale Mukta Aphale
Author Profile Icon Mukta Aphale
Mukta Aphale
Nagraj Gornalli Nagraj Gornalli
Author Profile Icon Nagraj Gornalli
Nagraj Gornalli
Priyanka Dive Priyanka Dive
Author Profile Icon Priyanka Dive
Priyanka Dive
Arrow right icon
View More author details
Toc

Table of Contents (10) Chapters Close

Preface 1. Salesforce Development and Delivery Process 2. Applying DevOps to Salesforce Applications FREE CHAPTER 3. Deployment in Salesforce 4. Introduction to the Force.com Migration Tool 5. Version Control 6. Continuous Integration 7. Continuous Testing 8. Tracking Application Changes and the ROI of Applying DevOps to Salesforce 9. Other Books You May Enjoy

Branching strategy


Branching is a very useful feature provided by Git. It helps to develop multiple features in parallel. Branching can be useful to define environment specific codes such as develop, test, stage, and production. Usually, the environment to Git branch mapping will be, for example, the code for the development environment stored in the develop Git branch; for the test environment, we use the test Git branch, and so on. For the production environment, we use the master branch, as it is the first default branch created when we create any Git repository.


Let's see how we can create a branch using the web UI:

  1. Log in to GitLab.
  2. Go to your repository, Sample, that we created in the Creating your first project in GitLab section:
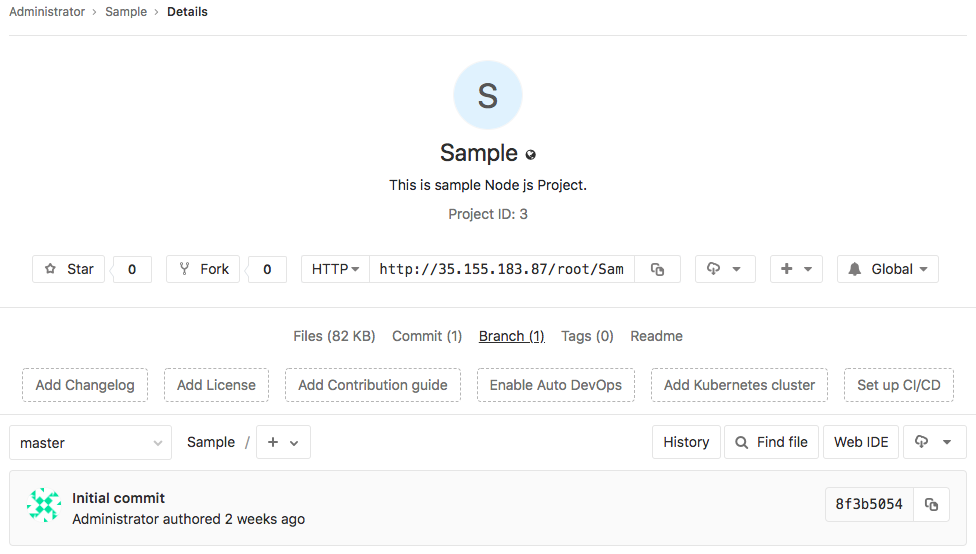
  1. As you see in this screenshot, we have only one branch which is the master, and is the default branch.
  1. Click on Branch, you will be redirected to a page where you can see all the active branches for this repository. Currently, we have a master branch:
  1. Click on...
lock icon The rest of the chapter is locked
Register for a free Packt account to unlock a world of extra content!
A free Packt account unlocks extra newsletters, articles, discounted offers, and much more. Start advancing your knowledge today.
Unlock this book and the full library FREE for 7 days
Get unlimited access to 7000+ expert-authored eBooks and videos courses covering every tech area you can think of
Renews at $19.99/month. Cancel anytime
Banner background image