Installing the Sun Java Development Kit (JDK)
All applications, that are written in Java programming language including ADempiere, require a Java Virtual Machine (JVM) for execution. The JVM is distributed along with a standard Java class library that implements the Java Application Programming Interface (API). A complete implementation of JVM is included in the Java Runtime Environment (JRE), which can be obtained during the installation of the Java Development Kit (JDK) or by installing Java Runtime Environment.
Obtaining JDK/JRE
ADempiere can be installed on any operating system—Mac OS, Linux, BSD families, and so on, but in this book we will use Microsoft Windows as the operating system.
You can download the latest JDK/JRE available from the Sun Microsystems website at http://java.sun.com/. Throughout this book, JDK 5.0 will be used as a prerequisite for installing ADempiere. We can download JDK 5.0 from http://java.sun.com/javase/downloads/index_jdk5.jsp. At the time of writing this book, the latest version or release for JDK 5.0 is JDK 5.0 Update 17. Future versions or releases of JDK can also be used without any problems.
Click on the JDK 5.0 Update 17 Download button, and you will be directed to the download page. Set the platform as Windows and the language as Multi-Language. On the next page, choose Windows Offline Installation. The filename for this JDK is jdk-1_5_0_17-windows-i586-p.exe. It is about 52.15 MB in size. In order to manage the downloaded files, first create a C:\download\jdk folder, and then save the files to this folder.
JDK installation files are required for the ADempiere server installation, but they are not necessary for the ADempiere client installation. On the client side, only the JRE installation files are needed. To download these files, click on the Java Runtime Environment (JRE) 5.0 Update 17 Download button. Select the platform and language as mentioned previously, (including the Windows Offline Installation mode). Save the jre-1_5_0_17-windows-i586-p.exe file to the C:\download\jdk folder.
Installing JDK/JRE
Due to the default installation behavior of Microsoft Windows, a new application installation will commonly be directed to the C:\Program Files folder. An important thing when installing JDK and/or JRE on Microsoft Windows is that we should avoid installing it to C:\Program Files directly. To avoid any problems during the ADempiere implementation, it is recommended that you install it to a folder that does not contain spaces in the directory or folder name, such as C:\Java.
JDK installation on the ADempiere server computer
Double-click on jdk-1_5_0_17-windows-i586-p.exe to start the Windows installer.
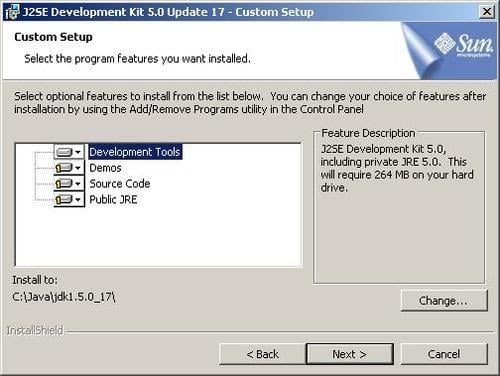
By default, the installer will install development tools, demo files, source code, and public JRE. For our reference, leave the Development Tools feature selected and deselect the other features by clicking on the buttons on the left-hand side of Demos, Source Code, and Public JRE, and then choosing Don't install this feature now. This is shown in the following screenshot:

Select Development Tools, click on the Change button to alter the default or target directory to C:\Java\jdk1.5.0_17, and proceed to complete the JDK installation.
Note
During the Development Tools installation, a private JRE will automatically be installed. In our case, it will be installed at C:\Java\jdk1.5.0_17\jre.
JRE installation on the ADempiere client computer
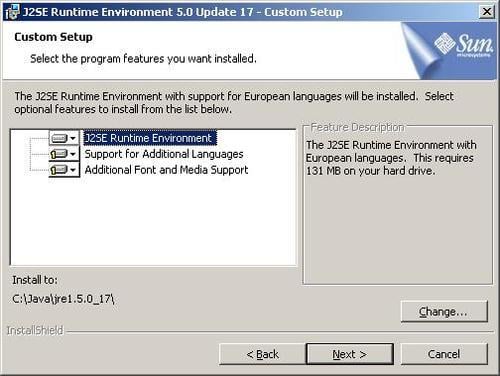
The ADempiere client installation requires installation of the Java Runtime Environment (JRE) only. Open the link http://java.sun.com/products/archive/j2se/5.0_17/ and double-click on jre-1_5_0_17-windows-i586-p.exe. At the license agreement, ensure that you choose the Custom setup, and click on the Accept button. Leave the J2SE Runtime Environment selected, and deselect the other features by clicking on the buttons to the left-hand side of Support for Additional Languages and Additional Font and Media Support. Choose Don't install this feature now. Select J2SE Runtime Environment, click on the Change button to alter the default or target directory to C:\Java\jre1.5.0_17, click on the Next button, and proceed to complete the JRE installation.

Tip
There is no need to install JRE if you are using the same computer for both the ADempiere Server and the Client.
Configuring Java system variables and the Windows path
Now that we have installed JDK/JRE, we have to set up JAVA system variables and set Windows paths both for the ADempiere server and the client computer, as ADempiere runs on a Java platform.
We need to set these variables in the System Properties window. You can access this window through Start | Control Panel | System (or Start | Settings | Control Panel | System in the case of the Windows classic menu). Select the Advanced system settings tab, and click on the Environment Variables button.
The following table shows the value of a Java system variable and a Windows path for the ADempiere server installation to be set up in the Environment Variables window:
|
No |
Variable |
Value |
|---|---|---|
|
1 |
JAVA_HOME |
|
|
2 |
Path |
|
For the ADempiere client installation, you may set the following Java system variable and Windows path in the Environment Variables window:
|
No |
Variable |
Value |
|---|---|---|
|
1 |
JAVA_HOME |
|
|
2 |
Path |
|
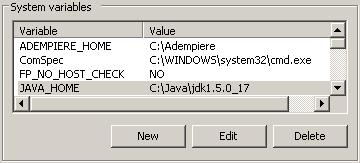
The Environment Variables window is shown as follows:

This is an example of System variables in the Environment Variable window from the author's computer. It might vary for your own computer's configuration.
You can set additional JAVA_HOME variables by clicking on the New button in System variables. To set your own JAVA_HOME variables, click on the Edit button by selecting an existing path variable entry and enter your additional path entries. In order to confirm the addition of system variables, click on OK in both the Environment Variable window and the System Properties window.
Tip
While setting up the Path variable, any additional variable inclusion in these entries must be prefixed with a semicolon (;) character.
Verifying system variables and the Windows path
Once we have finished adding the additional variables, we have to check whether the setup of the variables was configured properly. We shall check our variables' entries from the DOS prompt command line. We can access DOS prompt from Start | Run. Type cmd in the Run window, and click on the OK button. We will get the following command prompt:

We can type the following in this command line, and Enter:
C:\>SET
Pay attention to the resulting information. On the author's ADempiere server computer, it displays the following statements:
JAVA_HOME=C:\Java\jdk1.5.0_17
and
Path=C:\WINDOWS\system32;C:\WINDOWS;C:\WINDOWS\System32\Wbem;C:\Java\jdk1.5.0_17\bin;C:\Java\jdk1.5.0_17\jre\bin\client
Whereas the ADempiere client computer will contain the following statements:
JAVA_HOME=C:\Java\jre1.5.0_17
and
Path=C:\WINDOWS\system32;C:\WINDOWS;C:\WINDOWS\System32\Wbem;C:\Java\jre1.5.0_17\bin;C:\Java\jre1.5.0_17\bin\client
The second procedure for checking the setup configuration is to use Java commands. For example, in order to find a command to know what the currently-installed Java version is, we can use the following command:
C:\>java -version
and press Enter. This showed the following statements on the author's computer:
java version "1.5.0_17"Java(TM) 2 Runtime Environment, Standard Edition (build 1.5.0_17-b04)Java HotSpot(TM) Client VM (build 1.5.0_17-b04, mixed mode, sharing)


