(For more resources related to this topic, see here.)
Deploying VMware View on Windows 8 (Advanced)
If you want to get a hands-on experience with Windows 8 on VMware View and get ready for future View deployments, this should be a must-take guide for deploying it.
Getting ready
Let's keep the following requirements ready:
- You should have VMware vSphere 5.1 deployed
- You should have VMware View 5.1 Connection Server deployed
- You should have Windows 8 Release Preview installer and license keys for 32-bit version
How to do it...
Let's list the steps required to complete the task.
To create a Windows 8 Virtual Machine, perform the following steps:
- Create a standard virtual hardware version 9 VM with Windows 8 as the guest operating system.
- As this is a testing phase, keep the memory and disk size optimal.
- Edit the settings in VM and under Video card , select the Enable 3D support checkbox (this step is to make sure graphics, and adobe Flash content works with Windows 8 using VMware driver).
- Mount the ISO image of Windows 8 in the virtual machine and proceed with the Windows 8 Installation. Enter Windows license keys appropriately available with you.
- Install VMware tools in the VM; Shutdown and restart the VM.
- Install a VMware View 5.1 agent in VM, uncheck Persona Management during agent installation.
- Power-on the VM, set the network option to DHCP, and disable Windows Defender.
- Create a snapshot of VM and power the VM down.
- Now, we are ready with Windows 8 Parent virtual machine with Snapshot.
To create a pool for Windows 8 in View Admin console, perform the following steps:
- Launch the Connection Server Admin console and navigate to the Pool Creation wizard.
- Select the Automated pool type (you can use either Dedicated or Floating ).
- Choose a View Composer linked-clone-based pool.
- Navigate through the rest of the wizard accepting all defaults, and choosing the snapshot of your Windows 8 VM with the View Agent installed.
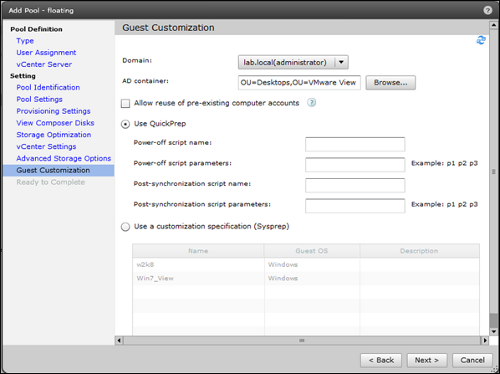
- Use QuickPrep for instant customization. You may require to manually restart the VM if Quickprep doesn't get initiated by itself once the VM boots.

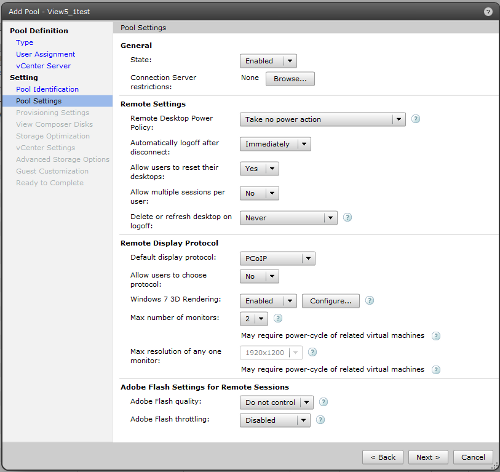
- Allow provisioning to proceed. Make sure you set Allow users to choose protocol: to No , else 3D rendering gets disabled automatically.
- If you want to set Allow users to choose protocol: to Yes , make sure you stick to the RDP protocol and not PCoIP in the Default display protocol: field, else you will end up with a black screen.

Unlock access to the largest independent learning library in Tech for FREE!
Get unlimited access to 7500+ expert-authored eBooks and video courses covering every tech area you can think of.
Renews at €18.99/month. Cancel anytime
To install View Client, perform the following step:
- Install View Client 5.1 on any device with iOS/Android/Linux/Windows. To view a list of supported clients, visit http://www.vmware.com/support/viewclients/doc/viewclients_pubs.html.
How it works...
Once all the preceding steps are performed, you should have Windows 8 with VMware View 5.x ready. You should be able to see the VM in ready status under Desktop Resources in VMware View Admin console.
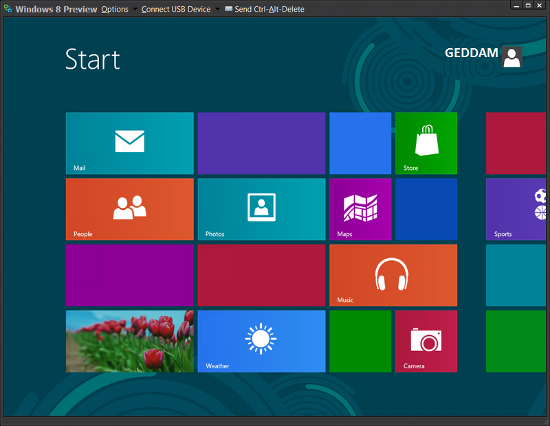
You should be able to launch Windows 8 with View Client now.

Please note that you have to entitle the users to the respective pools before users can access the VM.
More information
You can even refer to http://kb.vmware.com/kb/2033640 to know more on how to install Windows 8 in a VM.
Resources for Article :
Further resources on this subject:
 United States
 Great Britain
 India
India
 Germany
 France
 Canada
 Russia
 Spain
Spain
 Brazil
 Australia
 Singapore
 Hungary
 Ukraine
 Luxembourg
 Estonia
 Lithuania
 South Korea
 Turkey
 Switzerland
 Colombia
 Taiwan
 Chile
Chile
 Norway
 Ecuador
 Indonesia
 New Zealand
 Cyprus
 Denmark
 Finland
 Poland
 Malta
Malta
 Czechia
 Austria
 Sweden
 Italy
Italy
 Egypt
Egypt
 Belgium
 Portugal
 Slovenia
 Ireland
 Romania
 Greece
 Argentina
 Netherlands
 Bulgaria
 Latvia
 South Africa
 Malaysia
 Japan
Japan
 Slovakia
 Philippines
 Mexico
 Thailand


