Manual installation
If you find that the Automatic Install feature isn't compatible with your web-hosting provider, then manual installation is the next best option. In this section, we will cover how to do it on both a Mac and PC.
At the highest level, manually installing a plugin will require you to connect to your web server, locate the WordPress plugins directory, and transfer a plugin that you have downloaded to your computer using either FTP or SFTP. Once you connect to your web server, you will need to locate your WordPress Plugin folder, which will most likely be in wp-content/plugins.
Manually installing a plugin with a Mac
If you do not currently have an FTP/SFTP application on your Mac, then I highly recommend Cyberduck, the best free FTP/SFTP client available for the Mac. You can download a free copy of Cyberduck from http://cyberduck.ch/.
After launching the Open Connection, located in the upper-right hand side of the Applications window, the following screenshot will ask for the specifics on connecting to your website. This information can all be usually found in your web host's control panel or the initial setup e-mail you received when you created your hosting account.
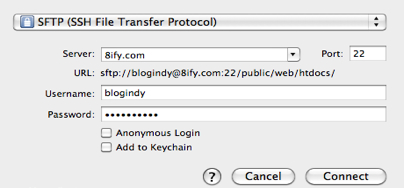
Connection Type: FTP, SFTP FTP-SSL. Which connection you should use depends on what your web-hosting provider supports. Almost all web hosts offer the less secure FTP protocol, but if you can, I would suggest connecting with SFTP (Secure FTP).
Server: the domain name or IP address of your website.
Username: your FTP account username.
Password: your FTP account password.
Click Connect.
If everything connects properly, you should see a list of files that exist on your website.
Browse to your plugin directory located at wp-content/plugins. This folder is where we will be putting any new plugin we want to install.
To save time, you can create a bookmark in Cyberduck, and save it on your desktop or Dock so you are only a click away from your plugin folder. To create a bookmark, select New Bookmark from Cyberduck's Action drop-down menu.
Transferring a plugin
Once you have downloaded the plugin to your computer, you will need to move it over to your website. To do this, we will move the plugin (most likely a .ZIP archive) to your website's FTP directory. Using Cyberduck, we will extract the ZIP file on the server. Extracting archives on the server can save significant time, as we are only uploading one file opposed to the hundreds some plugins can contain.
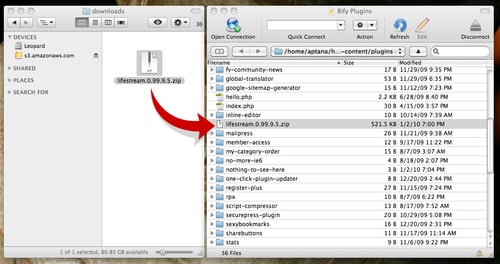
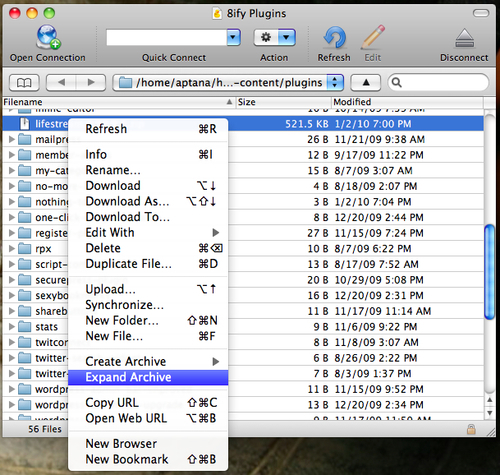
Now that we have the plugin's ZIP archive in the plugins directory, we need to expand it or unzip it. Cyberduck offers a super quick way for us to expand archived files like ZIP, TAR, and Gzip by right-clicking on your plugin and selecting Expand Archive.
Manually installing a plugin on Windows
For Windows users, I suggest the open source application called WinSCP—this great utility will allow you to connect to your server by FTP, SFTP, and FTP-SSL. To download WinSCP, visit http://winscp.net.
Once you have downloaded and installed WinSCP, launch the application, and you will be presented with the following screenshot:
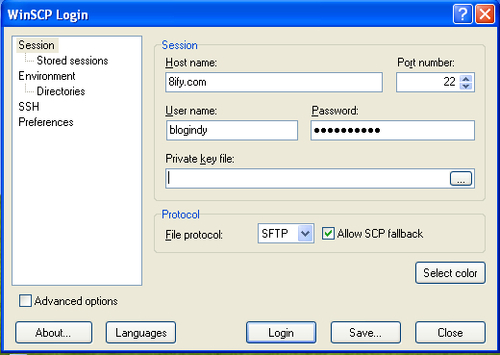
Host Name: The domain name or IP address of your website
Port number: Leave this field as it is, as it will be set when we select a protocol in the next couple of steps
Username: Your FTP account's username
Password: Your FTP account's password
Next click Login.
If everything connects properly, you should see the following screenshot, which will contain all of the files that exist on your website, in a similar fashion that Windows Explorer does.
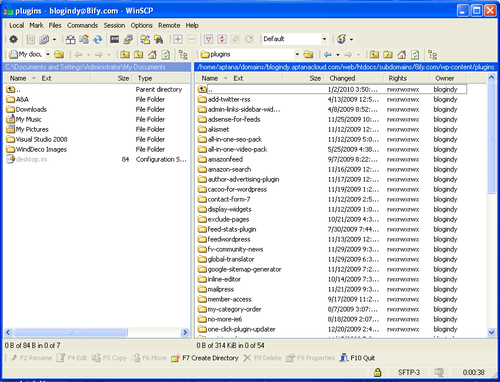
Most website providers keep all of the website files in a specific directory; our goal is to find this folder and proceed to wp-content/plugins. If you do not see wp-content, then look for a folder like htdocs, httpdocs, or www. Once you locate this folder, inside you should find the folders and files that make up your WordPress installation.
Once inside the plugins folder, we want to create a bookmark so that we can access this folder super quickly next time.


