Chapter 3. Building Games with PyGame
In the previous chapter, we learned how to get started with Minecraft on Raspberry Pi and how to play it and use Python to manipulate things. Continuing with the same theme, we will now take a look at a gaming library in Python called PyGame and also learn how to create simple games with it. In this chapter, we will go through the following topics:
- Introducing PyGame
- Drawing a fractal tree
- Building a simple snake game
Introducing PyGame
PyGame is a set of Python modules designed for the writing of video games. It is built on top of the existing Simple DirectMedia (SDL) library, and it works with multiple backends, such as OpenGL, DirectX, X11, and so on. It was built with the intention of making game programming easier and faster without getting into the low-level C code that was traditionally used to achieve good real-time performance. It is also very flexible and comes with many operating systems. It is very fast as it can use multiple core CPUs very easily and also use optimized C and assembly code for core functions.
PyGame was built to replace PySDL after its development was discontinued. Originally written by Pete Shinners, it is a community project from 2004 and is released under the open source free software GNU's lesser general public license. Since it is very simple to use and is open source, it has a lot of members in the international community and so it enjoys access to a lot of resources that other libraries may lack. There are many tutorials that can build different games with PyGame. It contains the following modules
|
Module |
The description |
|---|---|
|
cdrom |
Manages CD-ROM devices and audio playback |
|
cursors |
Loads cursor images and includes standard cursors |
|
display |
Controls the display window or screen |
|
draw |
Draws simple shapes onto a surface |
|
event |
Manages events and the event queue |
|
font |
Creates and renders Truetype fonts |
|
image |
Saves and loads images |
|
joystick |
Manages joystick devices |
|
key |
Manages the keyboard |
|
mouse |
Manages the mouse |
|
movie |
Used for the playback of MPEG movies |
|
sndarray |
Manipulates sounds with Numeric |
|
surfarray |
Manipulates images with Numeric |
|
time |
Controls timing |
|
transform |
Scales, rotates, and flips images |
Note
For more information on the PyGame library, you can visit www.pygame.org.
Installing PyGame
PyGame usually comes installed with the latest Raspbian distribution, but if it isn't you can use the following command to install it:
sudo apt-get install python-pygame
Test your installation by opening a Python terminal by entering python in a regular terminal and pressing Enter. Now, execute the following command:
import pygame
Now that you have your system set up and you have hopefully checked out the PyGame website to explore its complete functionalities, we will move on to build the binary fractal tree to introduce you to the workings of PyGame. Let's begin!
Drawing a binary fractal tree
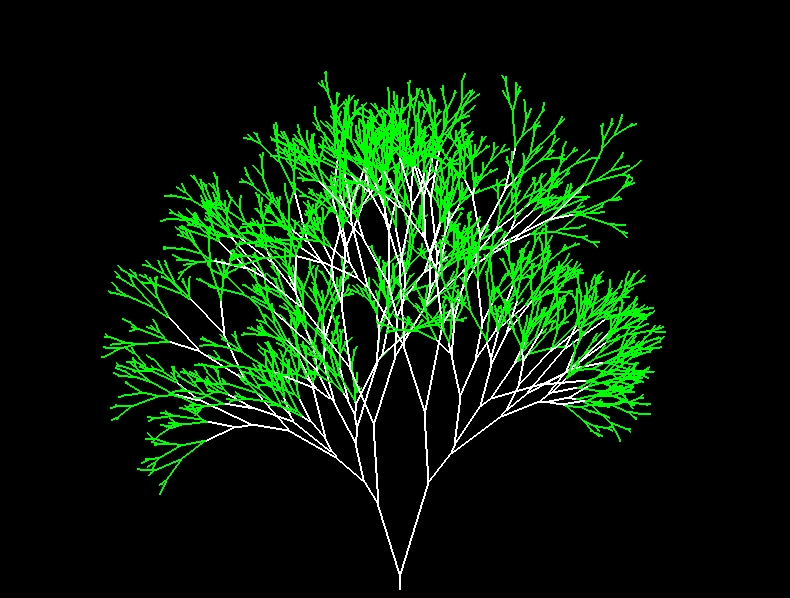
A binary fractal tree is defined recursively by binary branching. Typically, it consists of a trunk of length 1, which splits into two branches of decreasing or equal length, each of which makes an angle Q with the direction of the trunk. Furthermore, both of these branches are divided into two branches, each making an angle Q with the direction of its parent branch, and so on. Continuing in this way, we can infinitely make branches, and the collective diagram is called a fractal tree. The following diagram visually shows what such a fractal tree might look like:

Now, let's move on to the code and take a look at how such a fractal tree can be constructed with PyGame. Following this paragraph is the complete code, and we will go through it statement by statement in further paragraphs:
import pygame
import math
import random
import time

width = 800
height = 600

pygame.init()
window = pygame.display.set_mode((width, height))
pygame.display.set_caption("Fractal Tree")
screen = pygame.display.get_surface()

def Fractal_Tree(x1, y1, theta, depth):
    if depth:
        rand_length=random.randint(1,10)
        rand_angle=random.randint(10,20)
        x2 = x1 + int(math.cos(math.radians(theta)) * depth * rand_length)
    y2 = y1 + int(math.sin(math.radians(theta)) * depth * rand_length)
        if ( depth < 5 ):
            clr = ( 0 , 255 , 0 )
        else:
            clr = ( 255, 255 , 255 )
    pygame.draw.line(screen, clr , (x1, y1), (x2, y2), 2)
    Fractal_Tree(x2, y2, theta - rand_angle, depth - 1)
    Fractal_Tree(x2, y2, theta + rand_angle, depth - 1)

Fractal_Tree( (width/2), (height-10) , -90, 12)
pygame.display.flip()

while True:
    for event in pygame.event.get():
        if event.type == pygame.QUIT or event.type == pygame.KEYDOWN:
            pygame.quit()
            exit(0)
Save the preceding code as prog1.py and then run the following:
python prog1.py
You will now get the following output:

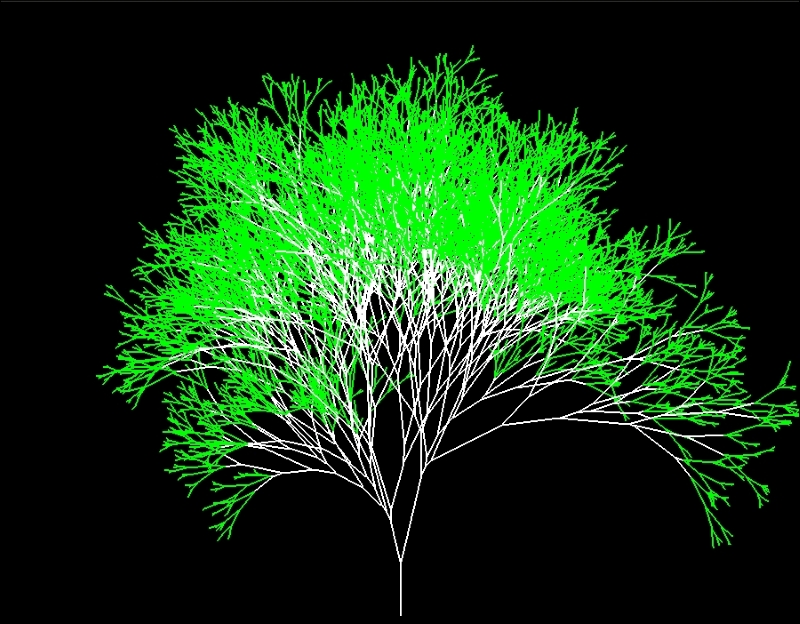
If you increase the depth by 2 with a slight increase in the canvas area, the fractal tree now looks like this:

The new tree looks considerably denser and more branched out than the original tree.
Now, since you know what the output looks like, let's grab our magnifying glasses and sift through the program to understand how it works!
The first four lines are there to satisfy the dependencies required to build the program. These are PyGame, a math library, a library to generate random numbers, and a library to keep track of time for delay functions. Next, we specify the dimensions for the screen space required for our program.
The pygame.init() method initializes all the modules that were loaded as part of importing pygame in the first statement. It is required to be executed if you want to be able use any functionality of PyGame. The display.set_mode() method creates a new Surface object, which represents the area on the screen that is visible to the user. It takes a tuple consisting of the dimensions of the window as the argument: the width and height variables in this case. It is literally the canvas on which you can draw. Anything you do to this object will be shown to the user. Images and other objects are represented as PyGame objects, and you can overlay them on the the main surface. Then, we set the title of the window using the caption() method, and finally, the screen variable actually gets the object that the display is stored in. So now, our canvas is stored in the screen variable, and we will use it to make any changes to the canvas.
The Fractal_Tree function should be fairly easy to understand. It takes four arguments: the starting point of the branch (X1, Y1), the angle of the branch with respect to the positive x axis—which is a horizontal line going to your right when you look at the computer screen, and the depth of the fractal tree (which indicates the levels in the tree). It is called for the first time in the 28th line with appropriate arguments. You might notice that towards the end of the function, it calls itself using different arguments. These kinds of function are called recursive functions and are very useful in tasks where there is repetition and where the same task needs to be performed with minor differences.
If the depth is positive, it selects a random length and angle for the next branch by selecting a random integer from the randint() method of the random package. It then specifies the coordinates of the end of that branch, which are labeled X2 and Y2. If the depth is less that 5, it selects the color of the line as green; otherwise, it is white. Here, it is important to understand that the color is represented in the RGB format. Hence, (0, 255, 0) means green. Similarly, (255, 0, 0) will be red. The three numbers in the tuple represent the intensity of RGB colors; hence, we can select any color using a mixture of these three intensities.
Finally, there is a recursive call to itself (Fractal_tree), and the program then draws the second level of the fractal tree and so on until the depth becomes zero. There are two recursive calls: one to draw the left branch and the other to draw the right branch. If you've noticed, the function isn't actually executed until the 28th line. And once it is executed, the complete pattern is drawn at once due to the recursiveness of the function, but it still isn't displayed. The next line, pygame.display.flip(), is responsible for displaying the drawn shapes on screen:
while True:
    for event in pygame.event.get():
If event.type == pygame.QUIT or event.type == pygame.KEYDOWN:
            pygame.quit()
            exit(0)
This block of code is there to ensure that PyGame quits properly and specifies how to shut down the program. The event.get()method clears the event queue so that you always get the last event that occurred. An event queue consists of all the key presses and mouse clicks that happen, and they are stored in a Last In First Out (LIFO) fashion. You will see this while loop in almost every PyGame program as it handles the exit of the program properly. If you are using IDLE, then not shutting down PyGame properly can cause it to hang. In this case, PyGame quits when pygame.quit() is executed. Finally, with exit(0), Python also quits and closes the application.
As we are randomizing the length and the angle every time the function calls itself, no two branches will be exactly the same, giving it the appearance of the irregularity of real-life trees. By induction, no two trees will be same.
You can modify parts of this code to see for yourself how the tree behavior changes on changing a few variables, such as theta and depth. Now that we have completed all the basics of PyGame and can implement fairly complex problems, we are now ready to move on to a real challenge: making an actual game.
Building a snake game
Who doesn't remember the classic game called Snake, which involves a snake chasing a morsel of food? It is probably the very first game that you played as a child. The basic premise of the game is that you control a snake and lead it to a morsel of food. Every time the snake consumes that food, it grows by one unit length, and if the snake hits a boundary wall or itself, it dies. Now as you can imagine, the more you play the game, the longer the snake grows, which, consequently, makes it more difficult to control the snake. In some versions of the game, the speed of the snake also increases, making it even more difficult to control. There comes a point where you simply run out of screen space and the snake inevitably hits a wall or itself, and the game is over.
Here, we will learn how to build such a game. The basic logic of playing the game will be to have a moving rectangle, of which we know the leading point coordinates. This will be our snake. It will be controlled by the four arrow keys. The piece of food is initialized randomly on the screen. At each point of time, we will check whether the rectangle has hit the boundary wall or itself since we know the position of the snake at every point of time. If it has, then the program will exit. Let's now look at the code sectionwise; the code will be explained after each section:
from pygame.locals import *
import pygame
import random
import sys
import time

pygame.init()

fpsClock = pygame.time.Clock()

gameSurface = pygame.display.set_mode((800, 600))
pygame.display.set_caption('Pi Snake')

foodcolor = pygame.Color(0, 255, 0)
backgroundcolor = pygame.Color(255, 255, 255)
snakecolor = pygame.Color(0, 0, 0)
textcolor = pygame.Color(255, 0, 0)

snakePos = [120,240]
snakeSeg = [[120,240],[120,220]]
foodPosition = [400,300]
foodSpawned = 1
Dir = 'D'
changeDir = Dir
Score = 0
Speed = 5
SpeedCount = 0
Now, we will learn what each block of code does, but for brevity the very basics are skipped as we have already learned about them in the previous sections.
The first few lines before the finish() function initialize PyGame and set the game parameters. The pygame.time.Clock()function is used to track time within the game, and this is mostly used for frames per second, or FPS. While it seems somewhat trivial, FPS is very important and can be tweaked. We can increase or decrease the FPS to control the speed of the game. Going further into the code, we can choose options such as the screen size, the color of the snake, the starting position, the starting speed, and so on. The snakePos list variable has the head of the snake, and snakeSeg will contain the initial coordinates of the segment of the snake in a nested list. The first element contains the coordinates of the head, and the second element contains the coordinates of the tail. This block of code also defines the initial food position, the state of the food, the initial direction, the initial speed, and the initial player score:
def finish():
    finishFont = pygame.font.Font(None, 56)
    msg = "Game Over! Score = " + str(Score)
    finishSurf = finishFont.render(msg, True, textcolor)
    finishRect = finishSurf.get_rect()
    finishRect.midtop = (400, 10)
    gameSurface.blit(finishSurf, finishRect)
    pygame.display.flip()
    time.sleep(5)
    pygame.quit()
    exit(0)
The preceding block of code defines the finishing procedure for the game. As we will see in the following code, finish() is called when the snake either hits the walls or itself. In this, we first specify the message that we want to display and its properties, such as the font, and then we add the final score to it. Then, we render the message via the render() function, which operates on the finishFont variable. Then, we get a rectangle via get_rect(), and finally we draw those via the blit() function. When using PyGame, blit() is a very important function that allows us to draw one image on top of the other. In our case, this is very useful because it allows us to draw a bounding rectangle over the message that we show as a part of the ending of the game. Finally, we render our message on screen via the display.flip() function and after a delay of 5 seconds, we quit the game:
while 1:
    for event in pygame.event.get():
if event.type == QUIT:
pygame.quit()
            exit(0)
elif event.type == KEYDOWN:
if event.key == ord('d') or event.key == K_RIGHT:
changeDir = 'R'
if event.key == ord('a') or event.key == K_LEFT:
changeDir = 'L'
if event.key == ord('w') or event.key == K_UP:
changeDir = 'U'
if event.key == ord('s') or event.key == K_DOWN:
changeDir = 'D'
if event.key == K_ESCAPE:
pygame.event.post(pygame.event.Event(QUIT))
        pygame.quit()
        exit(0)

if changeDir == 'R' and not Dir == 'L':
Dir = changeDir
if changeDir == 'L' and not Dir == 'R':
Dir = changeDir
if changeDir == 'U' and not Dir == 'D':
Dir = changeDir
if changeDir == 'D' and not Dir == 'U':
Dir = changeDir

if Dir == 'R':
snakePos[0] += 20
if Dir == 'L':
snakePos[0] -= 20
if Dir == 'U':
snakePos[1] -= 20
if Dir == 'D':
snakePos[1] += 20
Then, we move on to the infinite while loop, which contains the bulk of the game's logic. Also, as mentioned earlier, the pygame.event.get()function gets the type of event; according to what is pressed, it changes the state of some parameters. For example, pressing the Esc key causes the game to quit, and pressing the arrow keys changes the direction of the snake. After that, we check whether the new direction is directly opposite to the old direction and change the direction only if it isn't. In this case, changedDir is only an intermediate variable. We then change the position of the snake according to the direction that's selected. Each shift in position signifies a shift of 20 pixels on screen:
snakeSeg.insert(0,list(snakePos))
if snakePos[0] == foodPosition[0] and snakePos[1] == foodPosition[1]:
foodSpawned = 0
Score = Score + 1
SpeedCount = SpeedCount + 1
if SpeedCount == 5 :
SpeedCount = 0
Speed = Speed + 1
else:
snakeSeg.pop()

if foodSpawned == 0:
x = random.randrange(1,40)
y = random.randrange(1,30)
foodPosition = [int(x*20),int(y*20)]
foodSpawned = 1

gameSurface.fill(backgroundcolor)
for position in snakeSeg:
pygame.draw.rect(gameSurface,snakecolor,Rect(position[0], position[1], 20, 20))
pygame.draw.circle(gameSurface,foodcolor,(foodPosition[0]+10, foodPosition[1]+10), 10, 0)
pygame.display.flip()
if snakePos[0] > 780 or snakePos[0] < 0:
finish()
if snakePos[1] > 580 or snakePos[1] < 0:
finish()
for snakeBody in snakeSeg[1:]:
if snakePos[0] == snakeBody[0] and snakePos[1] == snakeBody[1]:
finish()
fpsClock.tick(Speed)
It is important to keep in mind that at this point, nothing is rendered on screen. We are just implementing the logic for the game, and only after we are done with that will anything be rendered on the screen. This will be done with the pygame.display.flip()function. Another important thing is that there is another function named pygame.display.update(). The difference between these two is that the update() function only updates specific areas of the surface, whereas the flip() function updates the entire surface. However, if we don't give any arguments to the update() function, then it will also update the entire surface.
Now, since we changed the position of the head of the snake, we have to update the snakeSeg variable to reflect this change in the snake body. For this, we use the insert() method and give the position of object we want to append and the new coordinates. This adds the new coordinates of the snake head into the snakeSeg variable. Then comes the interesting part, where we check whether the snake has reached the food. If it has, we increment the score, set the foodSpawned state to False, and increase SpeedCount by one. So, once the speed count reaches five, the speed is increased by one unit. If not, then we remove the last coordinate with the pop() method. This is interesting because if the snake has eaten the food, then its length will increase; consequently, the pop() method in the else statement will not be executed, and the length of the snake will be increased by one unit.
In the next block of code, we check whether the food is spawned; if not, we randomly spawn it, keeping in mind the dimensions of the screen. The randrange()function from the random package allows us to do exactly that.
Finally, we get to the part where the actual rendering takes place. Rendering is nothing but a term for the process that is required to generate and display something on screen. The first statement fills the screen with our selected background color so that everything else on the screen is easily visible:
for position in snakeSeg:
pygame.draw.rect(gameSurface,snakecolor,Rect(position[0], position[1], 20, 20))
The preceding block of code loops through all the coordinates present in the snakeSeg variable and fills the space between them with the color specified for our snake in the initialization code. The rect function takes three inputs: the window name on which the game will be played, the color of the rectangle, and the coordinates of the rectangle that are given by the Rect function. The Rect function itself takes four arguments: the x and y position and height and width of the rectangle. This means that for every coordinate contained in the snakeSeg variable, we draw on a rectangle that has dimensions of 20 x 20 pixels. So, we can see that we do not have to keep track of the snake as a whole; we only have to keep track of the coordinates that describe the snake.
Next, we draw our food using the circle() method from the draw module in the PyGame package. This method takes five arguments: the window name, the color, the centre of the circle, the radius, and the width of the circle. The centre of the circle is given by a tuple that contains the x and y coordinates that we selected previously. The next statement, pygame.display.flip(), actually displays what we have just drawn.
Then, we check for the conditions in which the game can end: hitting the wall or itself. When it hits an exit condition, the finish()function is called. The first two lines of the function are self-explanatory. In the third line, render() basically makes the text displayable. But it is not displayed yet. It will only be displayed once we call the pygame.display.flip() function. The next two lines set the position of the textbox that will be displayed on the window. And, finally, we quit the PyGame window and the program after a delay of 5 seconds.
Save this program in a file named prog2.py and run it using the following command:
python prog2.py
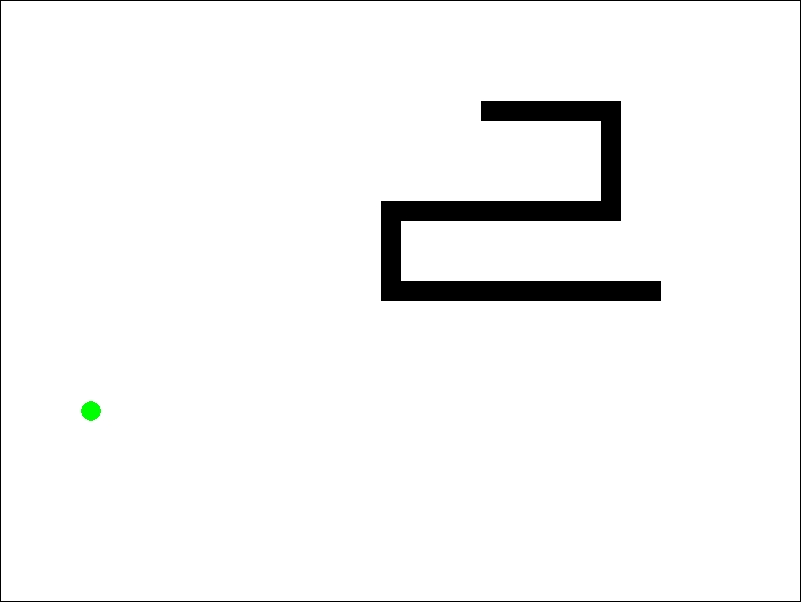
This is what you will be greeted with:

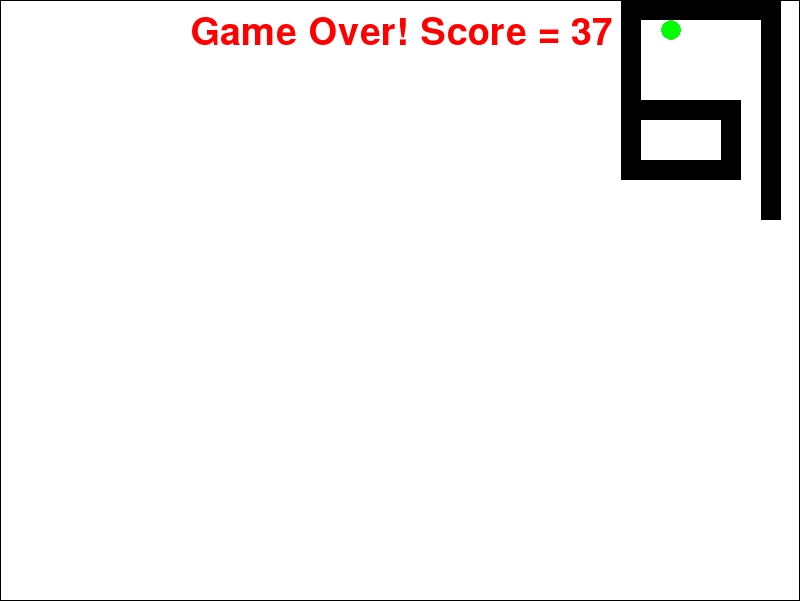
We can play the game for as long as we want (and we should because it's our creation) and when we exit, the game will be greeted by the same message that was defined in the finish() function!

As you may recognize, in the preceding screenshot, the black shape is the snake and the green circle is its food. You can play around with it and try to get an idea of the logic behind this game as to how it might be programmed.
With this, we complete the implementation of the snake game, and you should try out the program for yourself. An even better way to fully understand how the program works is to change some parameters and see how that affects the playing experience.
Summary
In this chapter, we learned about PyGame and its capabilities. We also learned how to build a binary fractal tree with random branches.
Furthermore, we built a snake game and used it to gain further experience in programming games using PyGame. You can also modify the game to gain any additional features you like.
Using these examples as an inspiration, you can also try to build games of your own. You can combine your knowledge of the chapter on Minecraft to build your own simple Minecraft clone!
In the next chapter, we will learn about the basics of Pi Camera and its webcam and how to capture images using them. We will also build some real-life examples using the Python language.


