Setting units and limits
When you start a new drawing, its template has settings for units and limits that are used by default. You can use the default template settings or make your own settings for units and limits. In this example, we will open a blank drawing, set the units and limits in it, and then we will save the drawing as a template file.
To start a new drawing in AutoCAD, you can click on the New button on the Start tab or select one of the readymade templates from the Browse templates list.
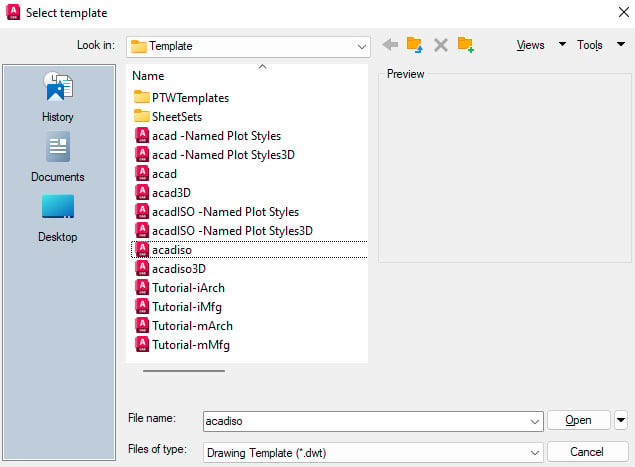
Readymade templates are divided into imperial and metric categories, with i and m prefixes respectively, as shown in the following screenshot:

Figure 1.20: The list of templates in the Select template window
Templates are just a collection of settings and predefined objects that you can save to reuse with a new drawing. Here, we will start by setting some settings, such as units and limits, and then we will convert the settings into a template file.
Setting units
When you start a drawing with any template shown in Figure 1.20, you will have some predefined unit settings, which we will modify now.
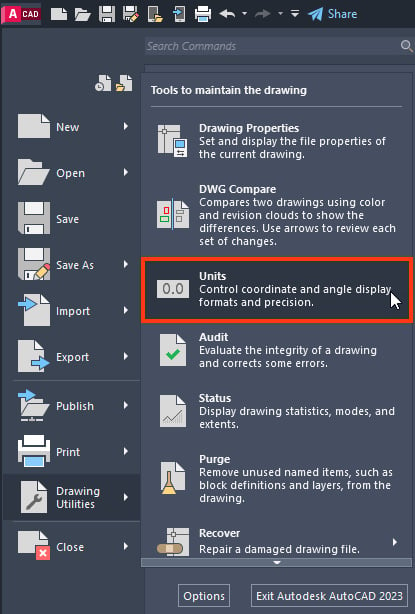
For this example, select the acad.dwt template from the start panel and a blank drawing will open. Type UN and press Enter to open the unit window. Alternatively, you can also click on the application button and select the Drawing Utilities option and then Units from the next menu:

Figure 1.21: The Units option in the application menu
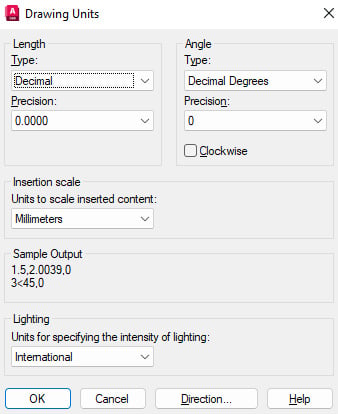
The Drawing Units window is divided into several panels, such as Length, Angle, Insertion scale, Sample Output, and Lighting. Let’s talk about these options in the Drawing Units window:

Figure 1.22: The Drawing Units window
In the Length panel, the drop-down window has many different length types, such as Architectural, Decimal, Engineering, Fractional, and Scientific. You can select Decimal from these options if you want a simple decimal type output, such as 12.2345 or 245.01289.
The Architectural length type will show output in the form of feet and inches, such as 12’ 6”, where 12 is in feet (shown with the single apostrophe sign) and 6 is in inches (shown with the double apostrophe sign). The Architectural format can be used when you want to enter the length in terms of feet and inches, and it’s mostly useful for civil and architectural drawings.
Other formats will have their respective representation types and you can select any from the list, as per your drawing and project requirements.
The next option, Precision, controls the number of decimal places that will show in the drawing. This precision is not the precision with which AutoCAD calculates the dimensions. Instead, it’s the precision that is displayed on the drawing. AutoCAD will always measure your drawing with the maximum possible precision, no matter what precision you select in the Drawing Units window.
Just like the Length type, the settings for the angles can be managed from the Angle panel. Here, you can select between Decimal Degrees, Degree/Minute/Second, Grads, Radians, and Surveyor’s Unit. The precision is again the number of decimal places for the angle that will be displayed on the drawing.
In AutoCAD, the angle is measured in an anticlockwise direction and hence, anticlockwise is the positive angle. If, however, you want to make a clockwise direction the positive angle, check the checkbox that says Clockwise:

Figure 1.23: The Clockwise checkbox in the Angle panel
From the Insertion scale panel, you can change the unit type of the current drawing. All the drawings inserted from external files will be scaled to this selected unit no matter what the unit of the original drawing is. There are lots of units in this list and you can even select the Unitless option from the list if you don’t want to use any unit in the drawing.
Finally, the Lighting panel has two options: American and International. The Lighting option will be used in the rendering section of Chapter 15, Rendering and Presentation, and it has no application in the 2D drawing environment.
For our example, I am selecting the Decimal Length type with a 0.00 length precision and the Decimal Degrees angle type with a 0.00 precision. I will leave the Clockwise checkbox unchecked. In the Insertion scale panel, I will select Millimeters and International in the Lighting section. These settings are also shown in Figure 1.22. After setting the settings, click OK and the settings will be applied to the current drawing.
So, now that we are done setting the unit settings, let’s move on to setting the limits of our drawing area. We will discuss this in the next section.
Setting limits
In AutoCAD, we make our drawing on a scale of 1:1, which means we are drawing to the actual scale of the project. For example, a square plate of 10 mm by 10 mm will be exactly the size in AutoCAD as well, but the drawing area can make the 10 mm by 10 mm square very big or small, depending on the zoomed state of the screen. If your drawing is zoomed in, the square may appear bigger and if it’s zoomed out, the drawing may appear tiny.
So, depending on the size of the drawing that you want to make in your AutoCAD file, you can set the limits, and then these settings can be used wherever needed. In the following example, we will add a drawing limit of 60, 40 units in our drawing:
- To set the limits, type the
LIMITScommand and press Enter. - The command line will now prompt you to specify the lower-left corner of the screen from where you want the limit to start. By default,
0,0, or the origin, is selected. You can specify any other point as well if you want and then press Enter. - Now, the command line will prompt you to specify the upper right-hand corner of the screen for the limit. Type the coordinates of the point in the form of
x, yand press Enter:

Figure 1.24: The limits command with the upper right-hand corner prompt
- Select
0,0as the lower left-hand corner and60,40as the upper right-hand corner. After setting the limits, typeZand press Enter. Then, typeAand press Enter again on the command line.
The screen will reset to adjust according to the newly specified limits.
In our example, the height of the screen will be 40 and the length of the screen will be 60, or any other that will be proportional to the screen size. For example, on a square screen, the length will now be 40 as well, but for a rectangular screen, the length will depend on the aspect ratio of the monitor.
Setting the limit will just let you adjust a reference for working on the drawing. This property will not affect your drawings in any way, and you can freely zoom in and out to change the drawing area and even make your drawing go outside this limit.
Saving settings as a template
So, by now, we have set the unit settings and made changes to the drawing limits. It is not always practical to make these changes whenever we want to start with the same set of settings in a blank drawing. You can save these settings as a template file and then these templates can be loaded to start a new drawing with the same set of settings.
In the previous examples, we set the unit- and template-related settings, and now, we will learn how to save these settings as a template file in the following example:
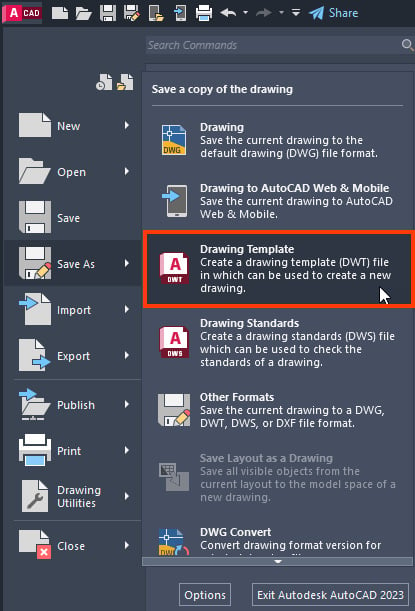
- Click on the application button in the top left of the AutoCAD window and select Save as the option from the menu. Then, go to the Drawing Template option.
- The default folder location for the templates will open up. You can save your template here or choose another location from this window. Select the location, give your template file a name, and hit the Save button:

Figure 1.25: Saving template files
Your file will be saved with a DWT file extension, which is the extension for AutoCAD template files.
- To load the template settings, simply double-click the next time you want to open a new drawing with the same settings as defined in the template.
- After opening a template once, if you open a new drawing from the Start tab, or click the + icon on the file tabs, AutoCAD will load the most recently used template, which in this case, is the template saved by you.
- To change the template to some other readymade template, you need to once again open another template from the Template drop-down menu in the Start tab or click on the + icon in the quick access toolbar and select a template from the list of templates to open a new drawing.
When you simply save the drawing file by clicking the Save icon in the quick access toolbar or the Save icon in the application menu, the file will be saved in a DWG format. The DWG format is the native drawing format in which AutoCAD drawing files are saved.
So, this is how you can save settings and other customizations as a template file in AutoCAD. The template can not only save the settings related to units and limits but it can also save other settings, such as status bar toggles and system variables, which we will learn about later in this book.
Now, let’s talk about saving the drawing in its native DWG format.
Saving a drawing file as DWG
To save a drawing, simply click the Save button in the quick access bar or use the SAVE command. The Save Drawing As window will open up. Specify a location, give your file a name, and save it.
If you save your file on a cloud account, such as OneDrive or Dropbox, AutoCAD will save the drawing history as well. This drawing history is a new feature that you will find in AutoCAD 2021 and later versions only.
When you open a drawing saved in OneDrive, Dropbox, or Box, the Version History palette will open up, which will show a list of all drawing revisions, as in the following screenshot:

Figure 1.26: The Version History palette with drawing revisions
To open any older revision of the drawing, hover your cursor over the drawing and you will see a drawing Compare icon, as in Figure 1.26. Click on the drawing Compare icon and older revisions of the drawing will open up in a window, showing new and older drawings compared using a feature called drawing compare, which will be discussed later in this book.
Once you are done checking the compared drawing, click on the green checkmark in the Version Compare bar, as shown here:

Figure 1.27: The Version Compare bar
If your drawing was saved by many other members, then the drawing history will show the name of the person who saved the drawing and you can use the name filter to select the drawings saved by any project member. You can also filter the drawing versions by date. To open any drawing version, double-click on it from the drawing history palette, and that version will open up in the drawing area.
So, this was all about the basic setup of AutoCAD and opening and saving drawing files. Before we move on, let’s summarize what we have learned in this chapter.


