Garageband – a basic project (Become an expert)
Garageband is a powerful and robust music application capable of creating and recording music. It's basically a recording studio on the go. We'll go through setting up a basic project and then explore the features that make it a great app for your new iPad, even if you're a novice.
Note
This is a paid Apple application priced at $4.99.
We'll begin by setting up a basic project and then dive a little deeper into some of its features.
Getting ready
Download Garageband from the App Store. The application is needed to complete the exercises in this recipe. Remember, it costs $4.99. We'll want to download over Wi-Fi to avoid consuming monthly data. The app file is large in size at around 800 MB. After the download is complete, open up Garageband.
How to do it...
Using the plus icon located in the upper-left corner of the screen, we'll select New Song.

Let's begin by recording a few bars of piano notes, so we can familiarize ourselves with the menu bar and all of the options at our disposal. We use the plus icon in the upper-left corner of Garageband's home screen.
We're immediately taken to a screen where we can select our instrument of choice. Selecting Keyboard brings up the keyboard with piano keys.
Let's go through the menu at the top of the screen, as shown in the screenshot after the following list:
My Songs will take us back to Garageband's home screen.
Instruments will pull up the swipeable menu of instruments (fun to play with).
Undo (tap and hold for Redo) functions just as it does in all other applications.
The piano keys icon will display our selected instrument. It will change depending on the instrument in use. So, if we were to be tracking drums, a drum icon would be displayed.
The track icon displays the song's tracks that we've created.
In the center of the menu are familiar playback controls with the inclusion of the record button, the one with the red center, that appears at the top, in the center of the screen.
Next you have the volume bar. Slide to the left or right to adjust playback volume.
The music note with the beam is an interesting icon, and one for advanced users. It's a collaboration button that allows you to start "jam sessions" with other iOS users on the same network.
The sliders icon displays the instrument's effects. There are several options such as Echo, Reverb, and Panning.
The tool icon contains our track settings.
The question mark icon is the help menu.
Let's tap on the record button and play some notes on the piano keys. We see the top track indicator turn red as we record. Press the stop button.
Now the length of the track is displayed in green and we've recorded some notes, as shown in the following screenshot:

After we've recorded a few bars of piano notes, tap on the track icon located to the right of the piano keys icon in the top menu, as previously shown. This will allow us to edit our track.

Tap on the track so it turns green, and play with the length. Double-tap and you get a menu of options including copy, paste, and delete.
How it works...
In this recipe, we learned how to record some bars of music by selecting the piano and using the record button. This is step one in starting a project. Try repeating the process with other instruments. Using the track icon and the plus icon in the lower-left corner of the screen, you can add as many instruments as you want.
There's more...
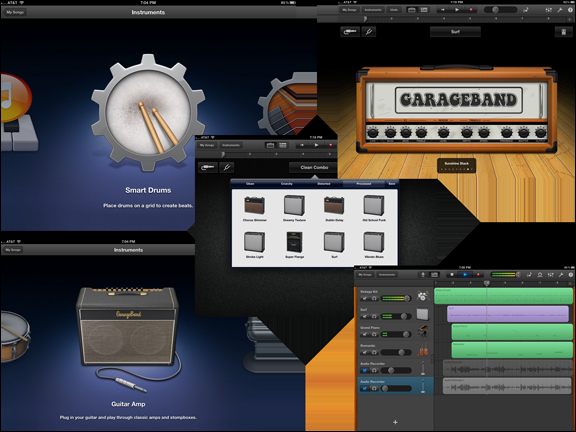
Swiping through all of the available instruments and recording options shows how versatile the app is. For someone interested in recording using a real guitar, there are options for that as well! The following screenshot shows a sample of the components of a project:

In the preceding screenshot, there are some images of amplifiers. Using a gadget called iRig, we have the ability to record the guitar straight into Garageband while running the guitar signal through a multitude of amplifiers. Playing with all of the amps and pedals makes this one of its greatest features.
Sharing and syncing to iCloud
This is all very similar to sharing in other Apple applications.
Tap on Edit in the upper-right corner of the Garageband home screen, which displays all of the projects. Your songs will begin to shake. Select the song that we just created and note the icons in the upper menu, as shown in the following screenshot:

We have a share icon, a plus icon, a trashcan icon, and a cloud icon. Clicking on the cloud enables uploading your song to iCloud for editing on other OS X and iOS devices. The slightly modified plus icon is a duplication tool. It will copy the song you currently have selected.
Other ways to share include Facebook, YouTube, iTunes, and Mail.
This was a very brief overview because Garageband really deserves its own book. As one of Apple's applications optimized for the new iPad, it just had to be included in this book. It showcases the power of the new iPad quite well.


