Search icon CANCEL
Subscription
0
Cart icon
Your Cart (0 item)
Close icon
You have no products in your basket yet
Save more on your purchases! discount-offer-chevron-icon
Savings automatically calculated. No voucher code required.
Arrow left icon
Explore Products
Best Sellers
New Releases
Books
Videos
Audiobooks
Learning Hub
Newsletter Hub
Free Learning
Arrow right icon
timer SALE ENDS IN
0 Days
:
00 Hours
:
00 Minutes
:
00 Seconds
Arrow up icon
GO TO TOP
Cinematic Photoreal Environments in Unreal Engine 5

You're reading from   Cinematic Photoreal Environments in Unreal Engine 5 Create captivating worlds and unleash the power of cinematic tools without coding

Arrow left icon
Product type Paperback
Published in May 2024
Publisher Packt
ISBN-13 9781803244112
Length 548 pages
Edition 1st Edition
Tools
Concepts
Arrow right icon
Author (1):
Arrow left icon
Giovanni Visai Giovanni Visai
Author Profile Icon Giovanni Visai
Giovanni Visai
Arrow right icon
View More author details
Toc

Table of Contents (19) Chapters Close

Preface 1. Part 1: Getting Started with Unreal Engine 5
2. Chapter 1: Creating Your First Project in Unreal Engine 5 FREE CHAPTER 3. Chapter 2: Navigating through the Unreal Engine 5 Interface 4. Chapter 3: Exploring Unreal Engine 5 Project Structure 5. Chapter 4: Importing and Working with Assets 6. Chapter 5: Mastering Materials and Shading 7. Chapter 6: Illuminating Your World with Lighting 8. Chapter 7: Exploring Nanite, RVTs, and the World Partition Tool 9. Part 2: Environment Creation Techniques
10. Chapter 8: Utilizing the Megascans Library 11. Chapter 9: Mastering Landscape and Terrain 12. Chapter 10: Creating Diverse Environments with Plugins 13. Part 3: Cinematic Fundamentals and Rendering
14. Chapter 11: Crafting Cinematic Shots with Cameras and a Sequencer 15. Chapter 12: Enhancing Scenes with Post-Processing and Niagara 16. Chapter 13: Rendering and Exporting Cinematic Shots 17. Index 18. Other Books You May Enjoy

Creating your first material

In this section, we will learn how to create a new material, and we will take our first steps in creating different kinds of surfaces using the Material Editor.

You can create a new material directly in the Content Browser by clicking the right-mouse button inside it and selecting Material. The command will create a new asset in the Content Browser, ready to be renamed. Remember to rename it properly (you can check naming convention tips in Chapter 2). As we saw in the previous chapter, Material thumbnails are always green underlined.
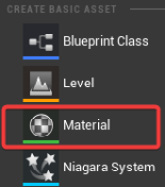
Figure 5.4 – Creating basic assets in the right-mouse button content browser options menu

Figure 5.4 – Creating basic assets in the right-mouse button content browser options menu

To take our first steps in material creation, we can add a simple sphere to the Viewport and assign to it our new material.

You can assign a material in three different ways:

  • Drag and drop the material asset directly on an object placed in the Level Viewport.
  • Drag and drop the material...
lock icon The rest of the chapter is locked
Register for a free Packt account to unlock a world of extra content!
A free Packt account unlocks extra newsletters, articles, discounted offers, and much more. Start advancing your knowledge today.
Unlock this book and the full library FREE for 7 days
Get unlimited access to 7000+ expert-authored eBooks and videos courses covering every tech area you can think of
Renews at $19.99/month. Cancel anytime
Banner background image