In this article by Alfonso V. Romero, author of VirtualBox 3.1: Beginner's Guide, you shall learn what the Guest Additions are and how to install them on Windows, Linux, and Open Solaris virtual machines.
Introducing Guest Additions
Ok, you have been playing with a couple of virtual machines by now, and I know it feels great to be capable of running two different operating systems on the same machine, but as I said at the beginning of this article, what's the use if you can't share information between your host and guest systems, or if you can't maximize your guest screen? Well, that's what Guest Additions are for.
With the Guest Additions installed in a virtual machine, you'll be able to enjoy all of these:
- Full keyboard and mouse integration between your host and your guest operating systems: This means you won't need to use the capture/uncapture feature anymore!
- Enhanced video support in your guest virtual machine: You will be able to use 3D and 2D video acceleration features, and if you resize your virtual machine's screen, its video resolution will adjust automatically. Say hello to full screen!
- Better time synchronization between host and guest: A virtual machine doesn't know it's running inside another computer, so it expects to have 100% of the CPU and all the other resources without any interference. Since the host computer needs to use those resources too, sometimes it can get messy, especially if both host and guest are running several applications at the same time, as would be the case in most situations. But don't worry about it! Guest Additions re-synchronize your virtual machine's time regularly to avoid any serious problems.
- Shared folders: This is one of my favorite Guest Addition features! You can designate one or more folders to share files easily between your host and your guest, as if they were network shares.
- Seamless windows: This is another amazing feature that lets you use any application in your guest as if you were running it directly from your host PC. For example, if you have a Linux host and a Windows virtual machine, you'll be able to use MS Word or MS Excel as if you were running it directly from your Linux machine!
- Shared clipboard: This is a feature I couldn't live without because it lets you copy and paste information between your host and guest applications seamlessly.
- Automated Windows guest logons: The Guest Additions for Windows provide modules to automate the logon process in a Windows virtual machine.
Now that I've shown you that life isn't worth living without the Guest Additions installed in your virtual machines, let's see how to install them on Windows, Linux, and Solaris hosts.
Installing Guest Additions for Windows
"Hmmm… I still can't see how you plan to get everyone in this office using VirtualBox… you can't even use that darned virtual machine in full screen!" your boss says with a mocking tone of voice. "Well boss, if you stick with me during these article's exercises, you'll get your two cents worth!" you respond back to him, feeling like the new kid in town…
Time for action – installing Guest Additions on a Windows XP virtual machine
In this exercise, I'll show you how to install Guest Additions on your Windows XP virtual machine so that your boss can stop whining about not being able to use the Windows VM as a real PC...
- Open VirtualBox, and start your WinXP virtual machine. Press F8 when Windows XP is booting to enter the Windows Advanced Options Menu, select the Safe Mode option, and press Enter to continue:
- Wait for Windows XP to boot, and then login with your administrator account. The Windows is running in safe mode dialog will show up.
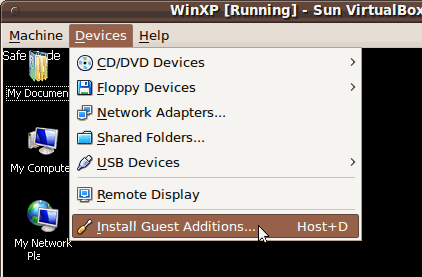
- Click on Yes to continue, and wait for Windows to finish booting up. Then select the Devices option from VirtualBox's menu bar, and click on the Install Guest Additions option:

Unlock access to the largest independent learning library in Tech for FREE!
Get unlimited access to 7500+ expert-authored eBooks and video courses covering every tech area you can think of.
Renews at €18.99/month. Cancel anytime
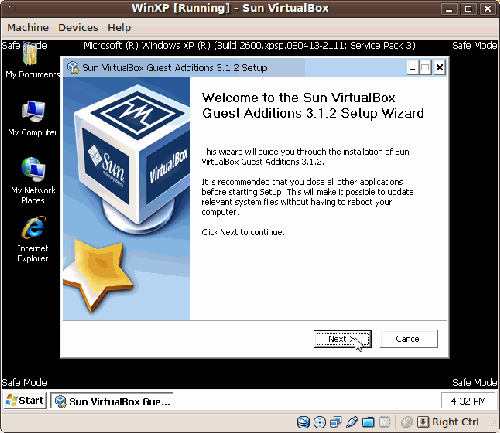
- VirtualBox will mount the Guest Additions ISO file on your virtual machine's CD/DVD-ROM drive, and the Guest Additions installer will start automatically:

- Click on Next to continue. The License Agreement dialog will appear next. Click on the I Agree button to accept the agreement and continue.
- Leave the default destination folder on the Choose Install Location dialog, and click on Next to continue.
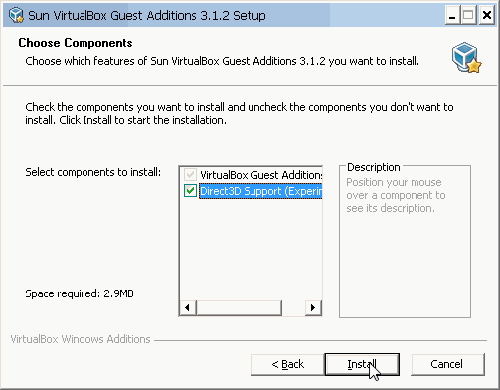
- The Choose Components dialog will appear next. Select the Direct 3D Support option to enable it, and click on Install to continue:

- Guest Additions will begin to install in your virtual machine.
- The next dialog will inform you that the Guest Additions setup program replaced some Windows system files, and if you receive a warning dialog from the Windows File Protection mechanism, you need to click on the Cancel button of that warning dialog to avoid restoring the original files.
- Click on OK to continue. The setup program will ask if you want to reboot your virtual machine to complete the installation process. Make sure the Reboot now option is enabled, and click on Finish to continue.
- Your WinXP virtual machine will reboot automatically, and once it has finished booting up, a VirtualBox - Information dialog will appear, to tell you that your guest operating system now supports mouse pointer integration.
- Enable the Do not show this message again, and click on the OK button to continue. Now you'll be able to move your mouse freely between your virtual machine's area and your host machine's area! You'll also be able to resize your virtual machine's screen, and it will adjust automatically!
What just happened?
Hey, it was pretty simple and neat, huh? Now you can start to get the real juice out of your Windows virtual machines! And your boss will never complain again about your wonderful idea of virtualizing your office environment with VirtualBox!
The Guest Additions installation process on Windows virtual machines is a little bit more complicated than its Linux or OpenSolaris counterparts due to the fact that Windows has a file protection mechanism that interferes with some system files VirtualBox needs to replace. By using 'Safe Mode', VirtualBox can override the file protection mechanism, and the Guest Additions software can be installed successfully. But if you don't want or need 3D guest support, you can install Guest Additions in Windows, normal mode.
 United States
 Great Britain
 India
India
 Germany
 France
 Canada
 Russia
 Spain
Spain
 Brazil
 Australia
 Singapore
 Hungary
 Ukraine
 Luxembourg
 Estonia
 Lithuania
 South Korea
 Turkey
 Switzerland
 Colombia
 Taiwan
 Chile
Chile
 Norway
 Ecuador
 Indonesia
 New Zealand
 Cyprus
 Denmark
 Finland
 Poland
 Malta
Malta
 Czechia
 Austria
 Sweden
 Italy
Italy
 Egypt
Egypt
 Belgium
 Portugal
 Slovenia
 Ireland
 Romania
 Greece
 Argentina
 Netherlands
 Bulgaria
 Latvia
 South Africa
 Malaysia
 Japan
Japan
 Slovakia
 Philippines
 Mexico
 Thailand


