Search icon CANCEL
Subscription
0
Cart icon
Your Cart (0 item)
Close icon
You have no products in your basket yet
Save more on your purchases! discount-offer-chevron-icon
Savings automatically calculated. No voucher code required.
Arrow left icon
Explore Products
Best Sellers
New Releases
Books
Videos
Audiobooks
Learning Hub
Newsletter Hub
Free Learning
Arrow right icon
timer SALE ENDS IN
0 Days
:
00 Hours
:
00 Minutes
:
00 Seconds
Arrow up icon
GO TO TOP
Learning Google BigQuery

You're reading from   Learning Google BigQuery A beginner's guide to mining massive datasets through interactive analysis

Arrow left icon
Product type Paperback
Published in Dec 2017
Publisher Packt
ISBN-13 9781787288591
Length 264 pages
Edition 1st Edition
Languages
Arrow right icon
Authors (3):
Arrow left icon
Eric Brown Eric Brown
Author Profile Icon Eric Brown
Eric Brown
Thirukkumaran Haridass Thirukkumaran Haridass
Author Profile Icon Thirukkumaran Haridass
Thirukkumaran Haridass
Mikhail Berlyant Mikhail Berlyant
Author Profile Icon Mikhail Berlyant
Mikhail Berlyant
Arrow right icon
View More author details
Toc

Table of Contents (9) Chapters Close

Preface 1. Google Cloud and Google BigQuery FREE CHAPTER 2. Google Cloud SDK 3. Google BigQuery Data Types 4. BigQuery SQL Basic 5. BigQuery SQL Advanced 6. Google BigQuery API 7. Visualizing BigQuery Data 8. Google Cloud Pub/Sub

Getting started with Google Cloud

Users can sign up for Google Cloud using their google account or Gmail ID. Google offers a free trial for most of its cloud services for up to 1 year. If you sign up using your company's account, Google will create an organization and will add users from the same domain to the organization so that resources can be shared with your team. You can also use your personal Gmail to sign up as an individual user to try the services.

You can sign up for a free trial at this link: https://cloud.google.com/free/. Google currently provides $300 free credit, which is valid for up to 12 months. The free trial requires you to enter your credit card details but you will not be billed until the $300 free credit is spent. When your account runs out of the credit, all the projects are suspended by default and you need to log in and authorize the use of your credit card for further usage of Google Cloud services.

After the successful sign up for Google Cloud, a new project with the default name My First Project is created by Google. We can use this project as a demo in this chapter. The next and most important step is to set up a budget alert for this project as well as all future projects that will be created on the Google Cloud platform. This will help the user to keep track of the budget and monitor any sudden surge in billing.

If your organization does not use Gmail for work, it is advised that everyone using Google Cloud create a Google account using his/her organization's email ID as the login name and link the organization's email ID as the email for that account. It is advised not to add any team member's personal Gmail account to the projects because the organization may forget to remove them from project if they leave the company:
  1. Click on the sandwich button on the top left to open the left-hand-side navigation menu.
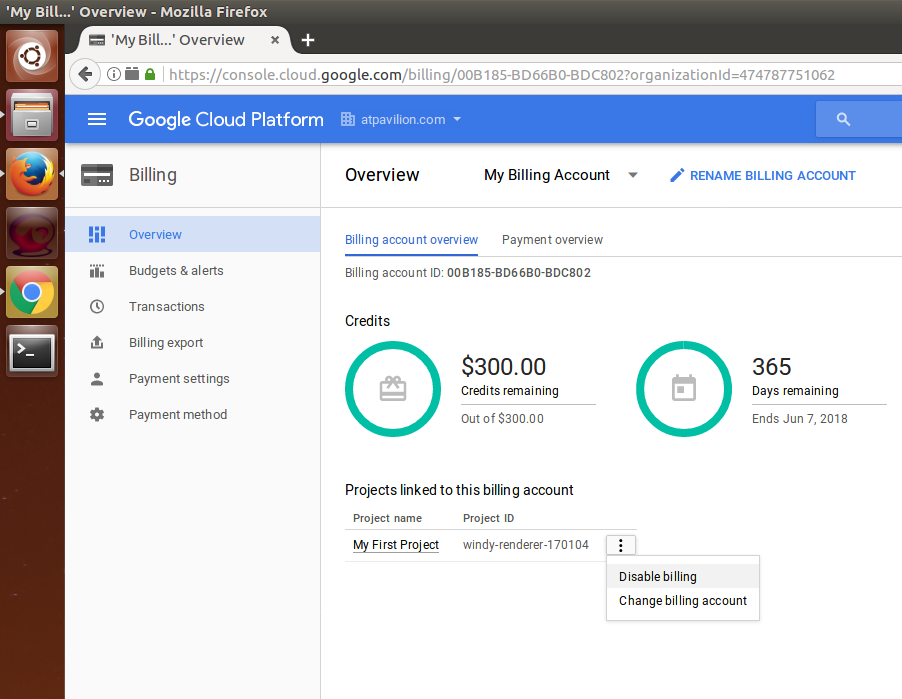
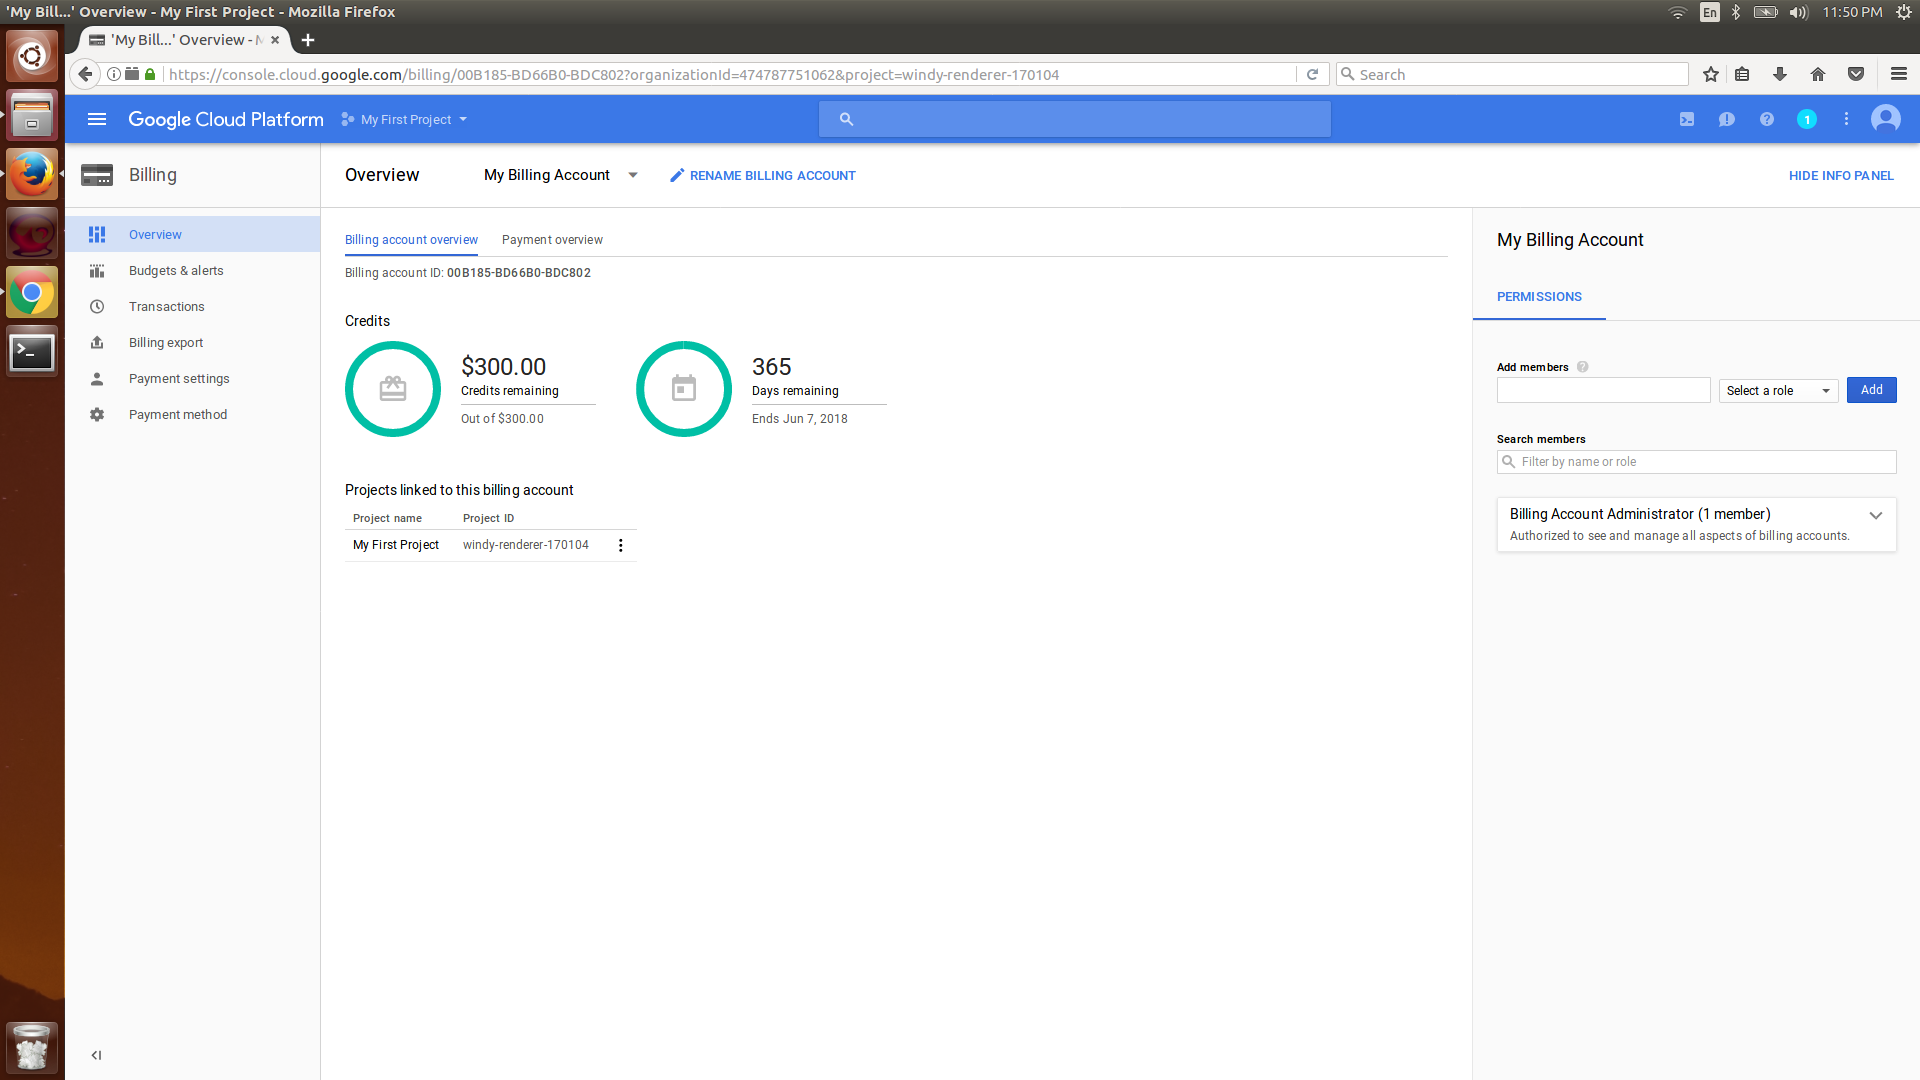
  1. Click on Billing in the left-hand-side menu and the billing dashboard will be displayed with the current billing details:
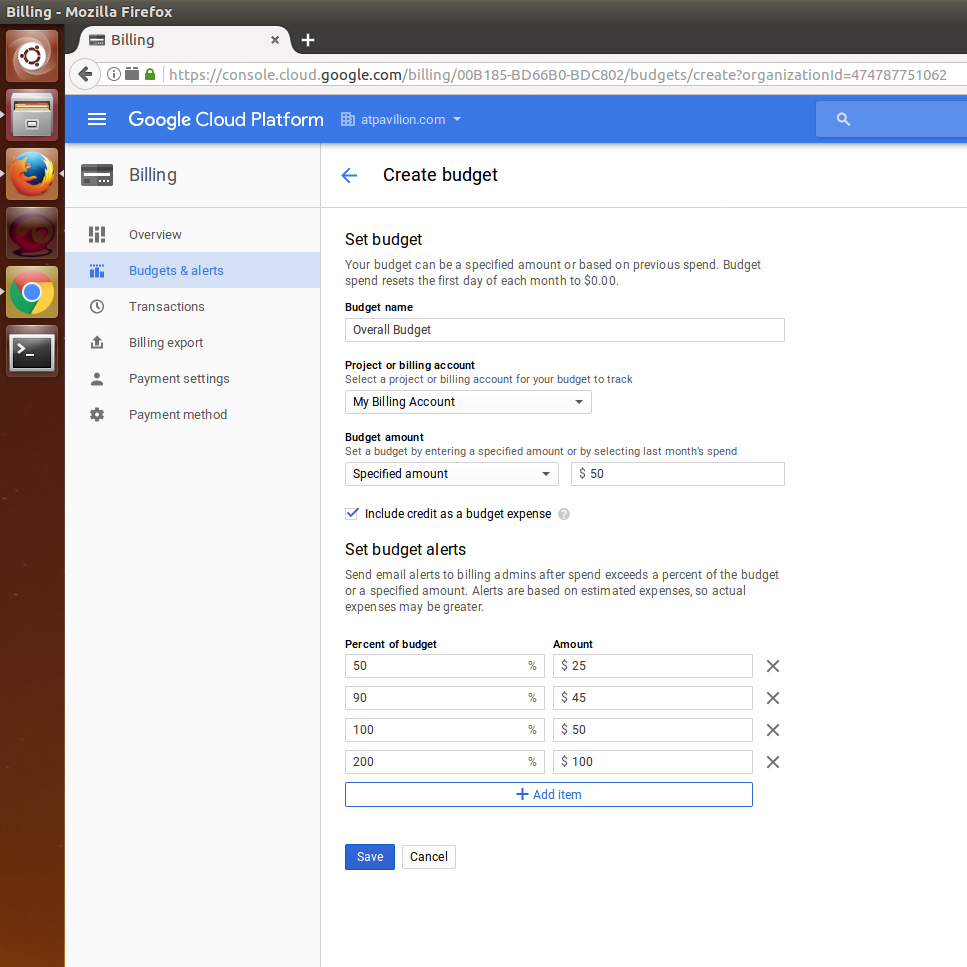
  1. Click on Budgets & alerts and create a budget at the billing account level so that your total expenses across all projects don't exceed the limit.
  2. Choose My Billing account in the Project or billing account dropdown and check the Include credit as a budget expense option. These budgets are monthly budgets. The user will receive an email if any of the budget exceeds the limit within that month.
You can see how the billing cycle works for your account by going to Billing | Payment Settings in the menu. Google uses Threshold Billing and Monthly Billing. If the threshold amount is reached within 30 days of your last billing, the payment is triggered. If the amount is not reached, then the payment is triggered 30 days from the last payment.
  1. Now, create a project-level budget alert by clicking on Budgets & alerts in the left-hand-side menu; this time, choose the project that was created by Google Cloud in the Project or billing account dropdown and check Include credit as budget expense:
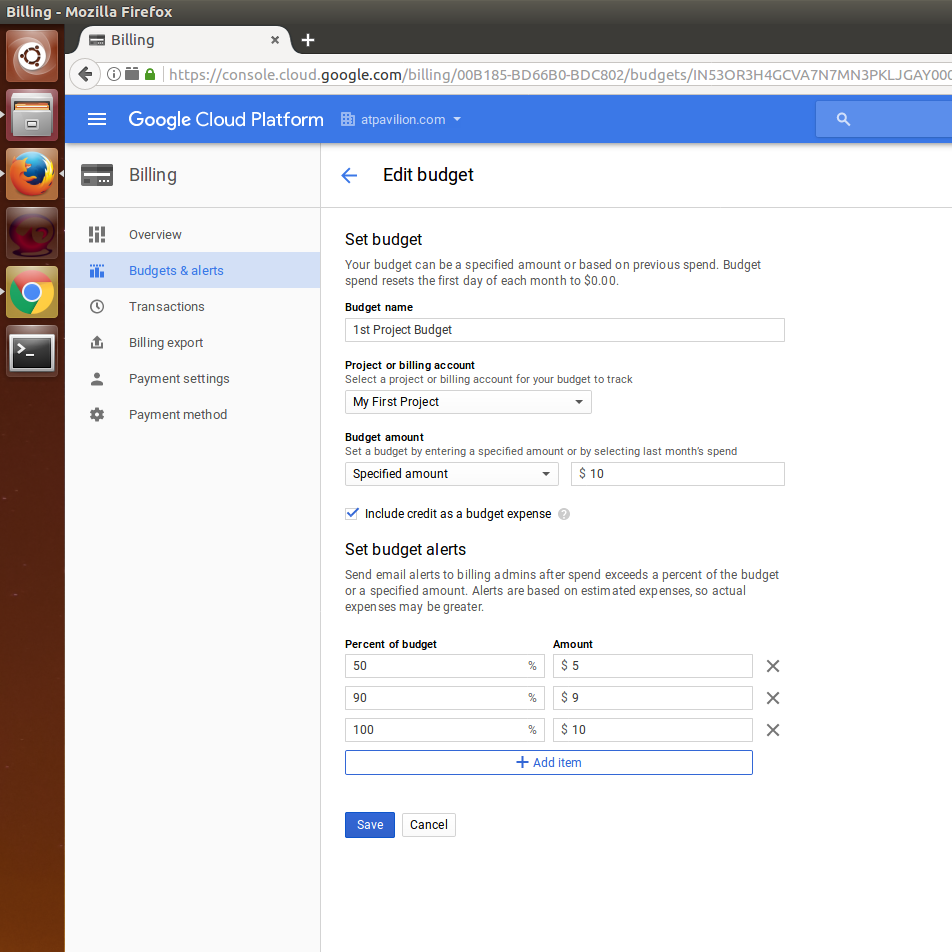
If the project exceeds the billing budget, then disable the billing for that project as shown in the following screenshot. This will stop the project from incurring further costs and suspend all services and resources. If a project is no longer needed, then shut down your project by going to IAM & admin | Settings in the menu and clicking on SHUT DOWN at the top. 
It is important to set up budget alerts both at the billing account level, covering total expense across all projects, and at the individual project level so that you can track the billing proactively. Keep your development, testing, and production projects as separate projects on the Google Cloud Platform; this can save some money and also help you to provide permissions for your team members appropriately for each project.

Whenever a project needs a service on the Google Cloud Platform, check out the following details about the service before deciding whether to purchase it:

  • Quotas: Understand the quotas allocated to various services. Some quota restrictions will be waived based on the billing tier and additional pricing. Some services include free tier pricing.
  • Sub-hour billing: Some services charge customers only for the minutes in which the resources are used and not for entire hours. It is better to understand whether the service you are planning to use is providing sub-hour billing. If it does not provide sub-hour billing, then plan to use the resources in one batch for a few hours rather than using them for a few minutes every hour.
  • Sustained-use discount: If a service is being used for more than x number of hours in a month, Google may offer a sustained-use discount. Compute engine VMs and cloud SQL VMs are offered at up to 30% discount for sustained use. The more predictably you use the resources on Google Cloud, the more the discounts you get.
  • Pre-emptible VMs: Pre-emptible VMs provide more savings than regular Compute engine VMs. These are short-lived VMs that can be created on the fly to deploy apps and run them. The catch is that these pre-emptible VMs can be reclaimed by Compute Engine anytime and your application will be provided 30 seconds to shut down. Turn off the VMs as soon as the process finishes.
To understand Google Cloud's pricing philosophy, visit https://cloud.google.com/pricing/philosophy/. To understand pre-emptible VMs and save money while executing your batch and scheduled programs, visit https://cloud.google.com/preemptible-vms/.

Overviewing Google Cloud Platform services

This section provides an overview of some of the services on Google Cloud Platform, and by the end of this chapter, you will be able to create a new table in Google BigQuery and import data from a file stored in Google Cloud storage. Most of the services on Google Cloud are accessible by browser, command-line interface, and API.

It is recommended for admins who manage projects and resources on Google Cloud Platform to install the Google Cloud Console app on their mobile devices so that they can manage a few critical operations from the app itself. The app is available for iOS at https://itunes.apple.com/us/app/google-cloud-console/id1005120814 and for Android at https://play.google.com/store/apps/details?id=com.google.android.apps.cloudconsole&hl=en.

Google Cloud storage and its features

Google Cloud storage provides the option to store your unstructured data with built-in version control, multi-region availability, and four types of storage classes that can help manage the life cycle of your data on Google Cloud.

To get started with Google Cloud storage:

  1. Click on the top-left menu and then on Storage option under the Storage category as shown in the following screenshot
  2. Click on Create a bucket in the dialog or the CREATE BUCKET button at the top and enter a bucket name; it should be unique across all Google Cloud storage buckets and not just your account
  1. Choose Regional for the default storage class of the bucket and choose your region for Regional location:
  1. Once the bucket is created, upload a file by clicking on the UPLOAD FILES button
  2. Download the sample CSV file from the following given URL and upload it to your storage bucket

We will be using this file to import its data to the BigQuery table. 

Google Cloud storage provides buckets as top-level storage structures for projects. Under buckets, the user can create a folder or directly upload files into the buckets. These files and folders in the bucket can be shared with others via a URL. We can also set the expiry date for the shared link so that it becomes inactive after a specified date. 

While the buckets, folders, and files might give the user a hierarchical storage notion, Google Cloud storage does not use hierarchical data structure to store these entities; hence the performance of Google File System is fast.

Google provides four storage classes for the buckets. In Multi-Regional buckets, the contents of the bucket are stored across data centers in various regions of Google Cloud. Regional buckets are stored only in one region, which you choose when creating the bucket. Most live data used by an application can be stored in Multi-Regional and Regional buckets as they provide high availability and minimum storage duration. These storage classes can be used to store the data needed by applications or ETL processes that run everyday.

Minimum storage duration means the number of days for which an object should be stored in the bucket. Objects in the buckets can be accessed anytime but should not be modified. The pricing for various types of buckets can be found here: https://cloud.google.com/storage/docs/storage-classes#comparison_of_storage_classes.

Data that is less frequently used can be stored in Nearline storage buckets. These buckets have a minimum storage duration of 30 days. Data for the past month or past year is usually moved from the Regional bucket to the Nearline bucket to save money. There is another storage class that is cheaper than Nearline; it is called Coldline storage. The buckets in this storage class have a minimum storage duration of 90 days, and mostly data older than 2 years or Disaster Recovery data is stored in this type of bucket. The minimum storage duration for Nearline and Coldline buckets means that the object should not be deleted or moved from those buckets within the number of days specified for each bucket type. Objects in Nearline and Coldline buckets can be modified and retrieved before the minimum storage duration days end.

The cost of storing objects decreases as we move an object from Multi-region buckets to Regional buckets to Nearline and Coldline buckets. The cost of retrieving objects is highest for Coldline, slightly less for Nearline, and lowest for Regional and Multi-line buckets.

Enterprises are advised to get Domain-Named buckets for their projects. Domain-Named buckets can be created after completing the domain owner verification process. Buckets can also be created for sub-domains for the verified domains. For more details, refer to this link: https://cloud.google.com/storage/docs/domain-name-verification.

Learning Google BigQuery

BigQuery is a serverless, fully managed, and petabyte-scale data warehouse solution for structured data hosted on the Google Cloud infrastructure. BigQuery provides an easy-to-learn and easy-to-use SQL-like language to query data for analysis. In BigQuery, data is organized as Tables, Rows, and Columns. BigQuery uses columnar storage to achieve high compression ratio and is efficient in executing ad hoc queries; the execution plans are optimized on the fly by BigQuery automatically. The reason BigQuery is capable of executing ad hoc queries is that it does not support or use any index, and the storage engine component of BigQuery continuously optimizes the way data is stored and organized. There are no maintenance jobs required to improve BigQuery's performance or clean up data to get better performance.

BigQuery can be accessed via a browser, command-line utility, or API. In this chapter, we will load data into a custom table via a browser by directly uploading the file to BigQuery and also importing data from a file in Google Cloud storage.

The hierarchy in BigQuery is Project | Datasets | Tables. Under a project, datasets can be created. Datasets are containers for tables. It is a way in which tables are grouped in a project. Tables belonging to different datasets in the same project can be combined in queries.

Working with the browser

To access BigQuery via a browser, go to https://bigquery.cloud.google.com. Once you log in, you will be seeing the BigQuery console; click on the down arrow in the project name and choose the Create new dataset option. Enter a name for your dataset in Dataset ID and choose the Data location and Never for Data expiration. Click on Ok to finish creating the dataset.

To create a new table under the dataset:

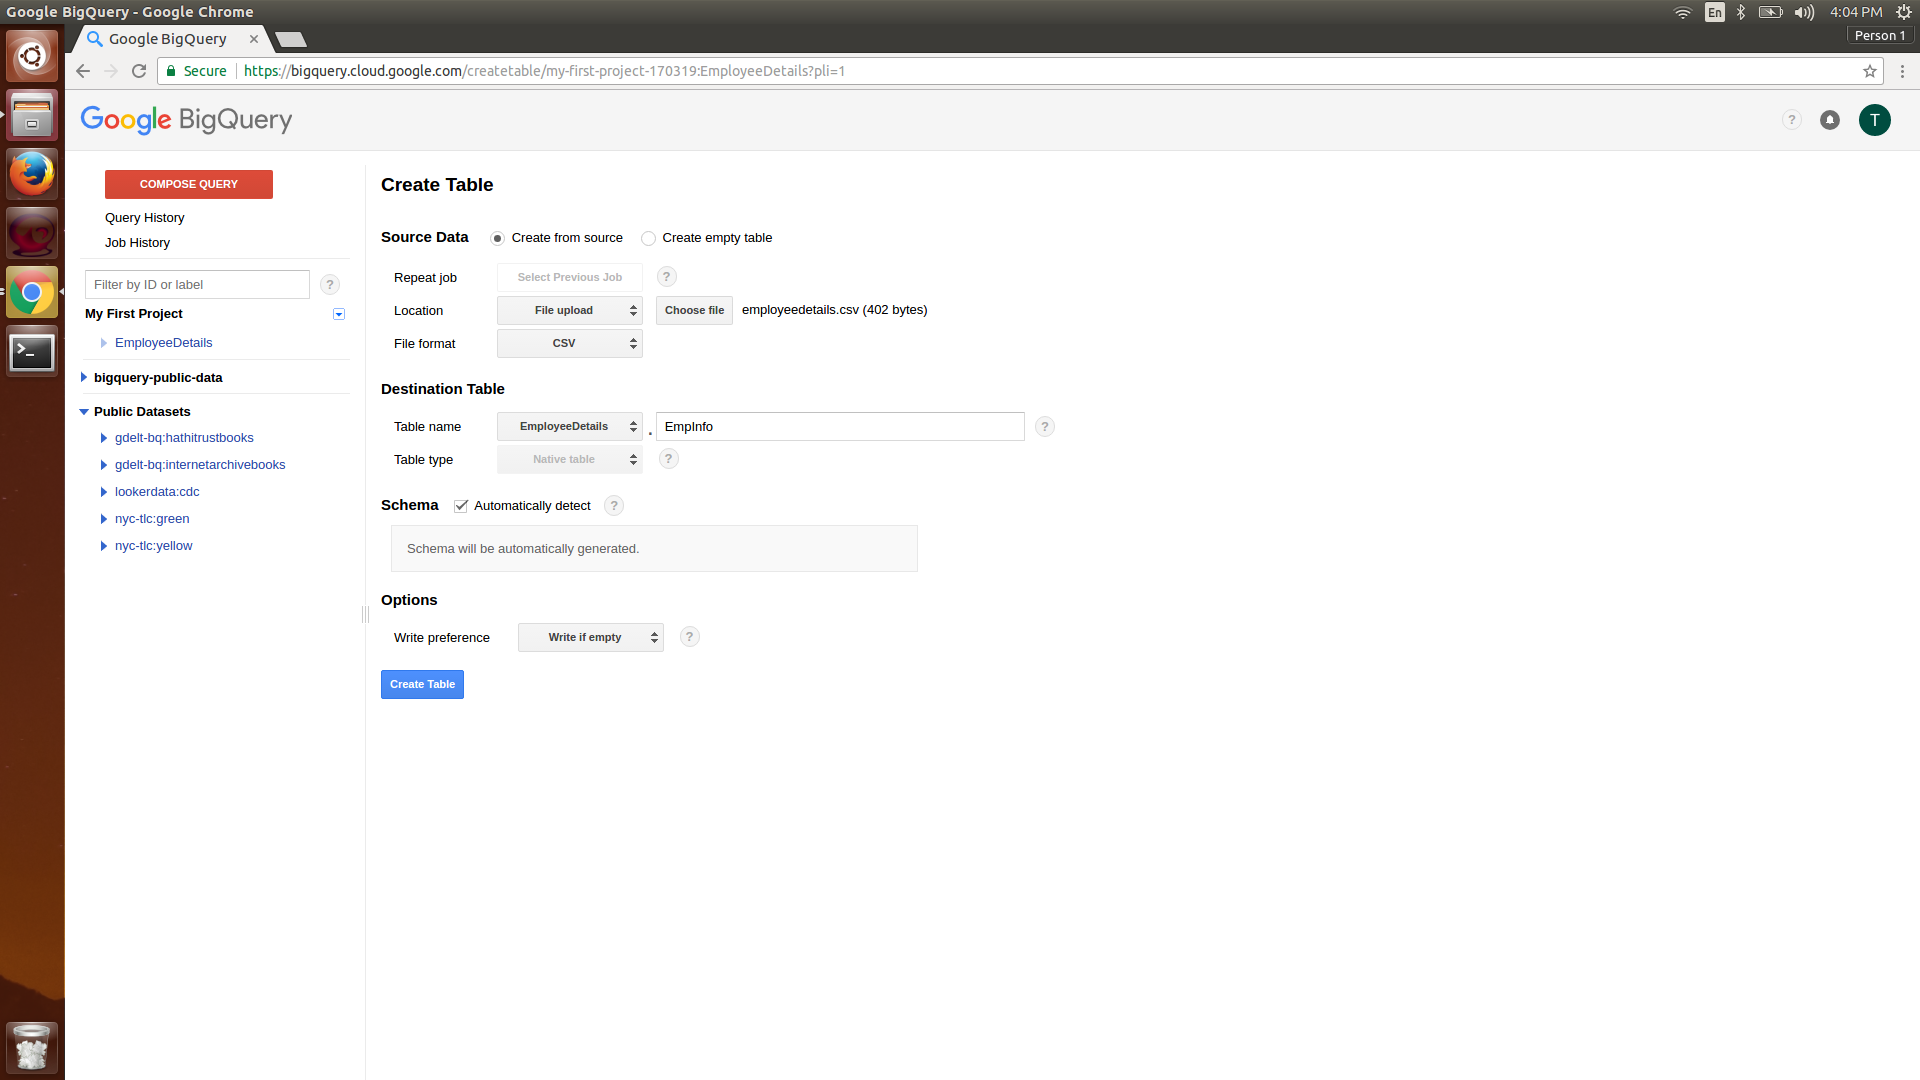
  1. Click on the down arrow and choose Create new table; you will be presented with the following screen.
  2. Choose the options as shown in the screenshot and click on Choose file button. Upload the file that you downloaded from https://github.com/hthirukkumaran/Learning-Google-BigQuery/blob/master/chapter1/employeedetails.csv.
  3. Choose Automatically detect for Schema and click on Create table. This option will automatically use the column names specified as the first row in the file for the table and import rest of the rows into the table:

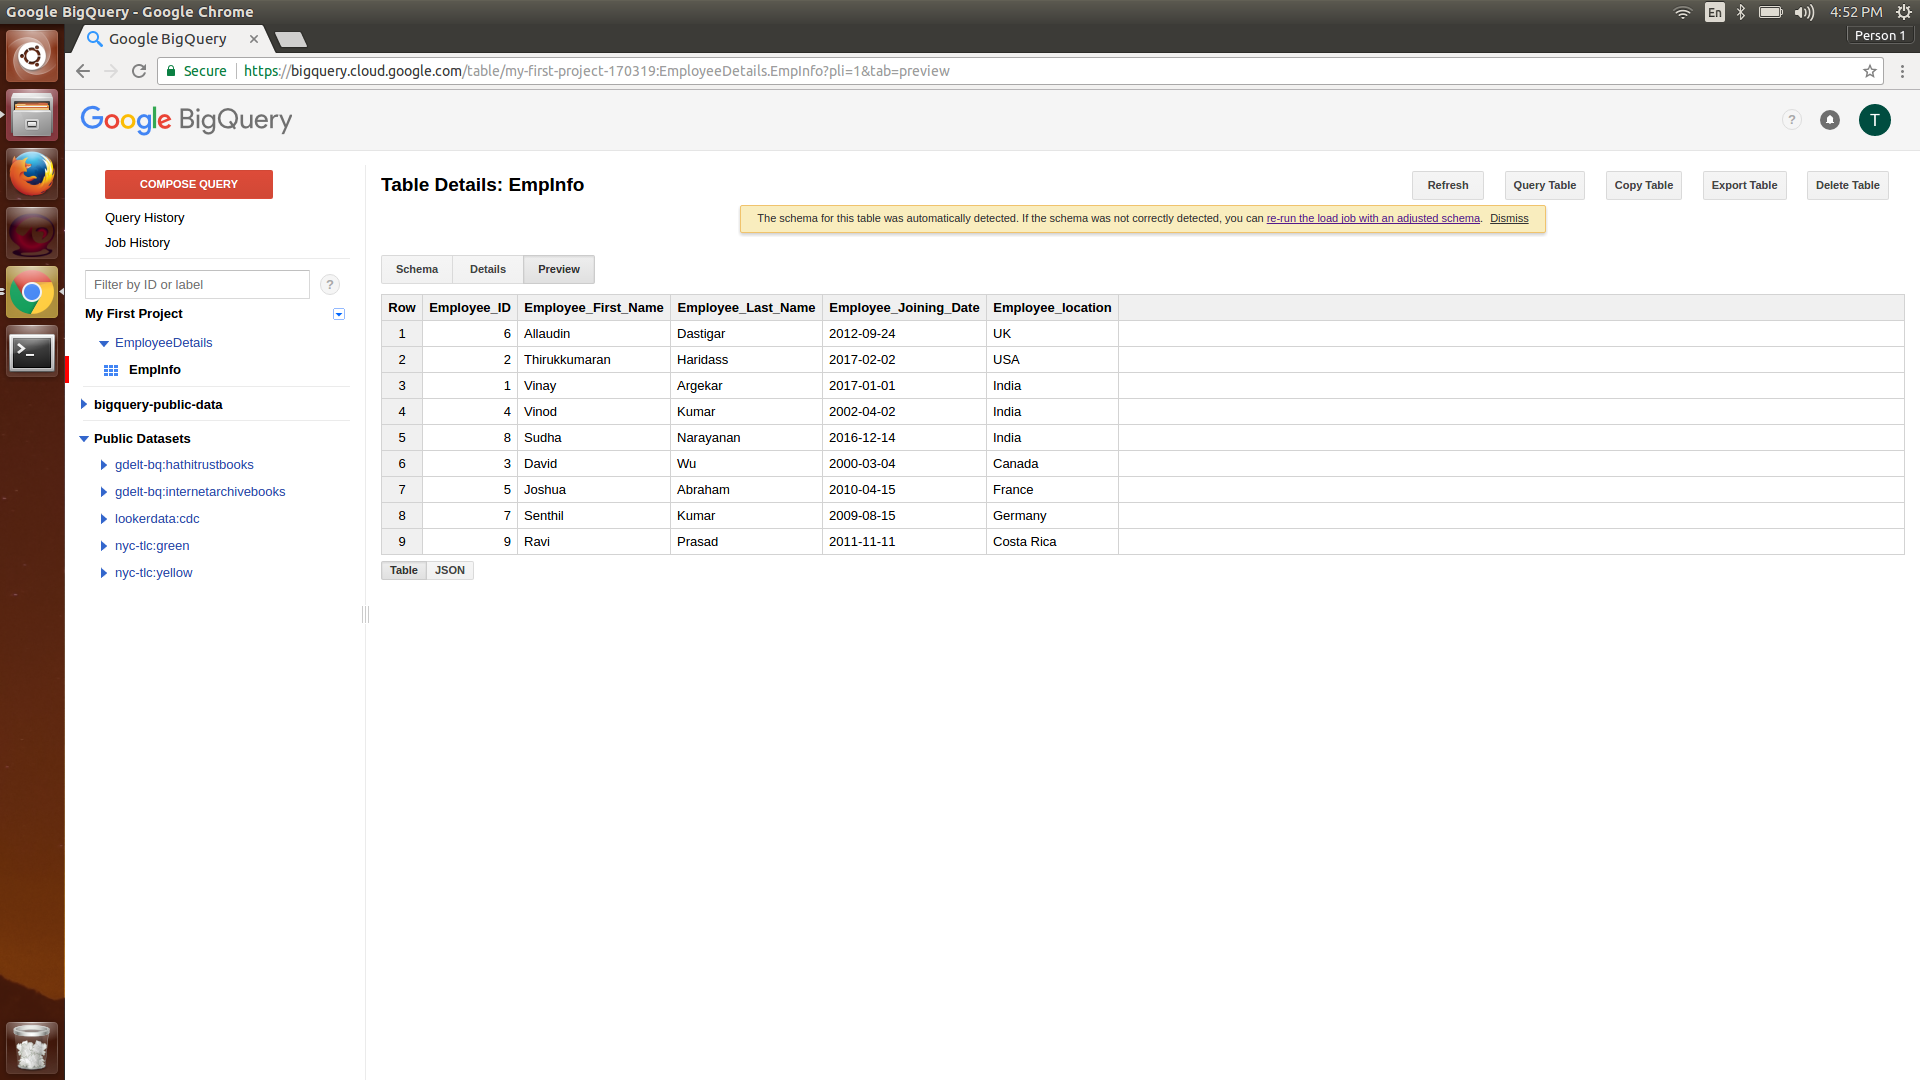
Once the table is created, you can see its details by clicking on the table name in the left-hand-side navigation under the dataset name. You can click on the schema, details, and preview table to see information about the table and the data in the table without running any query:

To import a file from Google Cloud storage:

  1. Create a new table as done previously and then choose Google Cloud storage in the Location option as shown in the following screenshot
  2. Enter the name of the bucket created previously and the file that was uploaded to that bucket
  1. Click on Create Table to create the table from the file in Google Cloud storage:

Running your first query

Now that the data is imported to the table, it is time to write a basic query to examine the data in it:

  1. Click on the table under the dataset, and then click on the Query Table option on the right. Type the query shown in the following screenshot.
  1. Click on the validator icon to see how many bytes of data from the table will be used to execute this query. If you add more columns to the selected query, the number of bytes processed will increase, which in turn will increase your billing. BigQuery uses columnar storage and also stores the data in a compressed format. It is advised to add only those columns that are needed to the query.
BigQuery SQL is case insensitive except for the project name, dataset name, and table name used in the query. It is always good to follow a convention when naming your projects, datasets, tables, and columns. BigQuery web console also provides an autocomplete feature to help users type column names and tables names easily, similar to IntelliSense in Microsoft Visual Studio.
It is always better to open the validator and get an estimate of the amount of bytes to be processed for your query. This will help you keep an eye on the billing.

BigQuery public datasets

Google is continually adding publicly available data for developers to use and evaluate BigQuery's capabilities and performance. They can also build demo products based on these public datasets. The user will not be billed for the storage part of these public datasets, but they will be billed for the bytes processed when they run a query on these public datasets. As mentioned previously, the user can use a validator to estimate the number of bytes to be processed for a query.

If you are an IT service provider, then showcase your ideas on Big Data using the public datasets in BigQuery. You can see some of the cool dashboards built for BigQuery data at https://www.bimeanalytics.com/dashboards.

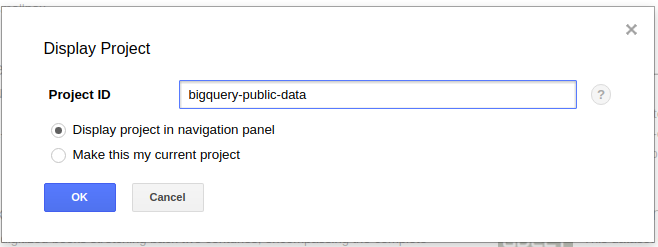
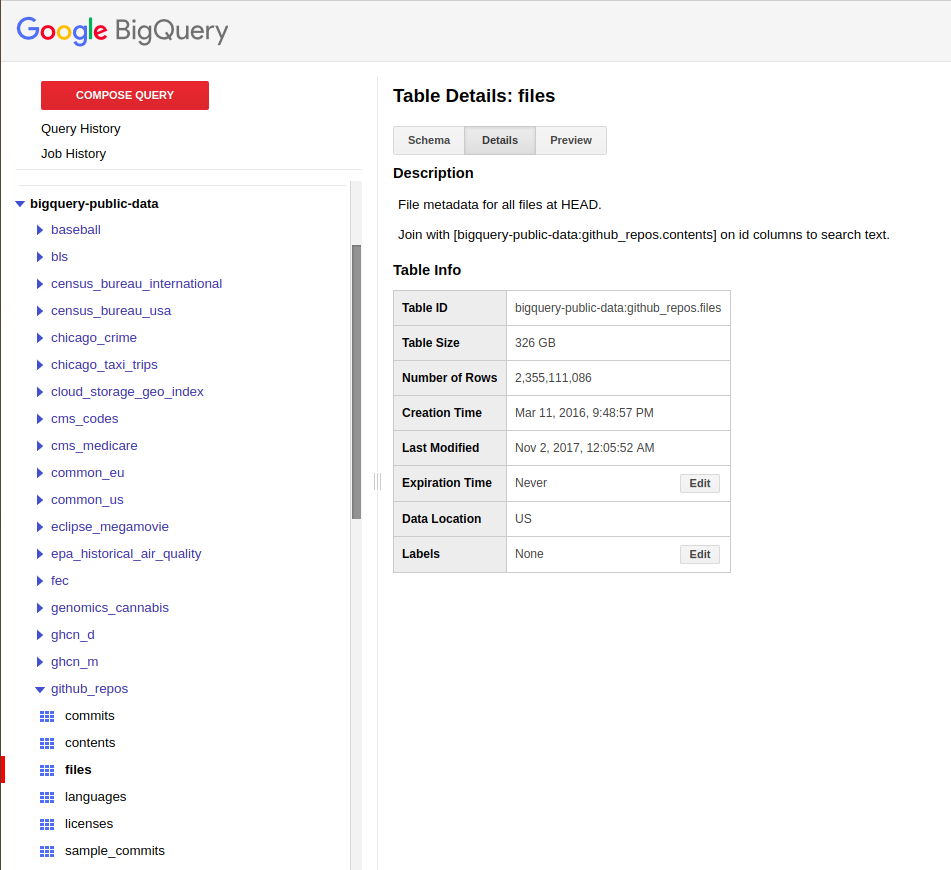
One of the datasets that contains huge data is bigquery-public-data:github_repos, which stores GitHub data for the repositories. One of the tables in the dataset, named files, has over 2 billion records. Querying such large data will give users an idea of the performance of BigQuery. To view that table click on the dropdown menu in the project and choose Display project as shown in the following screenshot:

Enter the project name bigquery-public-data in the dialog box and click on the OK button after choosing the options shown in the screenshot:

Choose the files table in the project bigquery-public-data under the dataset github_repos as shown in the following screenshot. Look at the schema for the table and execute some sample queries in this table to evaluate the performance of BigQuery:

As per a white paper in 2012 (https://cloud.google.com/files/BigQueryTechnicalWP.pdf), BigQuery can complete a full scan of 35 billion rows and return results in tens of seconds without any index for the table.

Getting started with Cloud SQL 

Cloud SQL is a fully managed RDBMS hosting on Google Cloud platform. The databases that are offered under this service are MySQL and PostgreSQL. For applications that require transaction databases, Cloud SQL is an option. The following demo explains how to create a MySQL database in Cloud SQL and connect to it using a sample App Engine app that has a page written in PHP.

To get started in Cloud SQL:

  1. Click on the top left menu and choose SQL under the storage category.
  2. Create an instance of MySQL server second generation by entering the instance name and root password.

The Cloud SQL instance will be assigned a static IP, but to access it from your local machine via command line or MySQL Workbench, you need to authenticate through Google Cloud SDK. This will be covered in Chapter 2, Google Cloud SDK.

Download the following file and upload it to the Google Cloud storage bucket for importing it to MySQL.

Click here, https://github.com/hthirukkumaran/Learning-Google-BigQuery/blob/master/chapter1/employeedetailswithoutheader.csv

To access the MySQL instance from a browser:

  1. Open the Cloud Shell by clicking on the  icon at the top. Cloud Shell is a Linux VM that is created on the fly and has Google Cloud SDK installed with the default configuration.
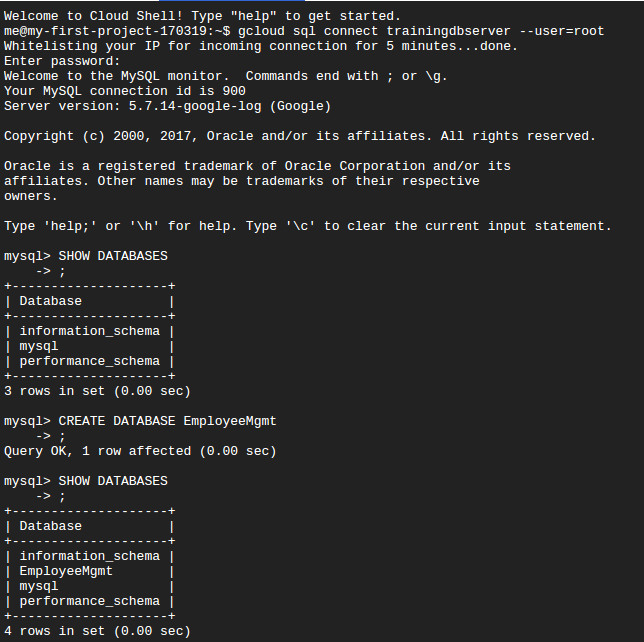
  1. To connect to the MySQL instance type the following command and replace trainingdbserver with your instance name:
gcloud sql connect trainingdbserver --user=root
  1. Create a sample database as shown in this screenshot:
  1. Create a sample table using the following script after selecting the EmployeeMgmt database:
USE EmployeeMgmt;

CREATE TABLE EmployeeDetails
(EmployeeID INT AUTO_INCREMENT NOT NULL,
FirstName VARCHAR(50) NOT NULL,
LastName VARCHAR(50) NOT NULL,
JoiningDate DATETIME,
Country VARCHAR(50),
PRIMARY KEY(EmployeeID));
  1. To import data into the table, click on the SQL instance in the Google Cloud Console and click on the IMPORT button on the top in the MySQL server instance screen.
  2. Choose the .csv file uploaded on the Google Cloud storage bucket and the CSV option in Format of import. Enter the database name and table name and click on IMPORT.
  3. Once the data is imported, run the following query in the command prompt of Cloud Shell to see all the rows of the table displayed in the console:
SELECT * FROM EmployeeDetails;

Chapter 2Google Cloud SDKcovers how to upload a sample PHP application to Google App Engine and connect to the MySQL instance created in this chapter. If you already have a database for your application with data, then create a dump SQL file for that database and upload it to a bucket in Google Cloud storage. Click on the MySQL instance name and choose the Import option at the top. Choose the SQL file from the bucket and import the script to a new database or existing database in the MySQL instance.

The import option also has a feature to import a CSV file into a table. The export option will generate a dump SQL file for the specified user-created database or export data from the specified user-created table to a CSV file. The CSV file imported by MySQL into Google Cloud storage can be imported to Google BigQuery in append or overwrite mode.

Cloud Datastore

Cloud Datastore is a NoSQL document database used to store key-value pair objects; they can be queried using an SQL-like language called GQL. Cloud Datastore provides options to index certain properties of the object stored. Applications can create entities of any kind dynamically and add data to those entities. GQL is a language using which developers can write queries to query the datastore by kind and property values. To get started, click on the top left menu () and choose Datastore under the Storage category. Create an entity as shown in the first screenshot.

Use Google Cloud Datastore for application logging and versioning of objects and objects that are bound to change their structure over the time. Cloud Datastore provides the option to maintain different sets of properties for the same kind of object.

The following screenshot shows how to create an entity of kind named EmployeeDetails, define its properties, and add values to the properties. It is similar to defining a class in object-oriented programming, instantiating it, and initializing its field values and properties:

To explore the list of entities of the same kind, you can use GQL to query the objects based on their property values, as shown in following screenshot:

Google App engine

If you are looking for a scalable hosting solution for your website and server application, then the Google App engine is a very good choice. It supports various languages such as Java, PHP, Go, Python, and even some frameworks such as Django in Python and CodeIgniter in PHP with minimal refactoring. Other frameworks such as Flask and Laravel can also be hosted on Google App Engine but require modification in the framework to be Google Cloud compatible.

In App engine, applications and storage are kept separate. Applications cannot write to files within the application folder; they must be written to either Cloud Datastore or Cloud Storage. User-uploaded contents on a website, such as profile pictures and so on, should be stored in Google Cloud Storage buckets.

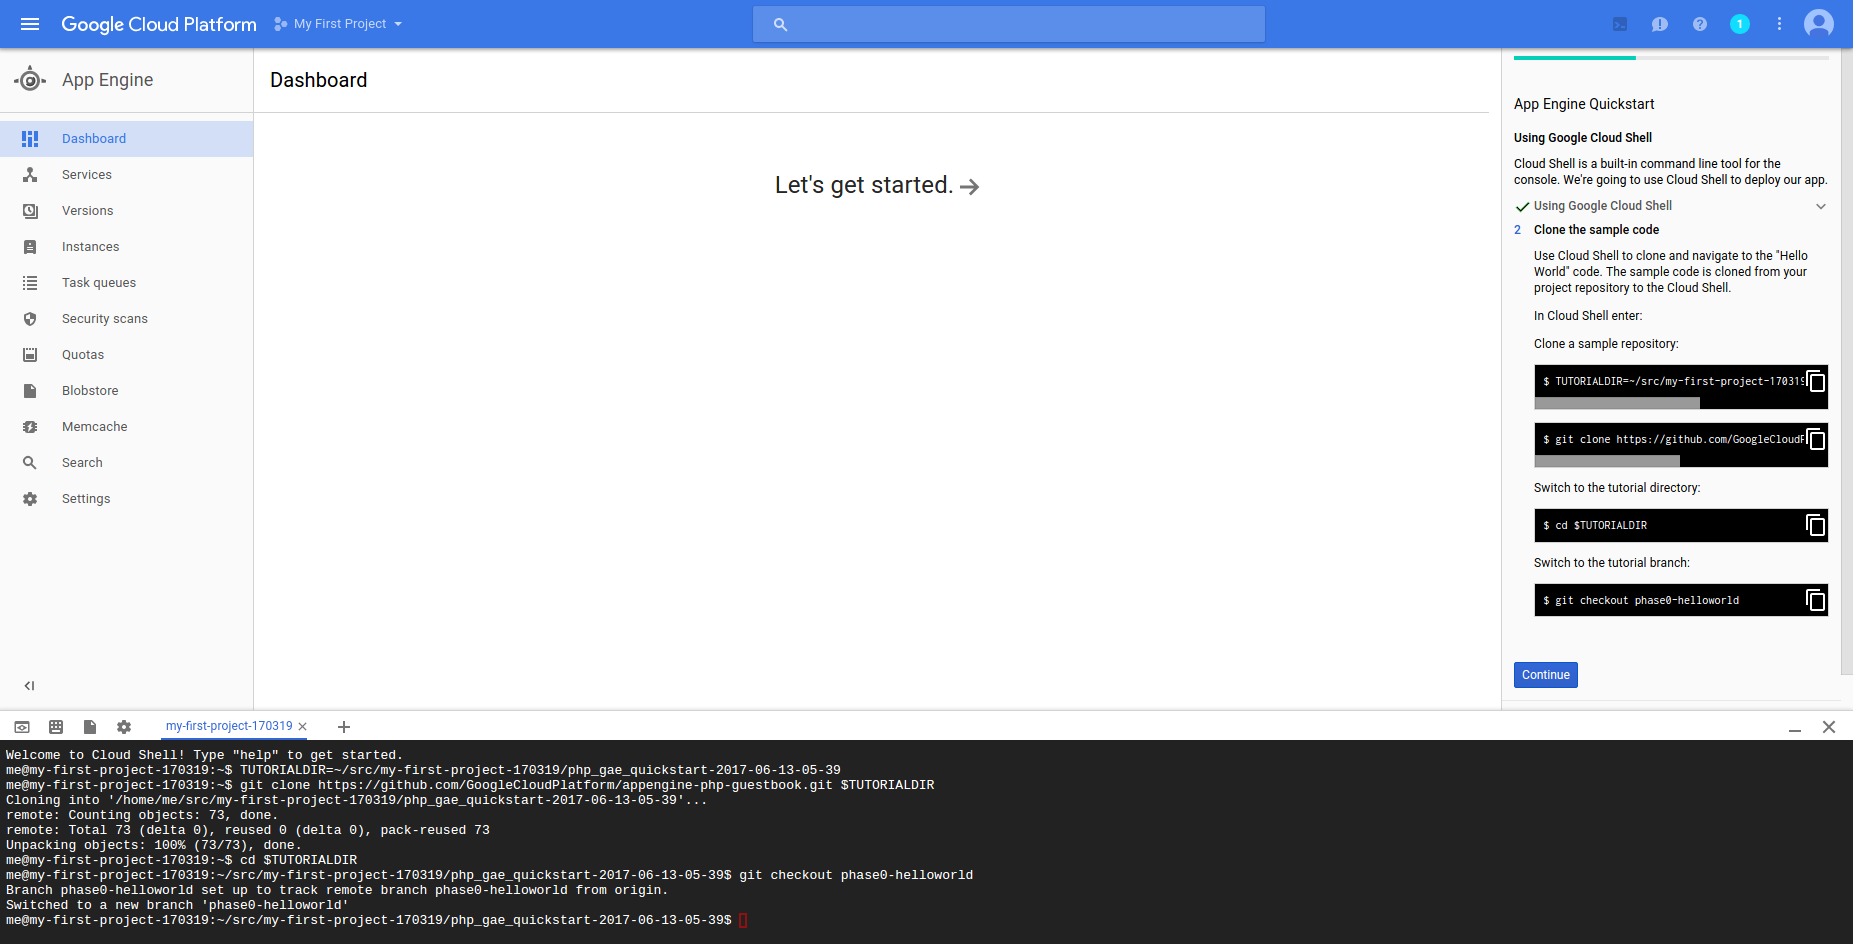
To create an App engine instance, click on App Engine in the left-hand-side menu under the Compute category. Choose a programming language of your choice. This demo uses PHP as the language and creates an application on App engine using the guided tutorial. The tutorial gets the code from GitHub and deploys it on the App engine instance. Copy and paste the commands in the Cloud Shell command prompt, and deploy the application on the App engine:

App engine standard environment

In this environment, runtimes with predefined configuration and specified versions for various programming languages such as PHP, Go, Java, and Python are used to deploy applications on Google Cloud Platform. These runtimes also contain various libraries that provide additional functionalities for your application running on App engine. Unlike traditional hosting, the applications hosted on App engine cannot write files to the folder in the App engine. All files uploaded by the users should be saved to Google Cloud Storage via API and the application cannot write files such as error logs or session data. The application must be modified to use either a database such as Cloud SQL to do session tracking or Cloud Datastore to store these details.

The App engine standard environment supports the following programming languages and the specified versions:
  • Go 1.6
  • Java 7
  • PHP 5.5
  • Python 2.7

The standard environment is similar to a sandbox with lots of restrictions for accessing resources and also has performance criteria for requests.

The App engine provides some additional features that make applications scale automatically. The following are some of the additional features that your application can take advantage of:

  • Multitenacy: This is an excellent feature for developing SAAS applications. This service helps a single site hosted on multiple domains to support multiple clients and partition their data across various services such as Datastore, Caching, and Task Queue. 
  • Memcache: This is a scalable caching service that can store gigabytes of data in memory. Cache management can be automated via API and cache data can also be shared with other applications on the Google Cloud.
  • Image API: The image API provides functions such as rotation, resizing, crop images, stitching images together, and also applying various enhancements to images.
  • Cron Service: This service provides features to schedule tasks to run at regular intervals. The cron job can invoke an HTTP URL that will execute the tasks within a specified time limit based on the billing tier. 
  • Search: The search API provides options to search and index the documents and data used by your application. This is one of the features that can help e-commerce websites because users mostly land on a product page or category page after searching the site. 
  • Logs: The logging feature helps all applications hosted on your account to the information and errors. Google Cloud also internally logs requests, and this helps you analyze and handle the application issues easily and reduce your turnaround time.
  • Task Queue: Applications can trigger some tasks asynchronously or outside of the request life cycle. This is one of the features that applications can take advantage of to boost their performance. Sending mails, logging events, and starting some transactions can be done outside of the request cycle.
  • Traffic Splitting: Applications can take advantage of Traffic Splitting to do A/B testing. This will help e-commerce sites to track a new or beta features performance before making it available to all users.
  • URL Fetch: This service helps clients access HTTP or HTTPS URLs to get a response and even save the response to Cloud Storage. If your application requires downloading or crawling and storing contents from various places on the Internet, this will be a handy feature. The requests are sent and responses are received through Google's infrastructure, and you can imagine the performance of your applications.

In addition to these features, the applications running on App engine can connect to Cloud SQL and other databases on Google Cloud. The apps can also connect to BigQuery and interact with various services such as Cloud Datastore and Cloud Storage.

The App engine Standard environment provides free resource usage with a daily limit. You can check out the quota for your App Engine instances by clicking on the Quota option in the App engine instance menu.

App engine flexible environment

It is inevitable for some companies to use the latest or specific version of programming languages, or they need to use a programming language that is not in the standard environment. An App engine Flexible environment may be the next best choice. It supports Node.js, Ruby, and .NET in addition to PHP, Go, Python, and Java. The flexible environment provides support for running newer versions of programming languages compared to a standard environment. Applications run in a Docker container in the flexible environment. Scalability for huge traffic is not straightforward nor automatic for applications running in flexible environments because of the way they are deployed using containers.

To choose between the App Engine standard environment and flexible environment, go through the comparison on this page: https://cloud.google.com/appengine/docs/the-appengine-environments.

Google container engine

For companies that have taken advantage of containers to run, develop, test, and deploy their applications, Google Cloud offers the Google container engine. The container format supported is Docker. It provides options to manage the containers, perform scaling, and automate deployments using the open source Kubernetes container orchestration system. Google Cloud also provides a container registry service to store private Docker images for your team to use. Container-based development, testing, and deployment is now becoming a de facto for agile development projects.

Compared to App engine, applications running on Container engine have fewer restrictions in terms of storage, performance, and using third-party libraries. 

The Pokémon GO application uses Google Container Engine to run its application logic. Read the detailed post about it at https://cloudplatform.googleblog.com/2016/09/bringing-Pokemon-GO-to-life-on-Google-Cloud.html.

Google compute engine

Google compute Engine is a service that provides virtual machines to run the application. The virtual machines charge has the following components; storage charge, CPU charge and Network usage charge. Users can install the software needed to run on their applications. Virtual machines are available for various Linux distributions and Windows Servers. Windows Servers with SQL Server pre-installed are also available in the Google compute engine options. The Compute Engine service provides the most flexible environment to host your applications. Google Cloud's networking infrastructure provides various options to scale the VMs based on the traffic to your application.

Use the Google Cloud Launcher service to find out the VMs with the software you require and add them to your project in minutes. When a VM is shut down, it incurs only storage charges and not CPU charges.

Compute Engine VMs also come in a special flavor called Pre-emptible VMs. When you create VMs in Compute Engine, make sure that they are not pre-emptible because pre-emptible VMs can be reclaimed by Google Cloud anytime with just a 30-second notice and wait time. Pre-emptible VMs provide up to 80% discount in billing. This is best suited to run batch programs that are running multiple instances from multiple machines and are fault tolerant.

You have been reading a chapter from
Learning Google BigQuery
Published in: Dec 2017
Publisher: Packt
ISBN-13: 9781787288591
Register for a free Packt account to unlock a world of extra content!
A free Packt account unlocks extra newsletters, articles, discounted offers, and much more. Start advancing your knowledge today.
Unlock this book and the full library FREE for 7 days
Get unlimited access to 7000+ expert-authored eBooks and videos courses covering every tech area you can think of
Renews at $19.99/month. Cancel anytime
Banner background image