Using all of the preceding knowledge should help you to better manage your subscriptions, their cost, and the policies assigned to them. There is one more thing that comes to mind when thinking about such complex tasks—automation. Fortunately, Azure offers full integration with its services, so you can build your own pipelines for handling additional tasks and monitoring actions.
Understanding the basics of the mentioned services is crucial to be able to get started with this topic. Once you are familiar with them, go to the subscription you want to automate.
To finish the integration, we need a service that will take the JSON string and push it further or trigger an action. For this example, I selected Azure Logic Apps, which seems like a better match for an administrator than Azure Event Hub and can help you to build a complex solution quickly.
Now we are ready to integrate the subscription with the service. To perform this exercise, you will need the following:
- A working Azure subscription
- Azure Logic Apps instance, which you can integrate with Azure Event Grid
Implementing automation will require deploying Azure Event Grid and connecting the gathered data with Azure Logic Apps. All of the steps are described here:
- Use the search box at the top of the Azure portal and type your subscription name (or just use it to go to the Subscriptions blade):
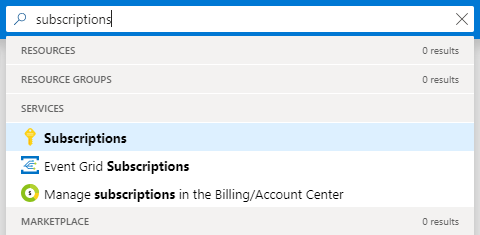
Figure 1.41 - Searching for the Subscriptions blade
- Click on the Events blade, which is the starting point to create an Azure Event Grid subscription:
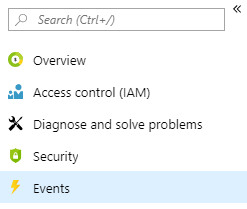
Figure 1.42 - Events blade
- Click on the + Event subscription button. You will see a new screen where you can enter details of a new subscription as shown in the following screenshot (Figure 1.43):
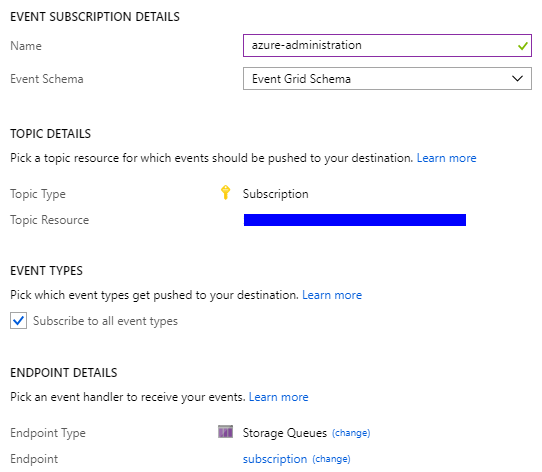
Figure 1.43 - Creating an event subscription
- When you click on the Create button, the process of creating a subscription will start. After a moment, you should be able to see a screen similar to mine:
Figure 1.44 - Current event subscription
- Go to your Azure Logic Apps instance and click on the Logic app designer blade:
Figure 1.45 - Logic app designer blade
- Search for Azure Queues, which is also available as a part of the recommended services:
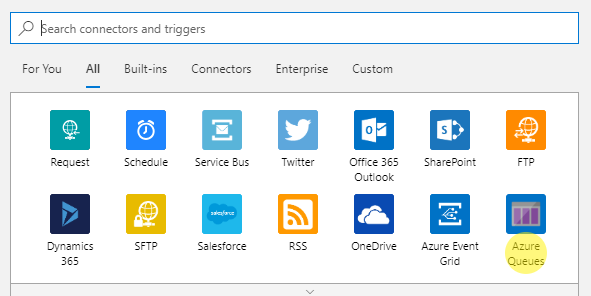
Figure 1.46 - Recommended connectors with Azure Queues visible in the bottom-right corner
- Click on the Azure Queues connector.
- Provide a name for the connection and select the storage account where messages are stored.
- Set the queue name and the check frequency.
- Save the application.
Before a subscription is created, you have to provide additional details:
- Name: This is a unique name for your subscription that will help you to distinguish it from the others.
- Event Schema: You have three different schemas available here. As this section is not about digging deeper into Azure Event Grid, you should select the Event Grid Schema option. Other ones (Cloud Event/Custom) would also be correct here as the choice changes the schema without affecting the payload.
- Subscribe to all event types: By deselecting this checkbox, you will have the opportunity to explicitly select event types you are interested in. In general, it is a good idea to subscribe to all nine events, but maybe your particular case will have different requirements so feel free to choose anything you want.
- Endpoint details: You have four different options available here: WebHook, Storage Queue, Event Hubs, and Hybrid Connections. For the purpose of this exercise, I selected Storage Queue, but again, you can create a connection using any connector you like. The WebHooks and Storage Queues options are the most straightforward ones and suit the most needs in most of the integrations made with Azure Logic Apps.
Note that you will have to create a new instance of a queue or Azure Event Hub if you do not have one when creating a connection.
At this moment, there is no event sent to the queue or generated by a subscription. To test the functionality, let's create a new resource, which should generate an event. For this exercise, I added an additional storage account named azureadministratortest.
Monitoring events via the Azure portal may be cumbersome as the chart is refreshed only once in a while. For a better understanding of what is going on, use the connector you defined during a subscription creation.
As I used a storage account as my endpoint, I can check the queue whether there are any events related to the resources in my subscription. To do so, I used Microsoft Azure Storage Explorer (https://azure.microsoft.com/en-us/features/storage-explorer/), which is a free tool you can download and install on any operating system:
Figure 1.47 - Generated events stored within Azure Storage Queue
As you can see, I already have plenty of different messages generated by resources. Some of them are related to security events and some of them tell me details about services provisioned. One of the events is specifically related to my new storage account:
{
  "subject": "/subscriptions/.../resourceGroups/azureadministrator-euw-rg/providers/Microsoft.Storage/storageAccounts/azureadministratortest",
  "eventType": "Microsoft.Resources.ResourceActionSuccess",
  "eventTime": "2019-02-09T17:36:55.8588074Z",
  "id": "c1950090-61e0-4627-9b77-776890ffb710",
  "data": {
    "correlationId": "c1950090-61e0-4627-9b77-776890ffb710",
    "httpRequest": {
    "resourceProvider": "Microsoft.Storage",
    "resourceUri": "/subscriptions/.../resourceGroups/azureadministrator-euw-rg/providers/Microsoft.Storage/storageAccounts/azureadministratortest",
    "operationName": "Microsoft.Storage/storageAccounts/listKeys/action",
    "status": "Succeeded",
  },
  "dataVersion": "2",
  "metadataVersion": "1",
  "topic": "/subscriptions/..."
}
As you can see, such an event contains a massive amount of detail, such as the following:
- data, an object containing the event payload (all information related to an event)
- eventType, which may help you to decide how to react to such an event
- subject, a resource to which an event is related to
You, as an Azure administrator, can use this for multiple purposes:
- Building a custom monitoring solution
- Auditing changes made to resources
- Creating your own alerts based on the provided payloads
For now, we only have a complex JSON, which gives us some information—the question is how to use it in a real scenario.
We need to connect to a Storage Account—with Azure Logic Apps, it is easy; you have to either search for the service you are interested in or just use the most popular ones. In my case, I found Azure Queues, which happened to be available without searching for it:
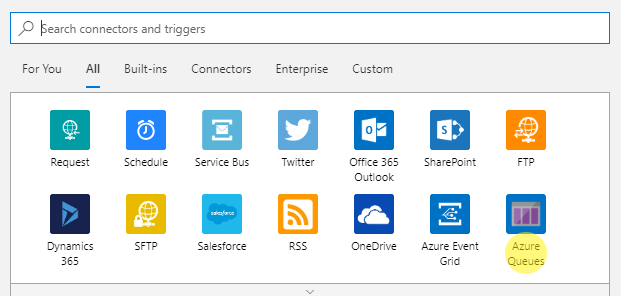
Figure 1.48 - Recommended connectors with Azure Queues visible in the bottom-right corner
When you click on the connector, you will see options available for it—for our case, we have two scenarios:
- When a specific number of messages are in a given queue
- When there are messages in a queue
I want to start my app anytime there is a message, so I use the latter. You will have to provide a name for the connection and select the storage account where messages are stored. Here, you can find my configuration:
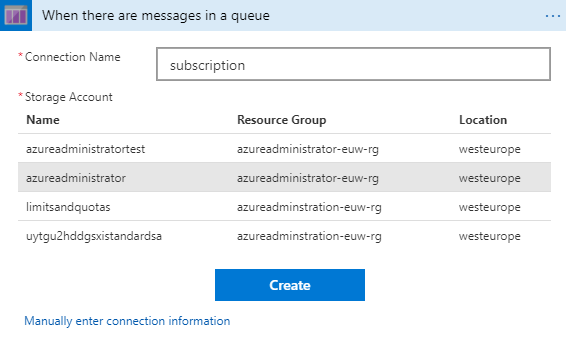
Figure 1.49 - Available storage accounts
If you do not see your storage account, use the Manually enter connection information option for the advanced configuration. You can also take a look at an in-depth article describing Azure Storage connector configuration, the link to which can be found in the Further reading section.
The last thing needed here will be the queue name and the check frequency. Once you are done, you can save your application. Congratulations—now events from a subscription can be read by your Logic App! Here, you can find the result of running it—as you can see, the event payload is available for further integrations by using the MessageText property of the JSON string:
Figure 1.50 - Azure Logic App run debugging
The debug view for Azure Logic Apps is really helpful when you are in a need of investigating an issue with your application. In this particular example, you can also see what are the available fields, which you can take control of. As there is no way to attach a debugger to Azure Logic Apps, use it frequently when developing your apps, so you can be sure that everything works exactly as you designed.
Now, your possibilities are almost limitless—any message generated by the resources in your subscription will be sent to a queue, which is read by Azure Logic Apps. As this service offers over 200 different connectors that can be used in your application, you can do whatever you want with the data aggregated—starting from parsing the JSON string to advanced integrations with Office 365, Azure Functions, or even SAP or IBM MQ. The most important thing is to leverage Azure capabilities in terms of flexibility and automation—as an administrator, you will be able to quickly develop a tool that you can use for better control over resources and subscriptions.
 United States
 Great Britain
 India
India
 Germany
 France
 Canada
 Russia
 Spain
Spain
 Brazil
 Australia
 Singapore
 Hungary
 Ukraine
 Luxembourg
 Estonia
 Lithuania
 South Korea
 Turkey
 Switzerland
 Colombia
 Taiwan
 Chile
Chile
 Norway
 Ecuador
 Indonesia
 New Zealand
 Cyprus
 Denmark
 Finland
 Poland
 Malta
Malta
 Czechia
 Austria
 Sweden
 Italy
Italy
 Egypt
Egypt
 Belgium
 Portugal
 Slovenia
 Ireland
 Romania
 Greece
 Argentina
 Netherlands
 Bulgaria
 Latvia
 South Africa
 Malaysia
 Japan
Japan
 Slovakia
 Philippines
 Mexico
 Thailand


