At this point, you know how to place data inside your component through slots, but those slots were made for HTML DOM elements or Vue components. Sometimes, you need to pass data such as strings, arrays, Booleans, or even objects.
The whole application is like a puzzle, where each piece is a component. Communication between components is an important part of this. The possibility to pass data to a component is the first step when it comes to connecting the puzzle, while validating the data is the final step for connecting the pieces.
In this recipe, we will learn how to pass data to a component and validate the data that was passed to it.
Getting ready
The prerequisite for this recipe is Node.js 12+.
The Node.js global objects that are required for this recipe are as follows:
- @vue/cli
- @vue/cli-service-global
To complete this recipe, we will continue using the project from the Using slots and named slots to place data inside your components recipe.
How to do it...
Follow these instructions to pass data to the component and validate it:
- Open the MaterialCardBox.vue file inside the src/components folder.
- In the <script> part of the component, we will create a new property called props. This property receives the component's data, which can be used for visual manipulation, variables inside your code, or for a function that needs to be executed. In this property, we need to declare the name of the attribute, its type, if it's required, and the validation function. This function will be executed at runtime to validate whether the attribute that has been passed is a valid one:
<script>
export default {
  name: 'MaterialCardBox',
  inheritAttrs: false,
  props: {
    header: {
      type: String,
      required: false,
      default: '',
      validator: (v) => typeof v === 'string',
    },
    subHeader: {
      type: String,
      required: false,
      default: '',
      validator: (v) => typeof v === 'string',
    },
    mainText: {
      type: String,
      required: false,
      default: '',
      validator: (v) => typeof v === 'string',
    },
    showMedia: {
      type: Boolean,
      required: false,
      default: false,
      validator: (v) => typeof v === 'boolean',
    },
    imgSrc: {
      type: String,
      required: false,
      default: '',
      validator: (v) => typeof v === 'string',
    },
    showActions: {
      type: Boolean,
      required: false,
      default: false,
      validator: (v) => typeof v === 'boolean',
    },
    elevation: {
      type: Number,
      required: false,
      default: 2,
      validator: (v) => typeof v === 'number',
    },
  },
  computed: {},
};
</script>
- In the computed property, in the <script> part of the component, we need to create a set of visual manipulation rules that will be used to render the card. These rules are called showMediaContent, showActionsButtons, showHeader, and cardElevation. Each rule will check the received props and the $slots objects to check whether the relevant card part needs to be rendered:
computed: {
  showMediaContent() {
    return (this.$slots.media || this.imgSrc) && this.showMedia;
  },
  showActionsButtons() {
    return this.showActions && this.$slots.action;
  },
  showHeader() {
    return this.$slots.header || (this.header || this.subHeader);
  },
  showMainContent() {
    return this.$slots.default || this.mainText;
  },
  cardElevation() {
    return `elevation_${parseInt(this.elevation, 10)}`;
  },
},
- After adding the visual manipulation rules, we need to add the created rules to the <template> part of our component. They will affect the appearance and behavior of our card. For example, if no header slot has been defined but a header property has been defined, we'll show the fallback header. This header contains the data that was passed down via props:
<template>
  <div
    class="cardBox"
    :class="cardElevation"
  >
    <div
      v-if="showHeader"
      class="header"
    >
      <slot
        v-if="$slots.header"
        name="header"
      />
      <div v-else>
        <h1 class="cardHeader cardText">
          {{ header }}
        </h1>
        <h2 class="cardSubHeader cardText">
          {{ subHeader }}
        </h2>
      </div>
    </div>
    <div
      v-if="showMediaContent"
      class="media"
    >
      <slot
        v-if="$slots.media"
        name="media"
      />
      <img
        v-else
        :src="imgSrc"
      >
    </div>
    <div
      v-if="showMainContent"
      class="section cardText"
      :class="{
        noBottomPadding: $slots.action,
        halfPaddingTop: $slots.media,
      }"
    >
      <slot v-if="$slots.default" />
      <p
        v-else
        class="cardText"
      >
        {{ mainText }}
      </p>
    </div>
    <div
      v-if="showActionsButtons"
      class="action"
    >
      <slot
        v-if="$slots.action"
        name="action"
      />
    </div>
  </div>
</template>
- To run the server and see your component, you need to open a Terminal (macOS or Linux) or Command Prompt/PowerShell (Windows) and execute the following command:
> npm run serve
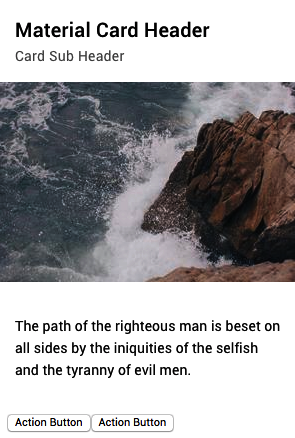
Here is the component rendered and running:

How it works...
Each Vue component is a JavaScript object that has a render function. This render function is called when it is time to render it in the HTML DOM. A single-file component is an abstraction of this object.
When we are declaring that our component has unique props that can be passed, it opens a tiny door for other components or JavaScript to place information inside our component. We are then able to use those values inside our component to render data, do some calculations, or make visual rules.
In our case, using the single-file component, we are passing those rules as HTML attributes because vue-template-compiler will take those attributes and transform them into JavaScript objects.
When those values are passed to our component, Vue checks whether the passed attribute matches the correct type, and then we execute our validation function on top of each value to see whether it matches what we'd expect.
Once all of this is done, the component's life cycle continues, and we can render our component.
See also
- You can find more information about props at https://v3.vuejs.org/guide/component-props.html.
- You can find more information about vue-template-compiler at https://vue-loader.vuejs.org/guide/.


