There comes a time in nearly every research project I undertake where I need to revert my system, and I usually forget to take a snapshot of a clean virtual machine build. The following instructions will help you to take a snapshot of each of the Ubuntu Desktop virtual machines we configured earlier in this chapter. That way we have a restore point if we need it.
Taking a snapshot of the virtual machines
Getting ready
If the VirtualBox application is closed, open it and wait for the Oracle VM VirtualBox Manager window to appear. Once you have that window open on your desktop, you are ready to proceed.
How to do it...
To take a snapshot of each virtual machine, perform the steps below.
- On the left-hand side of the Oracle VM VirtualBox Manager window, click and highlight the virtual machine you want to snapshot. Then, click on the Settings icon in the top menu area of that window.
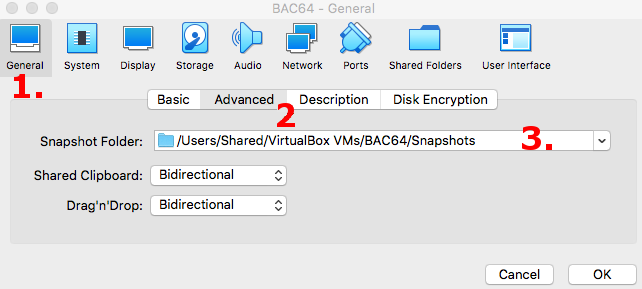
- In the Settings window, click on General | Advanced.
- Under the Snapshot Folder: drop-down, make sure the default location is sufficient for your storage restrictions and requirements. If it's not, change the setting to a location that's appropriate for your needs and click OK:

- Start the virtual machine for which you want to create a snapshot.
- Once the virtual machine is running, bring it into focus. Then, from the top toolbar menu items, click and select Machine | Take Snapshot.
- In the Snapshot window, provide a name for the snapshot and a description, and then click OK. Make sure the name and description clearly communicate this is a fresh, up-to-date state for the virtual machine.
- Repeat these steps for the other Ubuntu Desktop virtual machine.
How it works...
By working through this recipe, we configured the location where VirtualBox will store snapshots of virtual machines, we saved a snapshot of the 32-bit and 64-bit Ubuntu Desktop virtual machines we configured earlier in this chapter, and we gave each a name and description that will indicate that the snapshot is a fresh configuration of each virtual machine.
There's more...
Using the snapshot feature within VirtualBox allows you to save and restore various states of the virtual machines along the way. If you always want to have a fresh, up-to-date virtual machine, you can continually take snapshots after every time you perform an update or upgrade the operating system within the virtual machine. Snapshots are a great way to keep a backup of a virtual machine as well, in the event an upgrade to the operating system causes a significant error that makes it more time-consuming to recover. From a binary analysis perspective, we may encounter seriously malicious binaries from time to time, and it's always good to have a working virtual machine state to return to. As a matter of fact, and not that I want to give away the rest of this book, but we may see a destructive binary in later chapters and will need a snapshot to which we can revert.
See also
For more information on VirtualBox or for a user guide for some of the more advanced features that weren't covered in this chapter, open a browser and navigate to https://www.virtualbox.org/wiki/Documentation.
Now that we have a clean slate to which we can return if needed, we can move on to the next chapter. In Chapter 2, 32-Bit Assembly on Linux and the ELF Specification, and Chapter 3, 64-Bit Assembly on Linux and the ELF Specification, we will work through recipes that will help us to understand, or learn for the first time, the finer details of 32-bit and 64-bit Intel assembly as it pertains to Linux and to study the ELF binary specification in detail. If you're already an expert on 32-bit and 64-bit Intel assembly on Linux and with the ELF specification, please feel free to move on to Chapter 4, Creating a Binary Analysis Methodology. However, I encourage you to read through Chapter 2, 32-Bit Assembly on Linux and the ELF Specification, and Chapter 3, 64-Bit Assembly on Linux and the ELF Specification, as I intend to cover as much practical information on those topics as possible while skipping some of the information that doesn't pertain to the examples presented in this book.


