Installing Alfresco on Windows
There are two methods to install Alfresco on a Windows platform.
Using the Alfresco packaged installer
Deploying the Tomcat or JBoss bundle
The first approach will install Alfresco in Windows along with JDK (optionally), create the Alfresco database automatically, and can configure and start Alfresco as a Windows Service. It will inject the relevant shortcuts in your Start Menu just like any other application installed in your machine. You can start/stop the server using the Start Menu option or a Windows Service. This is a fully-automated and smooth approach to install Alfresco.
The second approach is more manual. You will have the downloaded Tomcat or JBoss bundle of Alfresco. Manually configure a few things, and you are ready to go. However, you cannot have Alfresco as a service in Windows very easily, in this case, and won't have the Start Menu shortcuts ready for you. But in this case, as a developer and explorer of Alfresco, you can have a number of Alfresco bundles deployed and running on your machine.
In this book, we will demonstrate the second option, as the first one is very straightforward and you will find lots of documentation around that. We will also use the Tomcat bundle of Alfresco and not the JBoss one.
Getting ready
1. Download the Alfresco community edition from the Alfresco download site. http://wiki.alfresco.com/wiki/Community_Edition_file_list_3.3
2. In Individual Components and Custom Installs section, download the
Alfresco-community-tomcat-3.3.zipfile. Or you can directly use the URL http://process.alfresco.com/ccdl/?file=release/community/build-2765/alfresco-community-tomcat-3.3.zip and use standard download.3. You will need the following prerequisite programs already installed on your machine—
WinZIP or WinRAR
JDK 1.6.x
MySQL database server
4. Once these programs are installed and after downloading the Alfresco Tomcat bundle, we are ready to go.
How to do it...
Carry out the following steps to install the Alfresco Tomcat bundle on your machine.
1. Download the ZIP archive from the preceding URL.
2. Unzip the archive in a folder in your system. Say the folder you have unzipped the archive into is
c:\Alfresco. These are the root level files in the unzipped folder.
3. You need to set the
JAVA_HOMEenvironment variable to make the Tomcat server understand where your JDK or JRE is installed.Open System Properties by right-clicking on the
My Computericon on your desktop.Open the Advanced tab.
Click on Environment Variables.
Check whether the JAVA_HOME environment variable is already set or not.
i. If not, create a new System Variable named
JAVA_HOMEand put the value of the variable to the directory where JDK or JRE is installed.ii. For example, if your JDK is installed in the
c:\Program Files\Java\jdk1.6.0_14directory, the value ofJAVA_HOMEshould be the same.If the
JAVA_HOMEvariable is already defined, validate whether it contains the correct value.
4. You also need to check whether Java runtimes are properly added in your windows
PATH.a. Open System Properties by right-clicking on the My Computer icon on your desktop.
b. Open the Advanced tab.
c. Click on Environment Variables.
iii. Open the PATH environment variable
iv. Check whether it is having the JDK binary folder value inserted into it. The value inserted should be
%JAVA_HOME%\bin
5. Assuming that you have properly created a database named
Alfrescoin your local MySQL server, and created a user with the nameAlfresco(as in the previous recipe), you can start your Tomcat server now. Run thealf_start.batfile and the Tomcat server should have started.
How it works...
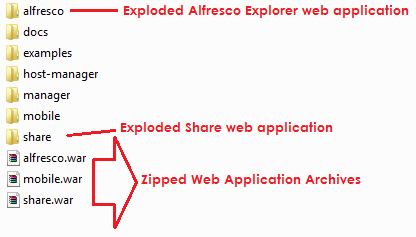
The first time the AlfrescoTomcat server starts, the web application files (.WAR files) are exploded in the tomcat\webapps folder.

Similarly, the deployer also populates the MySQL database, and creates the required database objects (tables, and so on) into it.
Alfresco uses some third-party tools and applications for several purposes. When the Tomcat server starts, Alfresco connects with these applications and performs the necessary actions later on, as required.
Open Office is used by Alfresco in order to convert or transform documents into the portable document format (PDF).
ImageMagick converter is used to generate thumbnail images of documents.
PDF2SWF tool is used to convert PDF documents into flash movies.
ImageMagick and PDF2SWF binaries come with the downloaded Tomcat bundle of Alfresco, thus you do not have to install and configure these separately. However, you may have to install Open Office in your machine separately.
There's more...
Sometimes you may need to configure the JAVA_OPTS variable as well, in case you are facing any memory issues while running the application—memory issues like Java Heap Space, Perm Gen error, and so on.
For setting up JAVA_OPTS, you have to follow the same procedure as in setting up the JAVA_HOME variable in your environment variable list.
There is no fixed value for JAVA_OPTS, it depends on your application load. However, in a standard developer machine, it should be something like
-Xms256m -Xmx1024m -XX:MaxPermSize=512m
in a machine having 2 to 4 GB of physical memory.


