Search icon CANCEL
Subscription
0
Cart icon
Your Cart (0 item)
Close icon
You have no products in your basket yet
Save more on your purchases! discount-offer-chevron-icon
Savings automatically calculated. No voucher code required.
Arrow left icon
Explore Products
Best Sellers
New Releases
Books
Videos
Audiobooks
Learning Hub
Free Learning
Arrow right icon
Arrow up icon
GO TO TOP
3D Environment Design with Blender

You're reading from   3D Environment Design with Blender Enhance your modeling, texturing, and lighting skills to create realistic 3D scenes

Arrow left icon
Product type Paperback
Published in Jan 2023
Publisher Packt
ISBN-13 9781803235851
Length 344 pages
Edition 1st Edition
Tools
Concepts
Arrow right icon
Authors (2):
Arrow left icon
Abdelilah Hamdani Abdelilah Hamdani
Author Profile Icon Abdelilah Hamdani
Abdelilah Hamdani
Carlos Barreto Carlos Barreto
Author Profile Icon Carlos Barreto
Carlos Barreto
Arrow right icon
View More author details
Toc

Table of Contents (20) Chapters Close

Preface 1. Part 1: Turn a Real Reference into a Realistic 3D Scene in Blender
2. Chapter 1: Most Common Modeling Mistakes That Prevent You from Achieving Photorealism FREE CHAPTER 3. Chapter 2: The Basics of Realistic Texturing in Blender 4. Chapter 3: Efficient Unwrapping and Texturing in Blender 5. Chapter 4: Creating Realistic Natural Plants in Blender 6. Chapter 5: Achieve Photorealistic Lighting in Your Environment with Blender 7. Part 2: Creating Realistic Landscapes in Blender
8. Chapter 6: Creating Realistic Landscapes in Blender 9. Chapter 7: Creating and Animating Realistic, Natural-Looking Water 10. Chapter 8: Creating Procedural Mud Material 11. Chapter 9: Texturing the Landscape with Mud Material 12. Part 3: Creating Natural Assets
13. Chapter 10: Creating Natural Assets: Rock 14. Chapter 11: Creating Realistic Flowers in Blender 15. Part 4: Rendering Epic Landscape Shots
16. Chapter 12: Using Particle System to Scatter Objects in Blender 17. Chapter 13: Finalizing the Landscape Scene – Lighting, Rendering, and Compositing 18. Index 19. Other Books You May Enjoy

The importance of using the bevel modifier when modeling

One of the fatal mistakes that most 3D designers commit that prevent them from achieving photorealistic results is modeling without using the bevel modifier. Let’s see a quick example in Blender to emphasize this theory.

Bevel modifier

The bevel modifier gives you the ability to bevel the edges of the mesh it is applied to. Basically, it adds edge lines in between the mesh corners (see Figure 1.17). It might seem like a simple step, but the effect the bevel modifier has is enormous for achieving photorealism; we’ll see that later.
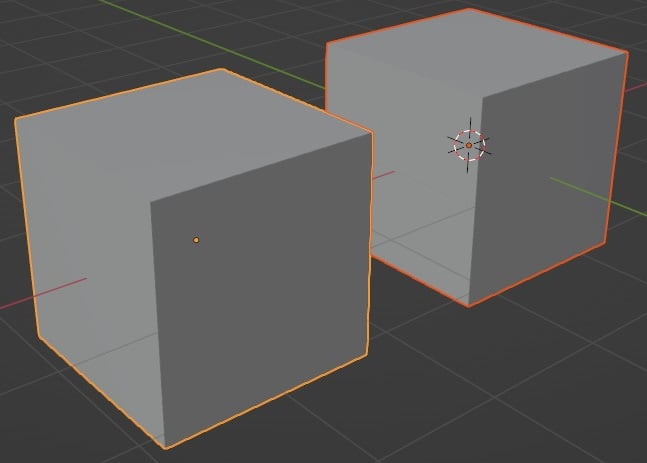
Figure 1.19 – Creation of two cubes

Figure 1.19 – Creation of two cubes

For our example, let’s use two cubes, one with the bevel modifier applied to it (red cube) and another without any beveling (blue cube). To apply beveling to the red cube, let’s perform the following steps:

  1. Go to Modifier Properties (wrench icon), select Add Modifier, and choose the Bevel modifier:
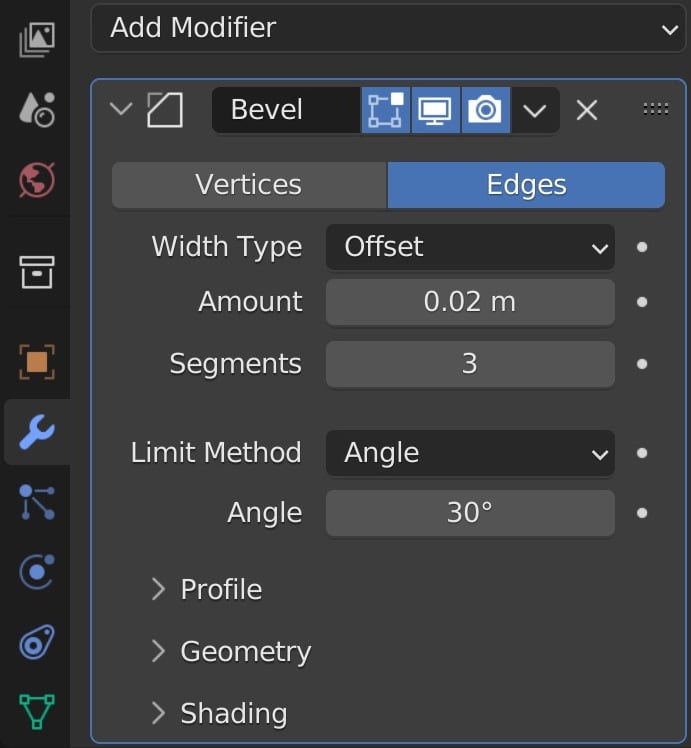
Figure 1.20 – Bevel modifier settings in Blender

Figure 1.20 – Bevel modifier settings in Blender

  1. Set Amount to 0.02 m; this represents how large we’re going to be affecting the corners of our cube object. Basically, the one corner edge we got by default will be divided into two edges, and the distance between the two edges is the bevel amount.
  2. Set Segments to 3; this indicates how many face loops there are going to be inside the bevel.
  3. Select the beveled cube, then right-click and choose Smooth.
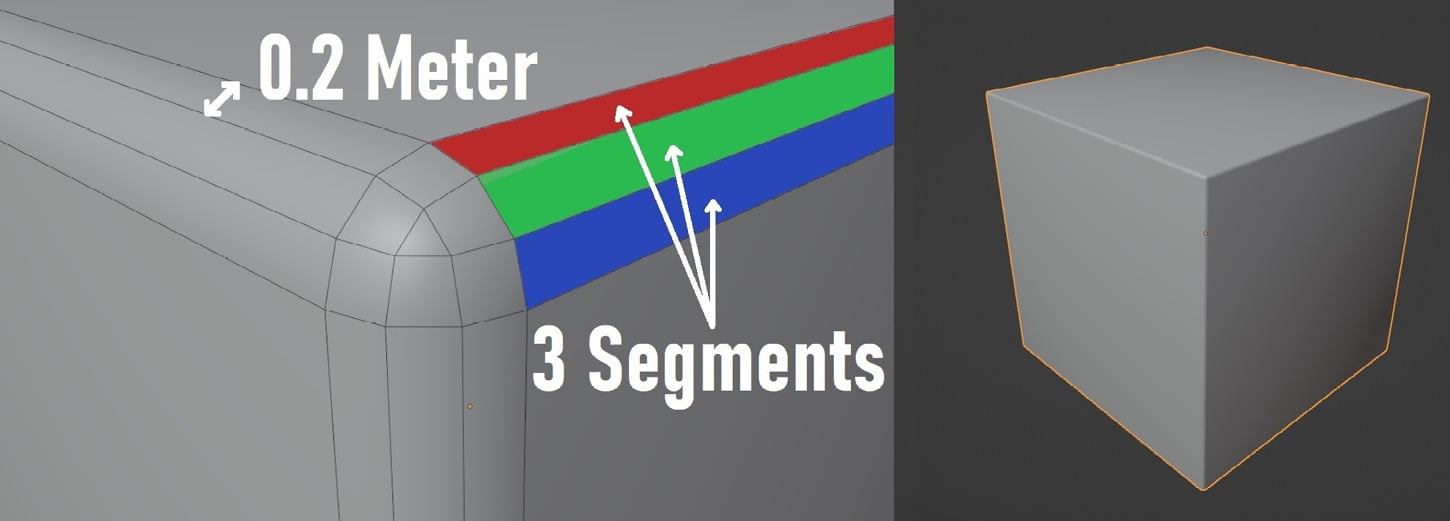
Figure 1.21 – Three cubes demonstrating the Amount, Segments, and Smooth bevel settings

Figure 1.21 – Three cubes demonstrating the Amount, Segments, and Smooth bevel settings

The other cube will remain as default: no beveling will be applied.

When you add a source of light to the scene, you will see a big difference between the two cubes:
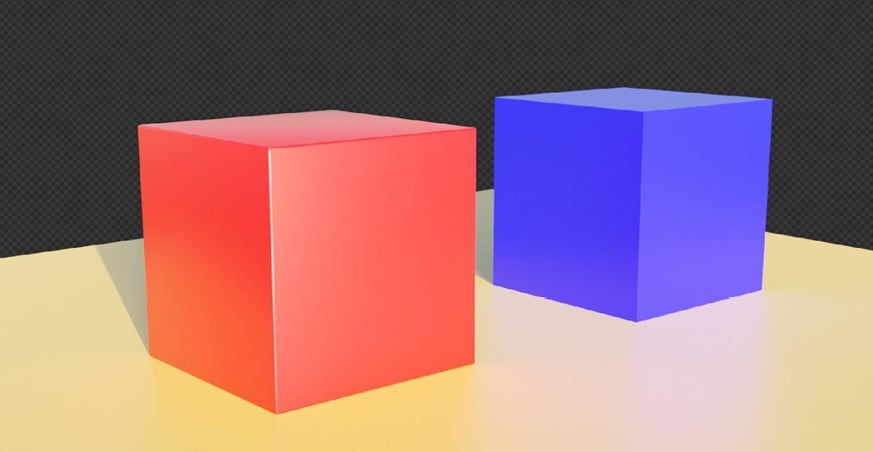
Figure 1.22 – Final render of the beveled and unbeveled cubes

Figure 1.22 – Final render of the beveled and unbeveled cubes

The red beveled cube reflects light on its corners, which makes it more realistic. On the other hand, the blue cube looks fake right on the spot: its edges are 100% sharp and non-realistic.

In general, 3D software programs like Blender make everything perfect by default. When creating a cube, for example, it will come with these sharp 90-degree corners, something that doesn’t exist in real life. In nature, you’ll never find an object that has completely sharp edges. Even if you zoom in on a sharp knife (zoom really close to its edge), you’ll find some sort of beveling.

I’ve heard a saying that says, “Imperfection is the CGI perfection,” which means that in order to make objects photorealistic, we have to break the perfection that comes with CGI, and one of the first steps to break it is to always apply the bevel modifier.

Now with the measurements we set earlier and the help of the fSpy, we can set the right scale.

You have been reading a chapter from
3D Environment Design with Blender
Published in: Jan 2023
Publisher: Packt
ISBN-13: 9781803235851
Register for a free Packt account to unlock a world of extra content!
A free Packt account unlocks extra newsletters, articles, discounted offers, and much more. Start advancing your knowledge today.
Unlock this book and the full library FREE for 7 days
Get unlimited access to 7000+ expert-authored eBooks and videos courses covering every tech area you can think of
Renews at $19.99/month. Cancel anytime
Banner background image