OpenLDAP user authentication and JIT user provisioning
Although a lot of people use SAML in combination with Azure Active Directory, that isn’t always the case. There are loads of different methods of running your user authentication.
One of those methods is using LDAP instead of SAML with, for example, an OpenLDAP server. OpenLDAP provides us with a solid open source implementation to set up a user database with LDAP. The great thing about this is that JIT user provisioning doesn’t just work with SAML, but also with LDAP, meaning we can apply JIT user provisioning here as well.
Getting ready
To get things going, we are going to need an OpenLDAP server set up and ready to go. It is recommended to use your own OpenLDAP environment. There are loads of guides available online to do a solid OpenLDAP implementation as well as a quick start guide for the latest version on the official website: https://www.openldap.org/
Another way to go is spin up a test OpenLDAP environment with Docker. We can use the following command:
docker run -p 389:389 -p 636:636 --name openldap-server --detach oicts/openldap:1.0.0
docker run -p 8081:80 -p 4443:443 --name phpldapadmin --hostname phpldapadmin --link openldap-server:ldap-host --env PHPLDAPADMIN_LDAP_HOSTS=ldap-host --detach osixia/phpldapadmin:0.9.0
Please use this for testing only, since the preceding code might not be using the latest versions anymore.
How to do it…
Once OpenLDAP is set up, we can start to create some users and groups in our new OpenLDAP environment. Let’s get started on that first:
- We will open the OpenLDAP GUI by navigating to the URL in our browser:
https://<ip_address_of_server>:4443
- After logging in, let’s create some new users. First, click on Login on the left-hand side of the window. The default username and password are as follows:
Login DN: cn=admin,dc=example,dc=org
Password: admin
- You should see that we have already created some groups and users for you if you are using our Docker images, as you can see in the following screenshot:
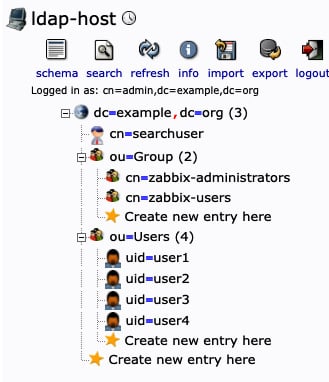
Figure 2.42 – OpenLDAP server groups and users
If you are using your own OpenLDAP environment, make sure to have at least one group and one user for testing.
- Let’s use these usernames and groups to set up LDAP authentication with JIT user provisioning.
- Move on to the Zabbix frontend and navigate to Users | Users. First, we’ll give ourselves access at any time even if the default authentication method will be switched to LDAP. Switch the Admin user’s default authentication method to internal by adding them to the Internal group.
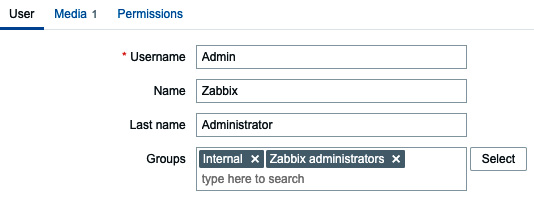
Figure 2.43 – Zabbix Admin user settings
- Click on Update and it should then look like the following screenshot.

Figure 2.44 – Zabbix Admin user with Internal Frontend access
- Then we will go to Users | Authentication and then LDAP settings. Set up the default authentication method to LDAP and the deprovisioned users group as follows.

Figure 2.45 – Zabbix Default authentication method
- Next, we’ll click on the LDAP settings tab. This is where we can configure our LDAP server and JIT user provisioning. Let’s start by enabling the ones we would like to use.

Figure 2.46 – Zabbix Default authentication method
When using just LDAP, we will have to create our users manually. By enabling JIT, users will be created and granted the correct permissions automatically.
- It’s also possible to add multiple LDAP servers in Zabbix now. Let’s add our OpenLDAP server by clicking on Add at Servers.
- Then, fill in the following.
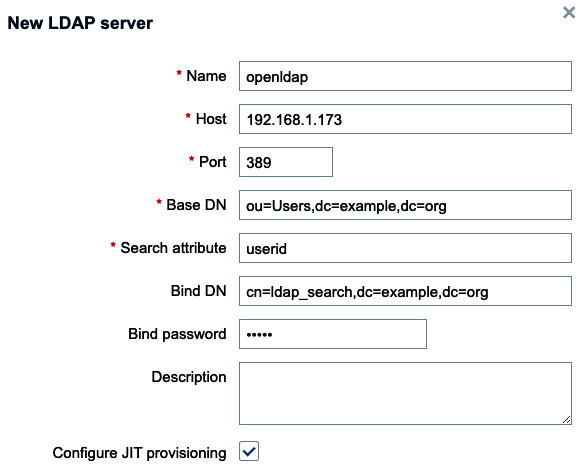
Figure 2.47 – Zabbix LDAP authentication setup
The default Bind password value is password.
- If we want, we can also enable JIT provisioning. Enable it and fill in the following.
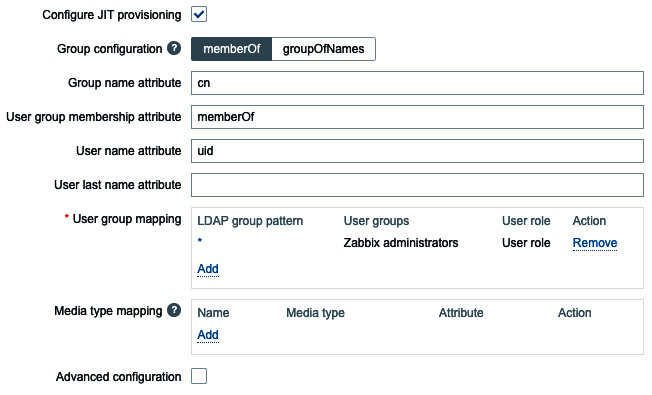
Figure 2.48 – Zabbix LDAP authentication setup with JIT
- Now, sign out of the currently logged-in account by clicking the Sign out button in the lower left corner of the sidebar.
- We should now be able to log in with the
user1LDAP user. The password ispassword.
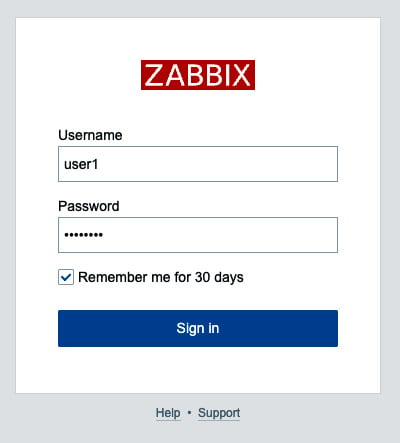
Figure 2.49 – Zabbix login window for user1
- When we log in for the first time, the user will be created with the correct permissions as defined in the JIT user provisioning step. If logged in as a Zabbix super admin, we can see this under Users | Users.

Figure 2.50 – Zabbix LDAP provisioned user
How it works…
As you can see, we can use Zabbix in combination with an LDAP server to make password management easier as a whole. There are two options for us to choose from: using LDAP with or without JIT user provisioning.
When we use Zabbix in combination with an LDAP server, but choose to not use JIT user provisioning, Zabbix will communicate with the LDAP server just to do the password authentication upon pressing the Sign in button.

Figure 2.51 – Zabbix LDAP authentication diagram
However, since Zabbix 6.4 it is also possible to enable JIT user provisioning. This new feature allows us to also assign Zabbix user groups and roles in line with the user groups on our LDAP server. As such, the whole process with JIT user provisioning included looks something like the following:
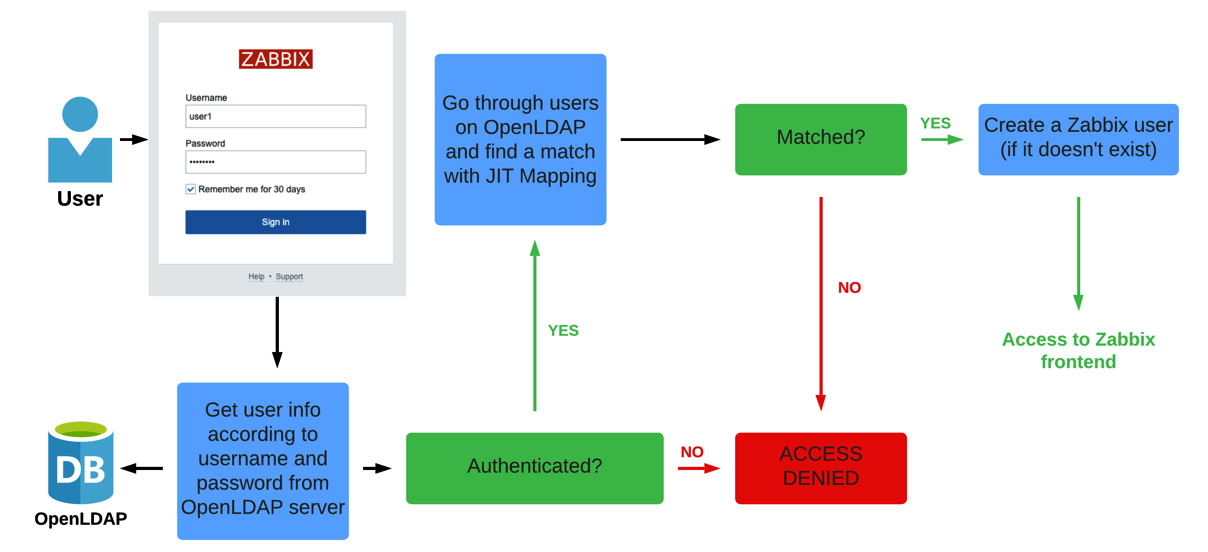
Figure 2.52 – Zabbix LDAP JIT authentication diagram


