Setting up the project baseline
Gathering and studying the system requirements for the development environment for the proposed project is essential. Some of these requirements include the correct versions of the installers and libraries, the appropriate servers, and the inclusion of other essential dependencies. We have to perform various setups before kicking off our projects.
Installing the latest Python version
All our applications will run on the Python 11 environment for faster performance. The updated Python installer for all operating systems is available at https://www.python.org/downloads/.
Installing the Visual Studio (VS) Code editor
The Django framework has a django-admin command that generates a project structure, but Flask does not have that. We can use a terminal console or a tool such as the Visual Studio (VS) Code editor that can help developers create a Flask project. The VS Code installer is available at https://code.visualstudio.com/download.
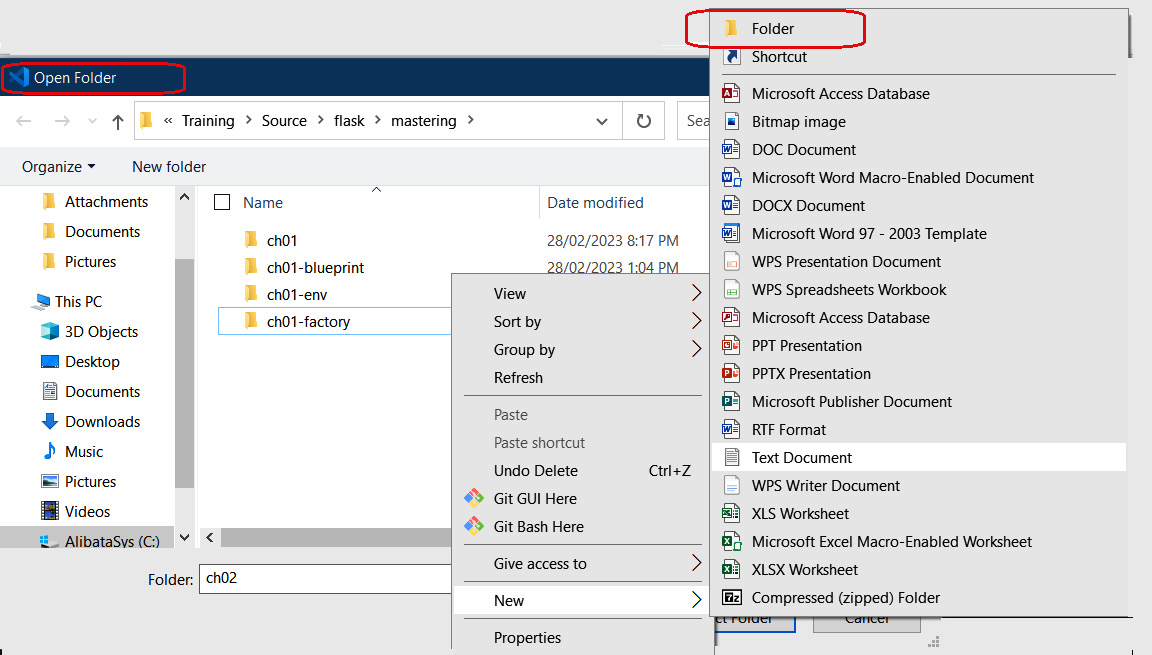
After installing the VS Code editor, we can create a filesystem folder through it and start a Flask project. To create the folder, we should go to the Open Folder option under File or use the Ctrl + K + O shortcut to open the Open Folder mini-window. Figure 1.1 shows a sample process of creating a Flask project using the editor:

Figure 1.1 – Creating a Flask project folder using the VS Code editor
Creating the virtual environment
Another aspect of developing a Flask project is having a repository called a virtual environment that can hold its libraries. It is a mechanism or a tool that can manage all dependencies of a project by isolating these dependencies from the global repository and other project dependencies. The following are the advantages of using this tool in developing Flask-based applications:
- It can avoid broken module versions and collisions with other existing similar global repository libraries.
- It can help build a dependency tree for the project.
- It can help ease the deployment of applications with libraries to both physical and cloud-based servers.
A Python extension named virtualenv is required to set up these virtual environments. To install the extension, run the following command in the terminal:
pip install virtualenv
After this installation, we need to run python virtualenv -m ch01-01 to create our first virtual environment for our Flask project. Figure 1.2 shows a snapshot of creating our ch01-env repository:

Figure 1.2 – Creating a virtual environment
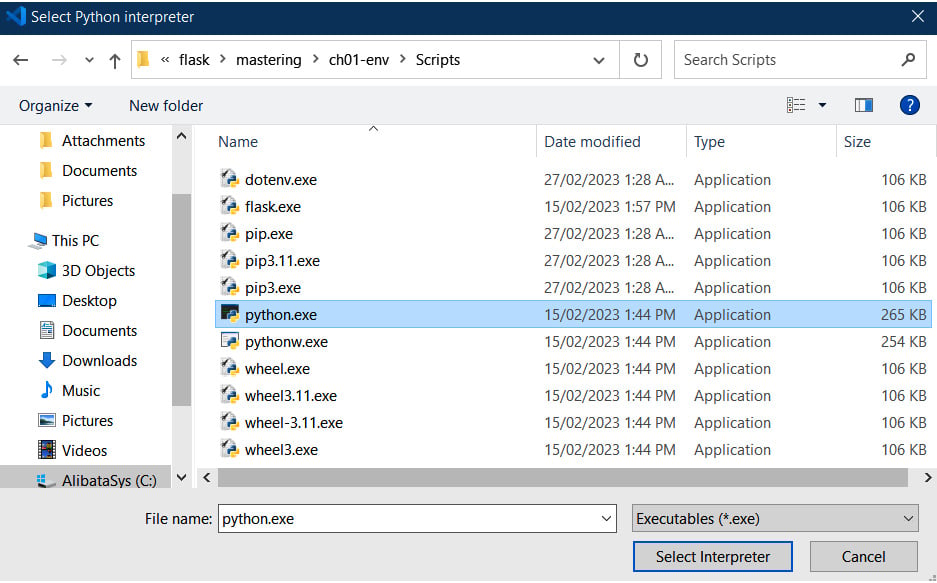
The next step is to open the project and link it to the virtual environment created for it. Pressing Ctrl + Shift + P in VS Code will open the Command Palette area. Here, we can search for Python: Select Interpreter. Clicking this option will lead you to the Enter interpreter path… menu command and eventually to the Find… option. This Find… option will help you locate the virtual environment’s Python.exe file in the /Scripts folder. Figure 1.3 shows a snapshot of locating the Python interpreter in the repository’s /Scripts folder:

Figure 1.3 – Locating the Python interpreter of the virtual environment
Afterward, the virtual environment must be activated for the project to utilize it. You must run /Scripts/activate.bat in Windows or /bin/activate in Linux through the editor’s internal console. Upon activation, the terminal should show the name of the virtual environment in its prompt (for example, (ch01-env) C:\).
Installing the Flask 3.x libraries
The integrated terminal of VS Code will appear after right-clicking the explorer portion of the editor, which leads to the Open in Integrated Terminal option. Once it appears on the lower right-hand side, activate the virtual environment first, then install all Flask dependencies into the repository by running pip install flask.
Once all the requirements are in place, we are ready to create our baseline application.
Creating the Flask project
The first component that must be implemented in the main project folder (that is, ch01) is the application file, which can be main.py or sometimes app.py. This component will become the top-level module the Flask will recognize when the server starts. Here is the baseline application file for our Online Personal Counseling System prototype:
from flask import Flask
app = Flask(__name__)
@app.route('/', methods = ['GET'])
def index():
    return "This is an online … counseling system (OPCS)"
if __name__ == '__main__':
    app.run(debug=True)
Let’s dissect and scrutinize the essential parts of the given main.py file:
- An imported
Flaskclass from theflaskpackage plays a considerable role in building the application. This class provides all the utilities that implement the Werkzeug specifications, which include features such as managing the requests and the responses of every route, redirecting pages, handling form data, accessing and creating cookies, parsing custom and built-in headers, and even providing debuggers for the development environment. In other words, theFlaskinstance is the main element in building a Web Server Gateway Interface (WSGI)-compliant application.
Werkzeug
Werkzeug is a WSGI-based library or module that provides Flask with the necessary utilities, including a built-in server, for running WSGI-based applications.
- The imported
Flaskinstance must be instantiated once per application. The__name__argument must be passed to its constructor to provideFlaskwith a reference to the main module without explicitly setting its actual package. Its purpose is to provide Flask with the reach it needs in providing the utilities across the application and to register the components of the project to the framework. - The
ifstatement tells the Python interpreter to run Werkzeug’s built-in development server if the module ismain.py. This line validates themain.pymodule as the top-level module of the project. app.run()calls and starts the built-in development server of Werkzeug. Setting itsdebugparameter toTruesets development or debug mode and enables Werkzeug’s debugger tool and automatic reloading. Another way is to create a configuration file that will setFLASK_DEBUGtoTrue. We can also set development mode by runningmain.pyusing theflask runcommand with the--debugoption. Other configuration approaches before Flask 3.0, such as usingFLASK_ENV, are already deprecated.
Running the python main.py command on the VS Code terminal will start the built-in development server and run our application. A server log will be displayed on the console with details that include the development mode, the debugger ID, and the URL address. The default port is 5000, while the host is localhost.
Now, it is time to explore the view functions of our Flask application. These are the components that manage the incoming requests and outgoing responses.


