For Mac users
Mac users should visit the LÖVE wiki (https://www.love2d.org/wiki/Getting_Started) page for instructions on how to install LÖVE and run a packaged game.
Choosing your editor
In choosing a suitable editor, you can use any text editor that supports the Lua programming language; we recommend Notepad++; it is free and has a clean and non-confusing GUI.
Running a LÖVE game
First of all, we assume we do not have any LÖVE game yet. OK, then let's just write a simple "Hello World!" program and run it with LÖVE. Open up a text editor and write the following Lua code:
--create a display

function love.draw()
--display a text on a 800 by 600 screen in the positions x= 400, and --y=300
   love.graphics.print('hello world!', 400, 300)

end
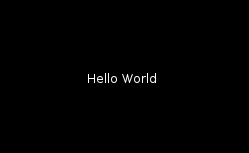
Now save this code as main.lua. Open a folder for your game project, put your main.lua file inside the folder, and compress the content of the folder. Change the .zip extension to .love. You'll notice a change in the icon of the compressed file; it changes to a LÖVE logo. Now that we've done all that, we can run our game. If you follow the instructions correctly, you should see a screen similar to the following screenshot:

If you do not compress the file properly, you will get the following blue screen displaying error information:
.jpg)
Note that it is the content of your game folder that should be compressed and not the folder itself, and make sure the main.lua file is at the top level.
Basic structure of LÖVE
There are three basic functions that make up a LÖVE game that are essential in most of the games you will be designing with LÖVE. For now, the following are the basics to make a small game:
love.load(): This preloads all the necessary assets we need to make our game.love.update(dt): This is where we do most of our maths, where we deal with events; it is called before a frame is drawn.dtis the time it takes to draw a frame (in seconds).love.draw(): This draws all that we want to display on the screen.
Examples
The basic structure of the game is done as you can see in the following code:
--load our assets
function love.load()
   --load all assets here
end


--update event
function love.update(dt)
--do the maths
end


--draw display
function love.draw()
--describe how you want/what to draw.
end
That's just it, well... maybe! So let's play with these chunks one more time.
Now let's edit main.lua to enable loading sample assets that we want to use within the game:
function love.load()

   local myfont = love.graphics.newFont(45)

   love.graphics.setFont(myfont)

   love.graphics.setColor(0,0,0,225)

   love.graphics.setBackgroundColor(255,153,0)
end


function love.update()


end

function love.draw()

   love.graphics.print('Hello World!', 200, 200)

end
Conf.lua
Before you go on and start coding your game, you need to give your video game some specs such as window width, window height, and window title. So set up a new file named
conf.lua; inside it you can then create your game specs as shown in the following code snippet:
function love.conf(w)

w.screen.width = 1024

w.screen.height = 768

w.screen.title = "Goofy's Adventure"

end
You can manipulate the figures and titles any way and also change that w to whatever variable you want.
The preceding code does the following:
Loads our font
Sets the font color
Sets the background color
Draws text on the screen
Configures the screen size
Basically we are using the
love.graphics module; it can be used to draw (in the real sense) texts, images, and any drawable object in the scene. In the previous code snippets, we defined our fonts with the love.graphics.newFont(45) that formats our text by declaring the size of the font as 45. setFont() loads the font we defined as myfont, setColor() colors the text in the RGB format, and setBackgroundColor() sets the background.
Then we printed text using the love.graphics.print('text', x, y) function in the draw function with three parameters parsed in it: the text and the x and y coordinates. We are not going to do anything in the
love.update() function yet, because we are not dealing with scene events.
So let's load our game as a .love file and see what it displays:
.jpg)


