Creating and editing 2D geometric shapes
Inkscape is a full-featured software package that provides us with a powerful and flexible set of tools. These tools can build beautiful drawings out of fundamental geometric objects (primitives), such as straight or curved lines, simple or complex polygons, or curved shapes.
Getting ready
Before we start drawing, let's take a quick look at the user interface and the facilities it provides:
The Commands bar: Normally displayed under the Menu, it contains buttons of common application commands, such as file opening and saving, history browsing (undo and redo), zooming, and some common operations related to objects and groups.

The Snapping bar: Snapping facilitates the placement of objects in the Canvas and is often a valuable timesaver, although in some cases it might get in the way, such as when you need the freedom to position an object in a particular spot. Using this tool bar, you can enable or disable snapping to the page border, grids, and other objects, in order to get the exact behaviour you need.

The Canvas: This is the large central area where all the drawing is done. You will find rulers on the top and on the left of the Canvas, which provide information on scaling, dimensioning, and positioning.
The Toolbox: Normally found on the left of the Canvas, it contains all the buttons related to drawing tools used to create primitives.

The Tools Controls bar: The content of this bar changes according to the tool you have selected in the Toolbox, exposing its specific functionality. In the following picture we can see what the Tool Controls bar would show us if we were using the Selector tool.

The Palette: This tool contains a swatch line with all the colors associated with the currently chosen palette.

The Status bar: This bar is normally located beneath the Canvas and provides a wealth of miscellaneous information, such as the style of the currently selected object, the name of the layer we are editing, some help messages on the function of the selected tool, and the current mouse pointer coordinates.

How to do it...
We will begin with a couple of four sided polygons that we are all very familiar with:
Rectangles and squares
1. Select the Rectangle tool
 (F4 or R).
2. Click and drag on the Canvas holding the Ctrl key to create a golden ratio rectangle. While dragging with the mouse, you will see more information on the shape you are creating in the help message area of the Status bar.
3. Let go of the mouse button when you are happy with the dimensions of your rectangle. You will now notice two little white square handles and one circle handle at the corners. The Status bar will provide some useful tips if you hover the mouse pointer over them.
4. Click on the circle handle while holding the Ctrl key and drag downwards to make the corners evenly rounded.
5. Move one of the square handles to resize the rectangle without changing the corner's radii, keeping the horizontal and vertical radii the same. Notice that if you reduce the width or height more than the corner radius, it will change to accommodate the lack of space.
6. Switch to the Selector tool
 (Space or F1 or S). Several arrow shaped handles will now be visible on the sides of the rectangle.
7. Grab the right-hand middle arrow handle and make the rectangle narrower. Notice how the horizontal corner radius now scales proportionally, adapting to change in width, so the horizontal and vertical radii are no longer the same.
8. Select the Rectangle tool (Space or F4 or R) again and click the Make corners sharp button on the rectangle toolbar or click on one of the circular handles while holding Shift. This option cancels all the changes made to round the corners. You can also specify precisely the values of the horizontal (Rx) and vertical (Ry) radii in the rectangle toolbar.
Ellipses, circles, and arcs
1. Select the Ellipse tool
 (F5 or E).
2. Click and drag on the canvas to create an ellipse. Notice two little white square handles and one circle handle. As we did before, hover over the handles with your mouse pointer and read the tips that appear in the Status bar.
3. Move one of the square handles to resize the ellipse.
4. Click on the circle handle and drag to the right and down to delimit a circular segment. Notice there are now two circle handles that control the span of the arc.
5. Continue dragging one of the circle handles around the ellipse always keeping it outside of the ellipse area to create a "pacman" like shape.
6. Click on one of the circle handles and drag inside the ellipse area to change the segment into a circular arc. Drag the cursor inside and outside the ellipse area to see how the shape changes.
7. Click on the Make the shape a whole ellipse, not arc or segment
 button on the ellipse toolbar to get the full ellipse shape back.
8. Create a circle by holding Ctrl while dragging with the selected Ellipse tool.
9. Create another ellipse by holding the Shift key while dragging. This time the mouse click determines the position of the ellipse center, instead of the top-left corner of the bounding box as before.
10. Create another ellipse by holding the Alt key while dragging. This time the first click and the release point will be on the ellipse edge and not the object bounding box.
11. Create a circle by determining its center with the first click and its radius upon release by holding Shift + Ctrl + Alt while dragging.
Note
In Linux and Mac OS X, the Alt key may not be immediately usable in Inkscape because it might be already assigned to a system shortcut. Refer to the Inkscape FAQ for a solution:
Polygons and stars:
1. Select the Star tool
 (Shift + F9 or *).
2. Click and drag towards the top while holding Ctrl to create an "upright" star.
3. Hover over the star handles and read the Status bar tips to see which one is the tip radius and which one is the base radius. Drag the base radius outwards evenly by holding Ctrl so it's longer than the tip radius.
4. Increase the number of corners to 8 by editing the Corners: option on the Star toolbar.
5. Drag the tip radius while holding Shift to round it. The Rounded: number on the toolbar will be negative.
6. Drag the base radius while holding Shift to round it in the other direction. The Rounded: number on the toolbar will be positive.
7. Turn the star into a polygon by clicking on the Regular polygon
 button on the toolbar. Notice how the corners are still rounded.
8. Hover over the polygon tip radius handle and notice what the Status bar has to say about it. Then, drag the handle while holding the Alt key to apply randomization to the position of the corners and create an irregular shape.
Spirals:
1. Select the Spiral tool
 (F9 or I).
2. Click and drag on the canvas to create an Archimedean spiral.
3. Hover over the spiral's inside and outside handles and read the Status bar tips.
4. Drag the inside handle to unwind it one turn, then drag the outside handle to create one more turn.
5. Drag the inside handle upwards while holding Alt to decrease the divergence and then downwards to increase it.
Here's what some of the preceding steps look like:

How it works...
As we have seen, Inkscape's 2D shape tools create special kinds of objects because they have additional editing parameters for their geometric qualities. By converting them to regular path objects by using the Object to Path  (Shift + Ctrl + C) option, these special parameters will be lost in the process. This is a tradeoff we will sometimes need to make in order to make use of some extensions and effects that can only be applied to regular paths.
There's more...
Now that we know how to create simple shapes, we can advance to more interesting objects.
Creating complex shapes in seconds with Star tool
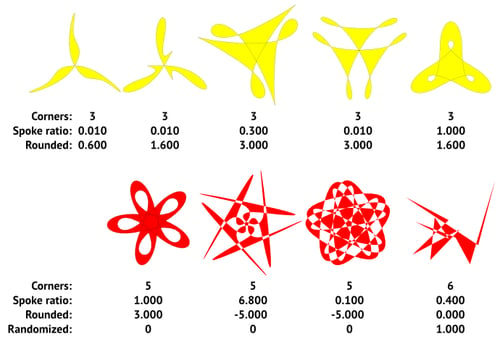
Moving the base radius handle away from its usual position can create wildly different shapes because tips and star inner corners form different relations, especially when combined with rounded corners. Try to recreate the following examples (you can find them in the StarsComplex.svg file):

Dotted spirals
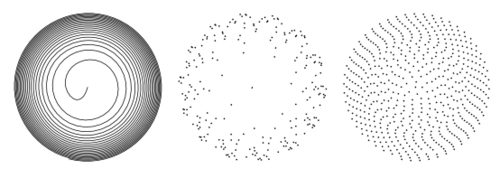
You can also change the spiral stroke style to different kinds of dashes. Some very pretty effects can be achieved. (SpiralsDashed.svg):


