
The following steps are specific to the PyCharm IDE. But if you prefer a different IDE, you can still use these steps as a reference for setting up CuPy, because the procedure is very similar. To configure CuPy with PyCharm, we focus on our Conda-based installation:
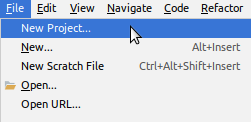
- First, let's create a virtual environment with Conda as a new PyCharm pure Python project. Choose New Project... from the PyCharm main menu:
- Create a Pure Python project within a new local Conda environment, as shown in the following screenshot:

- Wait for the environment to be created, as shown:

- After creating the Conda environment, you will have a ready-to-use CuPy development environment, as shown in the following screenshot:
Now you can import cupy within your Python programs. As you can see, PyCharm Edu detects and recommends this as you begin to type import cupy...