Enhancing title templates with Motion
FCPX comes with dozens of text templates built right in. As we learned about in Chapter 7, Titles, Transitions, and Generators, many of these templates have a number of parameters and qualities that can be tweaked, but all of them have their limits. Motion will help us take those limits and make them nearly limitless.
Getting ready
Although not absolutely essential, it's a good idea to read the previous Getting acquainted with Motion's interface recipe, if you are new to the program.
How to do it...
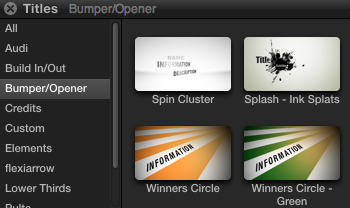
1. In FCPX, open your Titles browser and browse to the Bumper/Opener category:

2. Edit the title Winners Circle into your timeline (if it is the first clip you are placing in a timeline and are prompted to choose Video Properties, simply accept the defaults by clicking on OK. If you know you have specific settings in mind, feel free to adjust the settings here.)

3. Click on the clip in the timeline, open the Inspector (Command + 4), and click on the Title tab at the top. As you can see, the only available parameters to tweak are the lines of text in the text animation:

4. We can hop over to the Text tab to change the basic and style font attributes, but we don't have any options to customize the background of the title, for example. Let's say we like the sunrays, but we wish they were green and white instead of orange and white.
5. Right-click on the original Winners Circle title clip in the Titles browser (not your timeline) and choose Open a copy in Motion:

Motion will launch and after a few moments, you will see the interface of the program appear:

Virtually every title, transition, and effect in FCPX was originally built in Motion. When we send a copy of one of these items to Motion, we get to modify the actual project file! Don't get overwhelmed by what you see here. We are going to make one simple modification without having to understand Motion's entire interface!
6. In the bottom portion of the window, we have the Timeline pane. This is the timeline in Motion, although it obviously looks a bit different than the timeline in FCPX. Because motion graphic projects can be very complex and made of dozens or sometimes hundreds of objects, these objects are usually organized into groups.
Click on the disclosure triangle next to the word Gradient to see what's inside the group called Gradient:

We see one object called Gradient. This is the object we want to modify to change the orange sunrays.
7. Click on the Gradient object to highlight it:

8. In the upper-left corner of the screen, click on the tab labeled Inspector. This is a much more in-depth version of the similarly titled tab in FCPX:

In the list of parameters, we see the Gradient editor, currently with a rather orange setting.
9. Click on the orange color tag on the bottom right of the Gradient editor to select it:

10. Click on the disclosure triangle next to the Color parameter, located just below the Gradient editor. A color palette will appear, allowing you to select from a wide range of colors. As you do so, you will get an instant update about the color change in Viewer in Motion.
11. Move your cursor towards some hue of green and click on it to select it:

Your Viewer updates immediately with the new color selection:

12. Choose File | Save (by pressing Command + S) and return to Final Cut Pro X.
13. If it is closed, reopen your Titles browser and re-select the Bumper/Opener category. You will now see a new title clip called Winners Circle Copy with the green sunrays:

14. Use the title clip as you would any other in any project from now on.
How it works...
Almost all of FCPX's titles, transitions, and effects were made with Motion, and if you have purchased Motion, Apple essentially let's you play with copies of the original project files to tweak each one to look exactly the way you want. Of course, we took one very simple example here, but far more sophisticated changes can be made—if you know the ins and outs of Motion.
There's more...
Changing the title clip name in the Titles browser
Unfortunately, FCPX automatically gives any modified title the original name with the word Copy after it. Luckily, this can be changed, but not in the most obvious way. Let's say we wanted to change our new title, Winners Circle Copy to Winners Circle — Green.
Close FCPX. Open a Finder window and go to your user's Home folder. From there, go to Movies | Motion Templates | Titles | Bumper/Opener. Inside you will see a folder called Winners Circle copy. Rename that folder Winners Circle — Green and inside that folder, rename the Motion project file the exact same thing (make sure you keep the .moti on the end):

When you re-open FCPX, you should see the newly named title:


