Search icon CANCEL
Subscription
0
Cart icon
Your Cart (0 item)
Close icon
You have no products in your basket yet
Arrow left icon
Explore Products
Best Sellers
New Releases
Books
Videos
Audiobooks
Learning Hub
Newsletter Hub
Free Learning
Arrow right icon
timer SALE ENDS IN
0 Days
:
00 Hours
:
00 Minutes
:
00 Seconds
Arrow up icon
GO TO TOP
Delphi Cookbook

You're reading from   Delphi Cookbook Recipes to master Delphi for IoT integrations, cross-platform, mobile and server-side development

Arrow left icon
Product type Paperback
Published in Jul 2018
Publisher
ISBN-13 9781788621304
Length 668 pages
Edition 3rd Edition
Languages
Tools
Arrow right icon
Authors (2):
Arrow left icon
Daniele Teti Daniele Teti
Author Profile Icon Daniele Teti
Daniele Teti
Daniele Spinetti Daniele Spinetti
Author Profile Icon Daniele Spinetti
Daniele Spinetti
Arrow right icon
View More author details
Toc

Table of Contents (12) Chapters Close

Preface 1. Delphi Basics FREE CHAPTER 2. Becoming a Delphi Language Ninja 3. Knowing Your Friends – The Delphi RTL 4. Going Cross-Platform with FireMonkey 5. The Thousand Faces of Multithreading 6. Putting Delphi on the Server 7. Linux Development 8. Riding the Mobile Revolution with FireMonkey 9. Using specific platform features 10. Delphi and IoT 11. Other Books You May Enjoy

The amazing TFDTable – indices, aggregations, views, and SQL

Without question, the software industry is a data-driven environment. All of the IT industry runs on data (we are in the big data era, guys!)—customers, orders, purchases, billings; every day, our applications transform in data interactions between them. Undoubtedly, data is the wellspring of all IT businesses, so we must choose the best programs to interact with it, and fortunately with Delphi we are safe, we have FireDAC.

FireDAC is a unique set of Universal Data Access Components for developing multi-device database applications for Delphi and C++Builder. Here are some features that make this framework special:

  • Cross-platform support
  • You can use FireDAC on Windows, macOS, Android, iOS, and Linux applications
  • Drivers for almost every major relational database, both commercial and open source

In the 90s, the catchphrase in software development was developing database applications. Delphi was the master, thanks to the way it was designed (TDataSet interface, Data Module, and ClientDataSet) and its frameworks (Borland Database Engine). In the spring of 2013, Embarcadero acquired AnyDAC and re-branded it as FireDAC. Now Delphi Database Developers have made an unrivaled framework available again.

Getting ready

The TFDTable component implements a dataset that works with a single database table. What makes this component amazing is a set of additional features—filtering, indexing, aggregation, cached updates, and persistence.

In this recipe, we'll see some of these at work: how to configure an TFDTable, how to manage the indexes to sort an associated grid, and how to collect new information via aggregates.

This recipe uses the DELPHICOOKBOOK database, an InterBase DB prepared for the last three recipes of this chapter. To speed up the mechanisms, I suggest adding it to the FireDAC connections in the Data Explorer:

  1. Open Delphi.
  2. Go to the Data Explorer tab.
  3. Open the FireDAC section.
  4. Open the InterBase section.
  5. Right-click on it.
  6. Click Add New Connection.
  7. In the opened window, enter the name, DELPHICOOKBOOK.
  8. Complete the configuration with this data:
    • Username: sysdba
    • Password: masterkey
    • Database: Choose the path of the database in your filesystem (the database is under the data folder)

Follow the same steps to register the EMPLOYEE database; you can find it at C:\Users\Public\Documents\Embarcadero\Studio\19.0\Samples\data\employee.gdb.

How to do it...

Let's look at the following steps:

  1. Create a new VCL application by selecting File | New | VCL Forms Application.
  1. Put a DBNavigator (aligned to the top), a DBGrid (aligned to the client), a DataSource, and a PopUpMenu into the form.
  2. Set the DataSource property of DBGrid1 to DataSource1.
  3. Select the EMPLOYEE connection in the Data Explorer and then drag and drop it on the form to generate the EmployeeConnection.
  4. Put a TFDTable in the form and rename it to SalesTable.
  5. The connection property of SalesTable is automatically set to EmployeeConnection.
  6. Set the DataSet property of DataSource1 to SalesTable.
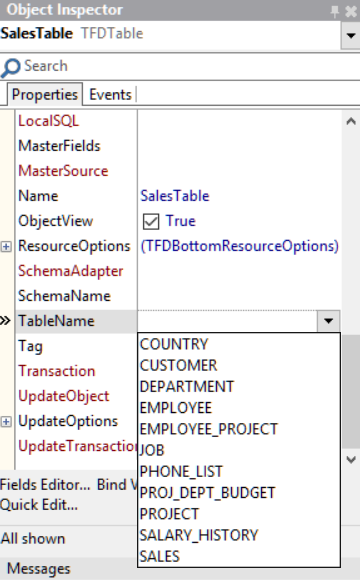
  7. To choose the Table, you have to expand the Table property combobox and select SALES:
Figure 1.25: SalesTable in the Object Inspector
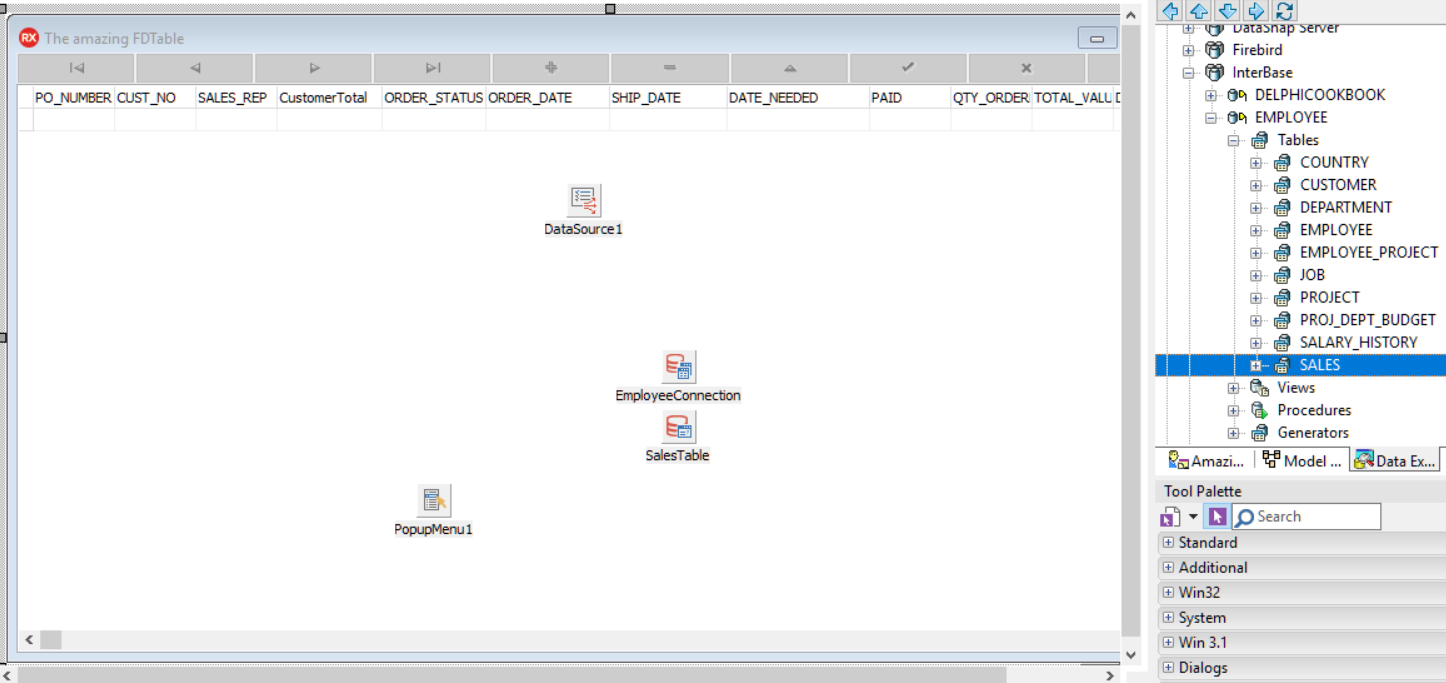
  1. If you performed all the steps correctly, you should be in this situation:
Figure 1.26: Form at design time
  1. Declare the CreateIndexes procedure under the private section of the form and implement it with the following code:
procedure TMainForm.CreateIndexes;
var
LCustNoIndex: TFDIndex;
begin
LCustNoIndex := SalesTable.Indexes.Add;
LCustNoIndex.Name := 'MyCustNoIdx';
LCustNoIndex.Fields := 'Cust_No';
LCustNoIndex.Active := true;
end;
  1. Declare the CreateAggregates procedure under the private section of the form and implement it with the following code:
procedure TMainForm.CreateAggregates;
begin
with SalesTable.Aggregates.Add do
begin
Name := 'CustomerTotal';
Expression := 'SUM(TOTAL_VALUE)';
GroupingLevel := 1;
Active := true;
IndexName := 'MyCustNoIdx';

end;

with SalesTable.Aggregates.Add do
begin
Name := 'CustomerMax';
Expression := 'MAX(TOTAL_VALUE)';
GroupingLevel := 1;
Active := true;
IndexName := 'MyCustNoIdx';

end;

with SalesTable.Aggregates.Add do
begin
Name := 'CustomerLastDate';
Expression := 'MAX(ORDER_DATE)';
GroupingLevel := 1;
Active := true;
IndexName := 'MyCustNoIdx';

end;
end;
  1. Now, we are able to set up the SalesTable component. So, implement the OnCreate event handler for the form and include this code:
procedure TMainForm.FormCreate(Sender: TObject);
begin
SalesTable.Active := false;
CreateIndexes;
CreateAggregates;
SalesTable.IndexName := 'MyCustNoIdx';
// index activated
SalesTable.IndexesActive := true;
// aggregates activated
SalesTable.AggregatesActive := true;
SalesTable.Active := true;
end;
  1. Now, we have to implement DBGrid1TitleClick to perform the right sorting method when the user clicks on a specific title:
procedure TMainForm.DBGrid1TitleClick(Column: TColumn);
begin

// if reset the column caption of LastColumnClickIndex, because index could be change...
if FLastColumnClickIndex > 0 then
DBGrid1.Columns[FLastColumnClickIndex].Title.Caption :=
DBGrid1.Columns[FLastColumnClickIndex].FieldName;

// if the order is descending set the IndexFieldNames to ''.
if SalesTable.IndexFieldNames = (Column.Field.FieldName + ':D') then
begin
Column.Title.Caption := Column.Field.FieldName;
SalesTable.IndexFieldNames := '';
end
// if the order is ascending set it to descending
else if SalesTable.IndexFieldNames = Column.Field.FieldName then
begin
SalesTable.IndexFieldNames := Column.Field.FieldName + ':D';
Column.Title.Caption := Column.Field.FieldName + ' â–¼';
end
// if no order is specified I'll use ascending one
else
begin
SalesTable.IndexFieldNames := Column.Field.FieldName;
Column.Title.Caption := Column.Field.FieldName + ' â–²';
end;

// set last column index
FLastColumnClickIndex := Column.Index;

end;
  1. It's time to insert the aggregates. The goal is to show some aggregated information through a simple ShowMessage procedure. Add a new menu item to PopupMenu1, rename it to Customer Info, and implement the OnClick event with the following code:
procedure TMainForm.CustomerInfoClick(Sender: TObject);
var
LOldIndexFieldNames: string;
begin

// i use LOldIndexFieldNames to reset the index to last user choice
LOldIndexFieldNames := SalesTable.IndexFieldNames;
DBGrid1.Visible := false;
// the right index for aggregate
SalesTable.IndexName := 'MyCustNoIdx';

// show some customer info
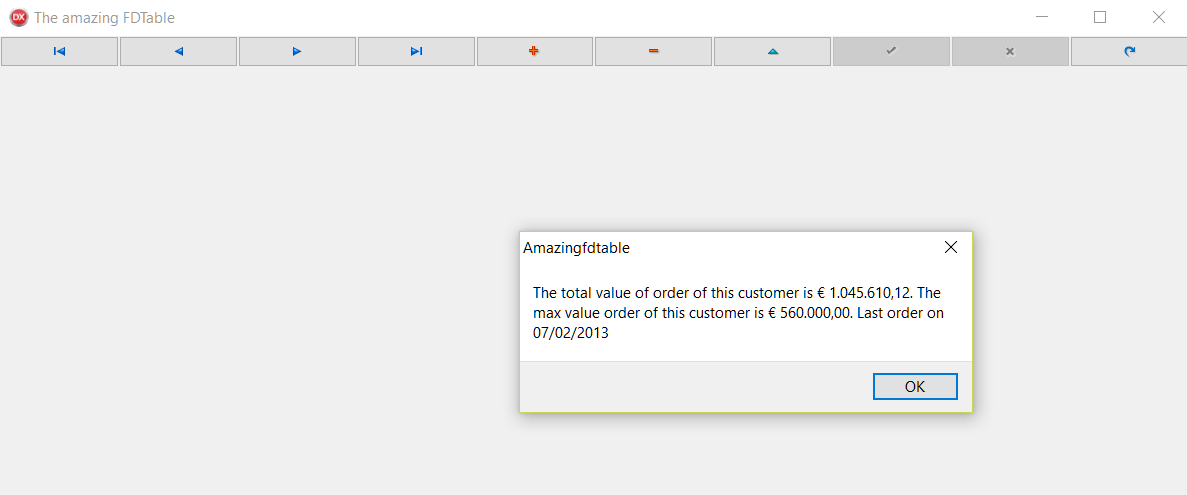
ShowMessageFmt('The total value of order of this customer is %m. ' +
'The max value order of this customer is %m. ' + 'Last order on %s ',
[StrToFloat(SalesTable.Aggregates[0].Value),
StrToFloat(SalesTable.Aggregates[1].Value),
DateTimeToStr(SalesTable.Aggregates[2].Value)]);

SalesTable.IndexFieldNames := LOldIndexFieldNames;
DBGrid1.Visible := true;
end;
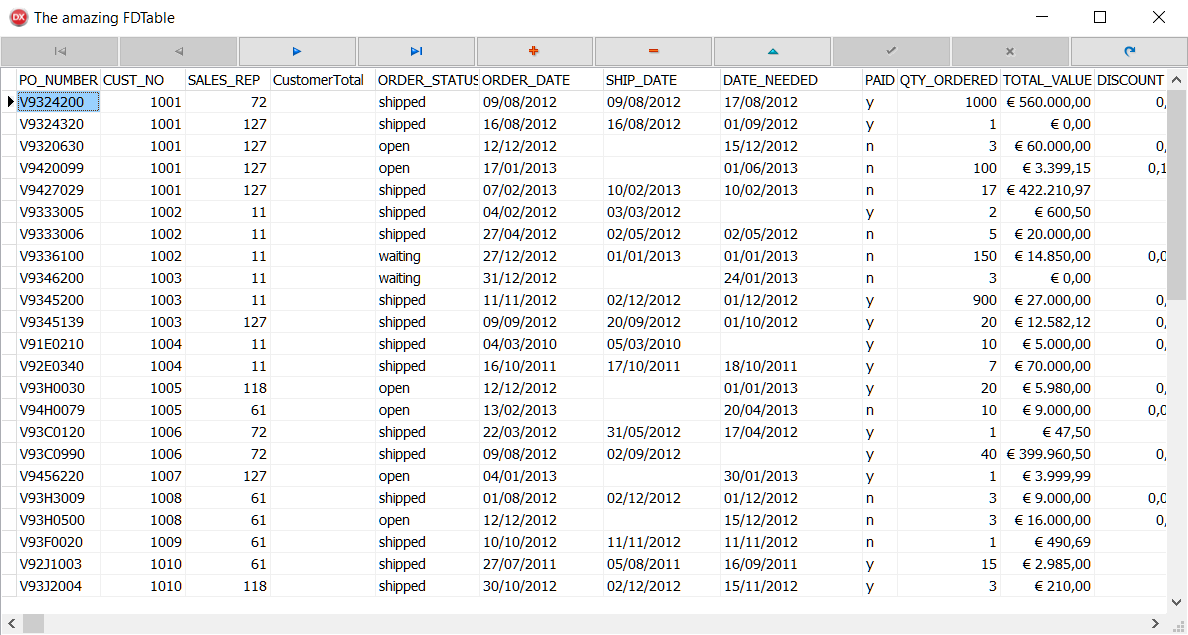
  1. Run the application by hitting F9 (or by going to Run | Run):
Figure 1.27: Amazing FDTable at startup

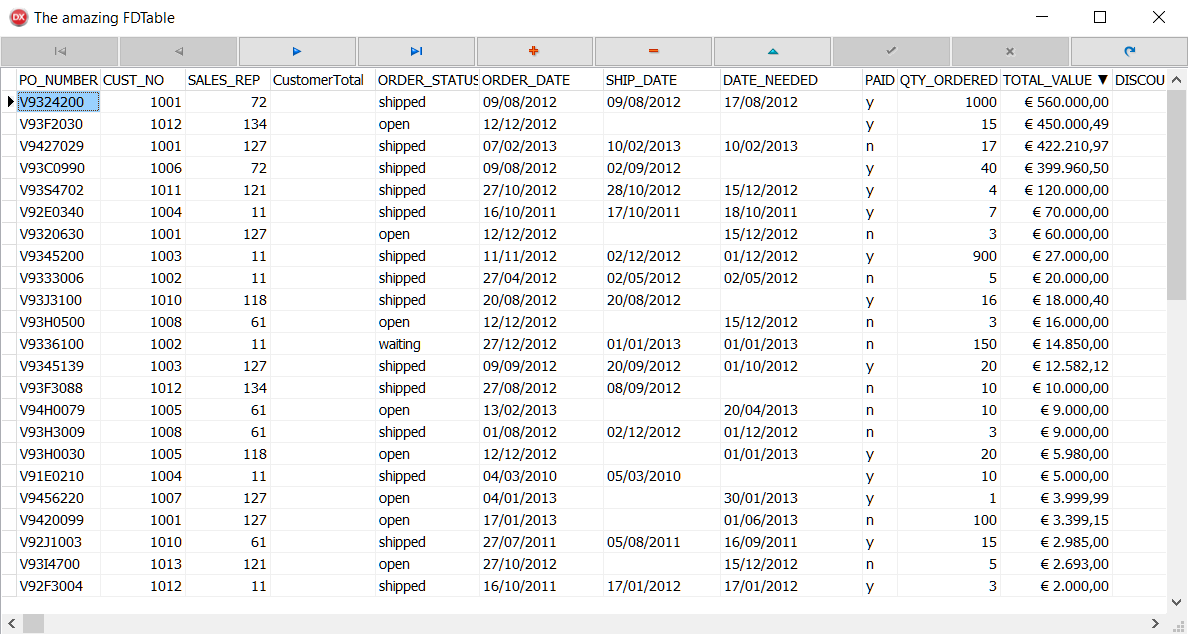
  1. Click on the Total Value column twice in the descending order:
Figure 1.28: Descending order on total_value field
  1. Right-click on the first record to bring up the pop-up menu, then click on Customer Info:
Figure 1.29: Aggregates in action

How it works...

The core concepts of this recipe are enclosed in the DBGrid1TitleClick and CustomerInfoClick functions.

In the first procedure, we used the IndexFieldNames property to generate a temporary index to perform sorting based on a field related to the DBGrid column clicked, and also applying a graphical change to the column to better understand the ordering.

A temporary index accepts more than one field, so if you want to sort data by several fields you can do it by separating fields, with a semicolon.
In addition, you can also specify the sort order, such as ascending or descending, adding the suffixes :A for ascending and :D for descending.

In the second procedure, we used Aggregate to report some customer info:

  • Total Value: This represents the total amount of all orders
  • Max Value: This represents the order with the maximum amount
  • Last Order: This represents the last date order

Aggregate are created in the CreateAggregates procedure. Here is some more information about the properties used:

  • Expression property: This defines the expression to be used to calculate the aggregate.
    • GroupingLevel property: This defines the number of indexed fields to use for grouping. By default, its value is set to 0 (no fields and no grouping; all records in a dataset).
  • IndexName property: This defines the name of the index to use for grouping. If none is specified, it will use the IndexName property of DataSet.

There's more...

You have been reading a chapter from
Delphi Cookbook - Third Edition
Published in: Jul 2018
Publisher:
ISBN-13: 9781788621304
Register for a free Packt account to unlock a world of extra content!
A free Packt account unlocks extra newsletters, articles, discounted offers, and much more. Start advancing your knowledge today.
Unlock this book and the full library FREE for 7 days
Get unlimited access to 7000+ expert-authored eBooks and videos courses covering every tech area you can think of
Renews at $19.99/month. Cancel anytime