Building chatbots is fun. Although chatbots are just another kind of software, they are very different in terms of the expectations that they create in users. Chatbots are conversational. This ability to process language makes them project a kind of human personality and intelligence, whether we as developers intend it to be or not. To develop software with a personality and intelligence is quite challenging and therefore interesting.
This tutorial is an excerpt from a book written by Srini Janarthanam titled Hands-On Chatbots and Conversational UI Development.
In this article, we will explore a popular tool called Chatfuel, and learn how to build a chatbot from scratch. Chatfuel is a tool that enables you to build a chatbot without having to code at all. It is a web-based tool with a GUI editor that allows the user to build a chatbot in a modular fashion.
Getting started with Chatfuel
Let's get started. Go to Chatfuel's website to create an account:

Click GET STARTED FOR FREE. Remember, the Chatfuel toolkit is currently free to use. This will lead you to one of the following two options:
- If you are logged into Facebook, it will ask for permission to link your Chatfuel account to your Facebook account
- If you are not logged in, it will ask you to log into Facebook first before asking for permission
Chatfuel links to Facebook to deploy bots. So it requires permission to use your Facebook account:

Authorize Chatfuel to receive information about you and to be your Pages manager:

That's it! You are all set to build your very first bot:

Building your first bot
Chatfuel bots can be published on two deployment platforms: Facebook Messenger and Telegram. Let us build a chatbot for Facebook Messenger first. In order to do that, we need to create a Facebook Page. Every chatbot on Facebook Messenger needs to be attached to a page. Here is how we can build a Facebook Page:
- Go to https://www.facebook.com/pages/create/.
- Click the category appropriate to the page content. In our case, we will use Brand or Product and choose App Page.
- Give the page a name. In our case, let's use Get_Around_Edinburgh. Note that Facebook does not make it easy to change page names. So choose wisely.
- Once the page is created, you will see Chatfuel asking for permission to connect to the page:

- Click CONNECT TO PAGE. You will be taken to the bot editor.
- The name of the bot is set to My First Bot. It has a Messenger URL, which you can see by the side of the name. Messenger URLs start with m.me. You might notice that the bot also comes with a Welcome message that is built in. On the left, you see the main menu with a number of options, with the Build option selected by default:

- Click the Messenger URL to start your first conversation with the bot. This will open Facebook Messenger in your browser tab:

- To start the conversation, click the Get Started button at the bottom of the chat window.
- There you go! Your conversation has just started. The bot has sent you a welcome message:

Notice how it greets you with your name. It is because you have given the bot access to your info on Facebook.
Now that you have built your first bot and had a conversation with it, give yourself a pat on your back. Welcome to the world of chatbots!
Adding conversational flow
Let's start building our bot:
- On the welcome block, click the default text and edit it. Hovering the mouse around the block can reveal options such as deleting the card, rearranging the order of the cards, and adding new cards between existing cards. Delete the Main menu button:

- Add a Text card. Let's add a follow-up text card and ask the user a question.
Unlock access to the largest independent learning library in Tech for FREE!
Get unlimited access to 7500+ expert-authored eBooks and video courses covering every tech area you can think of.
Renews at €18.99/month. Cancel anytime
- Add buttons for user responses. Click ADD BUTTON and type in the name of the button. Ignore block names for now. Since they are incomplete, they will appear in red. Remember, you can add up to three buttons to a text card:

- Button responses need to be tied to blocks so that when users hit a button the chatbot would know what to do or say. Let's add a few blocks. To add a new block, click ADD BLOCK in the Bot Structure tab. This creates a new untitled block. On the right side, fill in the name of the block. Repeat the same for each block you want to build:

- Now, go back to the buttons and specify block names to connect to. Click the button, choose Blocks, and provide the name of the block:

- For each block, you created, add content by adding appropriate cards. Remember, each block can have more than one card. Each card will appear as a response, one after another:

Repeat the preceding steps to add more blocks and connect them to buttons of other blocks. When you are done, you can test it by clicking the TEST THIS CHATBOT button in the top-right corner of the editor. You should now see the new welcome message with buttons for responses. Go on and click one of them to have a conversation:

Great! You now have a bot with a conversational flow.
Handling navigation
How can the user and the chatbot navigate through the conversation? How do they respond to each other and move the conversation forward? In this section, we will examine the devices to facilitate conversation flow.
Buttons
Buttons are a way to let users respond to the chatbot in an unambiguous manner. You can add buttons to text, gallery, and list cards. Buttons have a label and a payload. The label is what the user gets to see. Payload is what happens in the backend when the user clicks the button:

A button can take one of four types of payloads: next block, URL, phone number, or share:
- The next block is identified by the name of the block. This will tell the chatbot which block to execute when the button is pressed.
- The URL can be specified, if the chatbot is to open a web page on the embedded web browser. Since the browser is embedded, the size of the window can also be specified.
- The phone number can be specified, if the chatbot is to make a voice call to someone.
- The share option can be used in cards such as lists and galleries to share the card with other contacts of the user.
Go to block cards
Buttons can be used to navigate the user from one block to another, however, the user has to push the button to enable navigation. However, there may be circumstances where the navigation needs to happen automatically. For instance, if the chatbot is giving the user step-by-step instructions on how to do something, it can be built by putting all the cards (one step of information per card) in one block. However, it might be a good idea to put them in different blocks for the sake of modularity. In such a case, we need to provide the user a next step button to move on to the next step.
In Chatfuel, we can use the Go to Block card to address this problem. A Go to Block card can be placed at the end of any block to take the chatbot to another block. Once the chatbot executes all the cards in a block, it moves to another block automatically without any user intervention. Using Go to Block cards, we can build the chatbot in a modular fashion. To add a Go to Block card at the end of a block, choose ADD A CARD, click the + icon and choose Go to Block card. Fill in the block name for redirection:
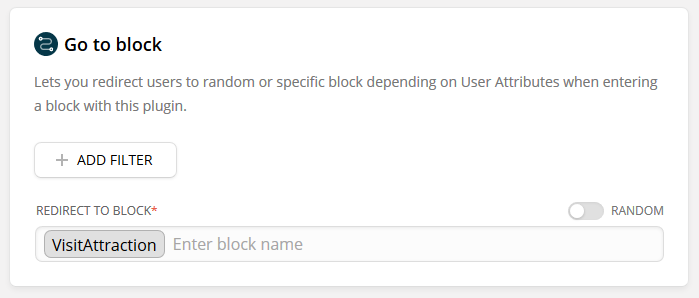
Redirections can also be made random and conditional. By choosing the random option, we can make the chatbot choose one of the mentioned blocks randomly. This adds a bit of uncertainty to the conversation. However, this needs to be used very carefully because the context of the conversation may get tricky to maintain.
Conditional redirections can be done if there is a need to check the context before the redirection is done. Let's revisit this option after we discuss context.
Managing context
In any conversation, the context of conversation needs to be managed. Context can be maintained by creating a local cache where the information transferred between the two dialogue partners can be stored. For instance, the user may tell the chatbot their food preferences, and this information can be stored in context for future reference if not used immediately. Another instance is in a conversation where the user is asking questions about a story. These questions may be incomplete and may need to be interpreted in terms of the information available in the context.
In this section, we will explore how context can be recorded and utilized during the conversation in Chatfuel. Let's take the task of finding a restaurant as part of your tour guide chatbot. The conversation between the chatbot and the user might go as follows:
User : Find a restaurant
Bot : Ok. Where?
User : City center.
Bot : Ok. Any cuisine that you fancy?
User : Indian
Bot : Ok. Let me see... I found a few Indian restaurants in the city center.
Here they are.
In the preceding conversation, up until the last bot utterance, the bot needs to save the information locally. When it has gathered all the information it needs, it can go off and search the database with appropriate parameters. Notice that it also needs to use that information in generating utterances dynamically. Let's explore how to do these two—dynamically generating utterances and searching the database.
First, we need to build the conversational flow to take the user through the conversation just as we discussed in the Next steps section. Let's assume that the user clicks the Find_a_restaurant button on the welcome block. Let's build the basic blocks with text messages and buttons to navigate through the conversation:

User input cards
As you can imagine, building the blocks for every cuisine and location combination can become a laborious task. Let's try to build the same functionality in another way—forms. In order to use forms, the user input card needs to be used. Let's create a new block called Restaurant_search and to it, let's add a User Input card. To add a User Input card, click ADD A CARD, click the + icon, and select the User Input card.
Add all the questions you want to ask the user under MESSAGE TO USER. The answers to each of these questions can be saved to variables. Name the variables against every question. These variables are always denoted with double curly brackets (for example, {{restaurant_location}}):

Information provided by the user can also be validated before acceptance. In case the required information is a phone number, email address, or a number, these can be validated by choosing the appropriate format of the input information. After the user input card, let's add a Go to Block card to redirect the flow to the results page:

And add a block where we present the results. As you can see here, the variables holding information can be used in chatbot utterances. These will be dynamically replaced from the context when the conversation is happening:

The following screenshot shows the conversation so far on Messenger:

Setting user attributes
In addition to the user input cards, there is also another way to save information in context. This can be done by using the set up user attribute card. Using this card, you can set context-specific information at any point during the conversation. Let's take a look at how to do it. To add this card, choose ADD A CARD, click the + icon, and choose the Set Up User Attribute card:

The preceding screenshot shows the user-likes-history variable being set to true when the user asked for historical attractions. This information can later be used to drive the conversation (as used in the Go to Block card) or to provide recommendations. Variables that are already in the context can be reset to new values or no value at all. To clear the value of a variable, use the special NOT SET value from the drop-down menu that appears as soon as you try to fill in a value for the variable. Also, you can set/reset more than one variable in a card.
Default contextual variables
Besides defining your own contextual variables, you can also use a list of predefined variables. The information contained in these variables include the following:
- Information that is obtained from the deployment platform (that is, Facebook) including the user's name, gender, time zone, and locale
- Contextual information—last pushed button, last visited block name, and so on
To get a full list of variables, create a new text card and type {{. This will open the drop-down menu with a list of variables you can choose from. This list will also include the variables created by you:

As with the developer-defined variables, these built-in variables can also be used in text messages and in conditional redirections using the Go to Block cards.
Congratulations! In this tutorial, you have started a journey toward building awesome chatbots. Using tour guiding as the use case, we explored a variety of chatbot design and development topics along the way.
If you found this post useful, do check out the book, Hands-On Chatbots and Conversational UI Development, which will help you explore the world of conversational user interfaces.
Facebook’s Wit.ai: Why we need yet another chatbot development framework?
Building a two-way interactive chatbot with Twilio: A step-by-step guide
How to create a conversational assistant or chatbot using Python

 United States
 Great Britain
 India
India
 Germany
 France
 Canada
 Russia
 Spain
Spain
 Brazil
 Australia
 Singapore
 Hungary
 Ukraine
 Luxembourg
 Estonia
 Lithuania
 South Korea
 Turkey
 Switzerland
 Colombia
 Taiwan
 Chile
Chile
 Norway
 Ecuador
 Indonesia
 New Zealand
 Cyprus
 Denmark
 Finland
 Poland
 Malta
Malta
 Czechia
 Austria
 Sweden
 Italy
Italy
 Egypt
Egypt
 Belgium
 Portugal
 Slovenia
 Ireland
 Romania
 Greece
 Argentina
 Netherlands
 Bulgaria
 Latvia
 South Africa
 Malaysia
 Japan
Japan
 Slovakia
 Philippines
 Mexico
 Thailand


