Search icon CANCEL
Subscription
0
Cart icon
Your Cart (0 item)
Close icon
You have no products in your basket yet
Save more on your purchases! discount-offer-chevron-icon
Savings automatically calculated. No voucher code required.
Arrow left icon
Explore Products
Best Sellers
New Releases
Books
Videos
Audiobooks
Learning Hub
Newsletter Hub
Free Learning
Arrow right icon
timer SALE ENDS IN
0 Days
:
00 Hours
:
00 Minutes
:
00 Seconds
Arrow up icon
GO TO TOP
Unity 2020 Mobile Game Development

You're reading from   Unity 2020 Mobile Game Development Discover practical techniques and examples to create and deliver engaging games for Android and iOS

Arrow left icon
Product type Paperback
Published in Aug 2020
Publisher Packt
ISBN-13 9781838987336
Length 464 pages
Edition 2nd Edition
Languages
Tools
Arrow right icon
Author (1):
Arrow left icon
John P. Doran John P. Doran
Author Profile Icon John P. Doran
John P. Doran
Arrow right icon
View More author details
Toc

Table of Contents (14) Chapters Close

Preface 1. Building Your Game 2. Project Setup for Android and iOS Development FREE CHAPTER 3. Mobile Input/Touch Controls 4. Resolution-Independent UI 5. Advertising Using Unity Ads 6. Implementing In-App Purchases 7. Getting Social 8. Keeping Players Involved with Notifications 9. Using Unity Analytics 10. Making Your Title Juicy 11. Game Build and Submission 12. Augmented Reality 13. Other Books You May Enjoy

Creating a title screen

Now, before we start adding UI elements to our game, let's first set up some groundwork and foundational knowledge by creating something that we will need anyway—a title screen:

  1. To start, we'll go ahead and create a new scene for us to work with by going to File | New Scene. When dealing with a UI, we will often want to see a visual representation of what will be drawn on the screen, so we will want to make use of 2D mode to have a better representation of what our UI will look like in the final version of the game.
  2. To do that, go to the Scene view tab—you'll see the control bar menu with a 2D button on it underneath that. Click on it, and you should see the camera automatically move into something that looks similar to the following screenshot:
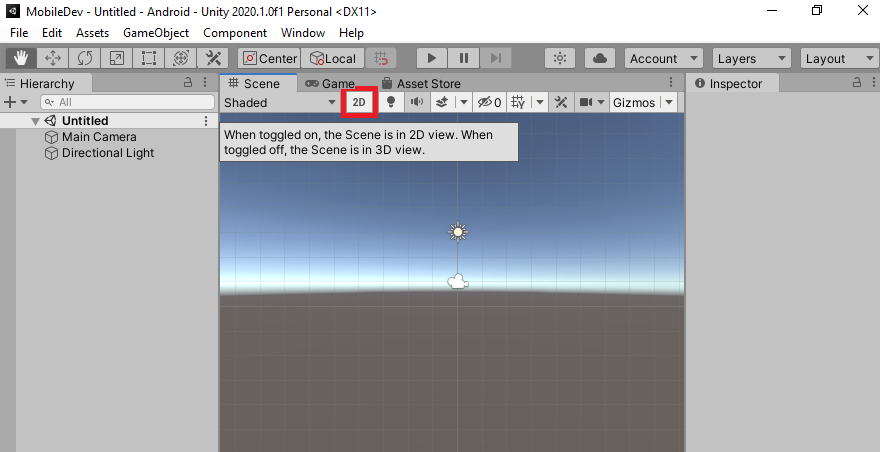
The 2D button switches the camera between 2D and 3D views. In 2D mode, you'll note that the Scene Gizmos is gone due to the fact that the only option is to look perpendicularly at the...

lock icon The rest of the chapter is locked
Register for a free Packt account to unlock a world of extra content!
A free Packt account unlocks extra newsletters, articles, discounted offers, and much more. Start advancing your knowledge today.
Unlock this book and the full library FREE for 7 days
Get unlimited access to 7000+ expert-authored eBooks and videos courses covering every tech area you can think of
Renews at $19.99/month. Cancel anytime
Banner background image