As you now know the basics of running code in the REPL and the worksheet, it is time to create your first 'Hello World' project. In this section, we are going to filter a list of people and print their name and age into the console.
Creating my first project
Creating the project
Repeat the same recipe that you completed in the Installing IntelliJ section to create a new project. Here is a summary of the tasks you must complete:
- Run IntelliJ and select Create New Project
- Select Scala and sbt
- Input the name of the project, such as Examples
- If the selected directory doesn't exist, IntelliJ will ask you if you want to create it – select OK
As soon as you accept that you are going to create the directory, IntelliJ is going to download all the necessary dependencies and build the project structure. Be patient, as this could take a while, especially if you do not have a good internet connection.
Once everything is downloaded, you should have your IDE in the following state:

Notice the folder structure. The source code is under src/main/scala and the test code is under src/test/scala. If you have used Maven before, this structure should sound familiar.
Creating the Main object
Here we are! Let's create our first application. First, create the entry point for the program. If you are coming from Java, it would be equivalent to defining the public static void main(String[] args).
Right-click on the src/main/scala folder and select New | Scala Class. Give Main as the class name and Object as the Kind:

We have created our first object. This object is a singleton. There can be only one instance of it in the JVM. The equivalent in Java would be a static class with static methods.
We would like to use it as the main entry point of our program. Scala provides a convenient class named App that needs to be extended. Let's extend our Main object with that class:
object Main extends App {

}
The App superclass defines a static main method that will execute all the code defined inside your Main object. That's all – we created our first version, which does nothing!
We can now run the program in IntelliJ. Click on the small green triangle in the gutter of the object definition, as follows:

The program gets compiled and executed, as shown in the following screenshot:

It is not spectacular, but let's improve it. To get the right habits, we are going to use the TDD technique to proceed further.
Writing the first unit test
TDD is a very powerful technique to write efficient, modular, and safe programs. It is very simple, and there are only three rules to play this game:
- You are not allowed to write any production code unless it is to make a failing unit test pass.
- You are not allowed to write any more of a unit test than is sufficient to fail, and compilation failures are failures.
- You are not allowed to write any more production code than is sufficient to pass the one failing unit test.
There are multiple testing frameworks in Scala, but we chose ScalaTest (http://www.scalatest.org/) for its simplicity.
In order to add the ScalaTest library in the project, follow these steps:
- Edit the build.sbt file.
- Add a new repository resolver to search for Scala libraries.
- Add the ScalaTest library:
name := "Examples"
version := "0.1"
scalaVersion := "2.12.4"
resolvers += "Artima Maven Repository" at "http://repo.artima.com/releases"
libraryDependencies += "org.scalatest" %% "scalatest" % "3.0.4" % "test"
- Create the test class by right-clicking on the test/scala folder and clicking on create a new class. Name it MainSpec.
ScalaTest offers multiple ways to define your test – the full list can be found on the official website (http://www.scalatest.org/at_a_glance/WordSpec). We are going to use the WordSpec style since it is quite prescriptive, offers a hierarchical structure, and is commonly used on large Scala projects.
Your MainSpec should extend the WordSpec class and the Matchers class, like so:
class MainSpec extends WordSpec with Matchers {

}
WordSpec and Matchers are underlined in red, which means that the class is not resolved. To make it resolved, go with the cursor on the class and press Alt + Enter of your keyboard. If you are positioned on the WordSpec word, a popup should appear. This is normal, as there are several classes named WordSpec in different packages:

Select the first option and IntelliJ will automatically add the import on the top of your code. On the Matchers class, as soon as you type Alt + Enter, the import will be added directly.
The final code should be as follows:
import org.scalatest.{WordSpec, Matchers}

class MainSpec extends WordSpec with Matchers {

}
Our class skeleton is now ready for our first test. We would like to create the Person class and test its constructor.
Let's explain what we would like to test using simple sentences. Complete the test class with the following code:
class MainSpec extends WordSpec with Matchers {
  "A Person" should {
    "be instantiated with a age and name" in {
      val john = Person(firstName = "John", lastName =  "Smith", 42)
      john.firstName should be("John")
      john.lastName should be("Smith")
      john.age should be(42)
    }
  }
}
IntelliJ is complaining that it cannot resolve the symbols Person, name, surname, and age. This is expected since the Person class does not exist. Let's create it in the folder src/main/scala. Right-click on the folder and create a new class named Person.
Transform it in the case of the class by adding the case keyword and defining the constructor with the name, surname, and age:
case class Person(firstName: String, lastName: String, age: Int)
If you go back to the MainSpec.scala file, you'll notice that the class is now compiled without any error and warning. The green tick ( ) on the top-right of the code window confirms this.
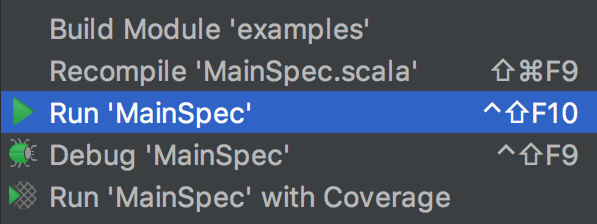
Run the test by right-clicking on the MainSpec.scala file and selecting Run 'MainSpec', or use the keyboard shortcut Ctrl + Shift + F10 or Ctrl + Shift + R:

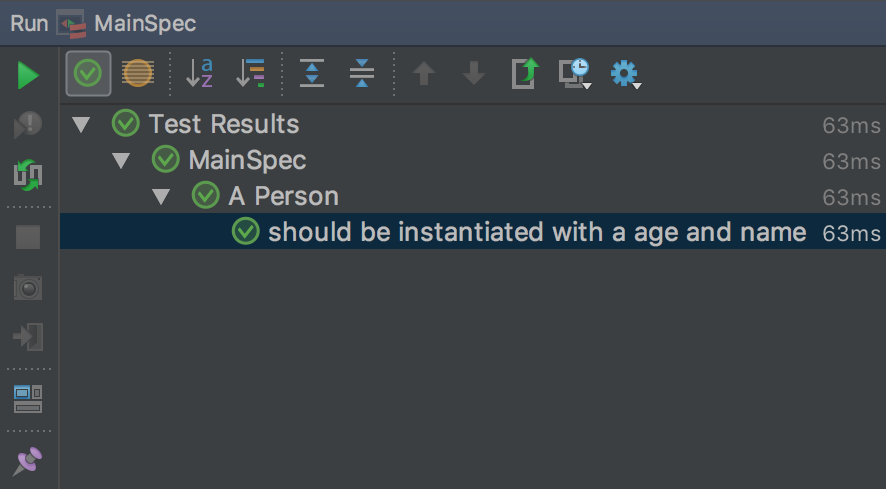
The test contained in MainSpec runs and the results appear in the Run window:

Implementing another feature
Now, we would like to have a nice representation of the person by stating his/her name and age. The test should look like the following:
"Get a human readable representation of the person" in {
  val paul = Person(firstName = "Paul", lastName = "Smith", age = 24)
  paul.description should be("Paul Smith is 24 years old")
}
Run the test again. We will get a compilation error:

This is expected as the function doesn't exist on the Person class. To implement it, add the expected implementation by setting the cursor on the description() error in the MainSpec.scala class, hitting Alt + Enter, and selecting the create method description.
IntelliJ generates the method for you and sets the implementation to ???. Replace ??? with the expected code:
def description = s"$firstName $lastName is $age ${if (age <= 1) "year" else "years"} old"
By doing so, we defined a method that does not take any parameter and return a string representing Person. In order to simplify the code, we are using a string interpolation to build the string. To use string interpolation, you just have to prepend an s before the first quote. Inside the quote, you can use the wildcard $ so that we can use an external variable and use the bracket after the dollar sign to enter more code than just a variable name.
Execute the test and the result should be green:

The next step is to write a utility function that, given a list of people, returns only the adults.
For the tests, two cases are defined:
"The Person companion object" should {
  val (akira, peter, nick) = (
    Person(firstName = "Akira", lastName = "Sakura", age = 12),
    Person(firstName = "Peter", lastName = "Müller", age = 34),
    Person(firstName = "Nick", lastName = "Tagart", age = 52)
  )
  "return a list of adult person" in {
    val ref = List(akira, peter, nick)
    Person.filterAdult(ref) should be(List(peter, nick))
  }
  "return an empty list if no adult in the list" in {
    val ref = List(akira)
    Person.filterAdult(ref) should be(List.empty[Person])
  }
}
Here, we used a tuple to define three variables. This is a convenient way to define multiple variables. The scope of the variables is bounded by the enclosing curly brackets.
Use IntelliJ to create the filterAdult function by using the Alt+ Enter shortcut. The IDE understands that the function should be in the Person companion object and generates it for you.
We implement this method using the for comprehension Scala feature:
object Person {
  def filterAdult(persons: List[Person]) : List[Person] = {
    for {
      person <- persons
      if (person.age >= 18)
    } yield (person)
  }
}
It is a good practice to define the return type of the method, especially when this method is exposed as a public API.
The for comprehension has been used only for demonstration purposes. We can simplify it using the filter method on List. filter is part of the Scala Collections API and is available for many kinds of collections:
def filterAdult(persons: List[Person]) : List[Person] = {
  persons.filter(_.age >= 18)
}
Implementing the Main method
Now that all our tests are green, we can implement the main method. The implementation becomes trivial as all the code is already in the test:
object Main extends App {
  val persons = List(
    Person(firstName = "Akira", lastName = "Sakura", age = 12),
    Person(firstName = "Peter", lastName = "Müller", age = 34),
    Person(firstName = "Nick", lastName = "Tagart", age = 52))

  val adults = Person.filterAdult(persons)
  val descriptions = adults.map(p => p.description).mkString("\n\t")
  println(s"The adults are \n\t$descriptions")
}
The first thing is to define a list of Person, so that Person.filterAdult() is used to remove all the persons, not the adults. The adults variable is a list of Person, but I would like to transform this list of Person into a list of the description of the Person. To perform this operation, the map function of the collection is used. The map function transforms each element of the list by applying the function in the parameter.
The notation inside the map() function defines an anonymous function that takes p as the parameter. The body of the function is p.description. This notation is commonly used whenever a function takes another function as an argument.
Once we have a list of descriptions, we create a string with the mkString() function. It concatenates all the elements of the list using the special character \n\t, which are respectively the carriage return and the tab character.
Finally, we perform the side effect, which is the print on the console. To print in the console, the println alias is used. It is a syntactic sugar for System.out.println.


