Search icon CANCEL
Subscription
0
Cart icon
Your Cart (0 item)
Close icon
You have no products in your basket yet
Arrow left icon
Explore Products
Best Sellers
New Releases
Books
Videos
Audiobooks
Learning Hub
Free Learning
Arrow right icon
Arrow up icon
GO TO TOP
Photorealistic Materials and Textures in Blender Cycles

You're reading from   Photorealistic Materials and Textures in Blender Cycles Create impressive production-ready projects using one of the most powerful rendering engines

Arrow left icon
Product type Paperback
Published in Oct 2023
Publisher Packt
ISBN-13 9781805129639
Length 394 pages
Edition 4th Edition
Tools
Concepts
Arrow right icon
Author (1):
Arrow left icon
Arijan Belec Arijan Belec
Author Profile Icon Arijan Belec
Arijan Belec
Arrow right icon
View More author details
Toc

Table of Contents (21) Chapters Close

Preface 1. Part 1: Materials in Cycles FREE CHAPTER
2. Chapter 1: Creating Materials in Blender 3. Chapter 2: Introducing Material Nodes 4. Chapter 3: Mapping Images with Nodes 5. Part 2: Understanding Realistic Texturing
6. Chapter 4: Achieving Realism with Texture Maps 7. Chapter 5: Generating Texture Maps with Cycles 8. Chapter 6: Creating Bumpy Surfaces with Displacement Maps 9. Part 3: UV Mapping and Texture Painting
10. Chapter 7: UV-Unwrapping 3D Models for Texturing 11. Chapter 8: Baking Ambient Occlusion Maps 12. Chapter 9: Introducing Texture Painting 13. Chapter 10: Creating Photorealistic Textures on a 3D Model 14. Part 4: Lighting and Rendering
15. Chapter 11: Lighting a Scene in Cycles 16. Chapter 12: Creating Photorealistic Environments with HDRIs 17. Chapter 13: Preparing the Camera for Rendering 18. Chapter 14: Rendering with Cycles 19. Index 20. Other Books You May Enjoy

Preparing the Shading workspace

Blender has multiple workspaces. A workspace is simply a way of arranging the windows and tools in Blender to make them more convenient for a particular job. For example, the Modeling workspace makes available the most important modeling tools and windows. The Shading workspace will do the same but for shading and material creation. We will work in the Shading workspace because it provides us with all the tools we need for now.

By default, Blender displays four separate windows in the workspace, as indicated in Figure 1.1.
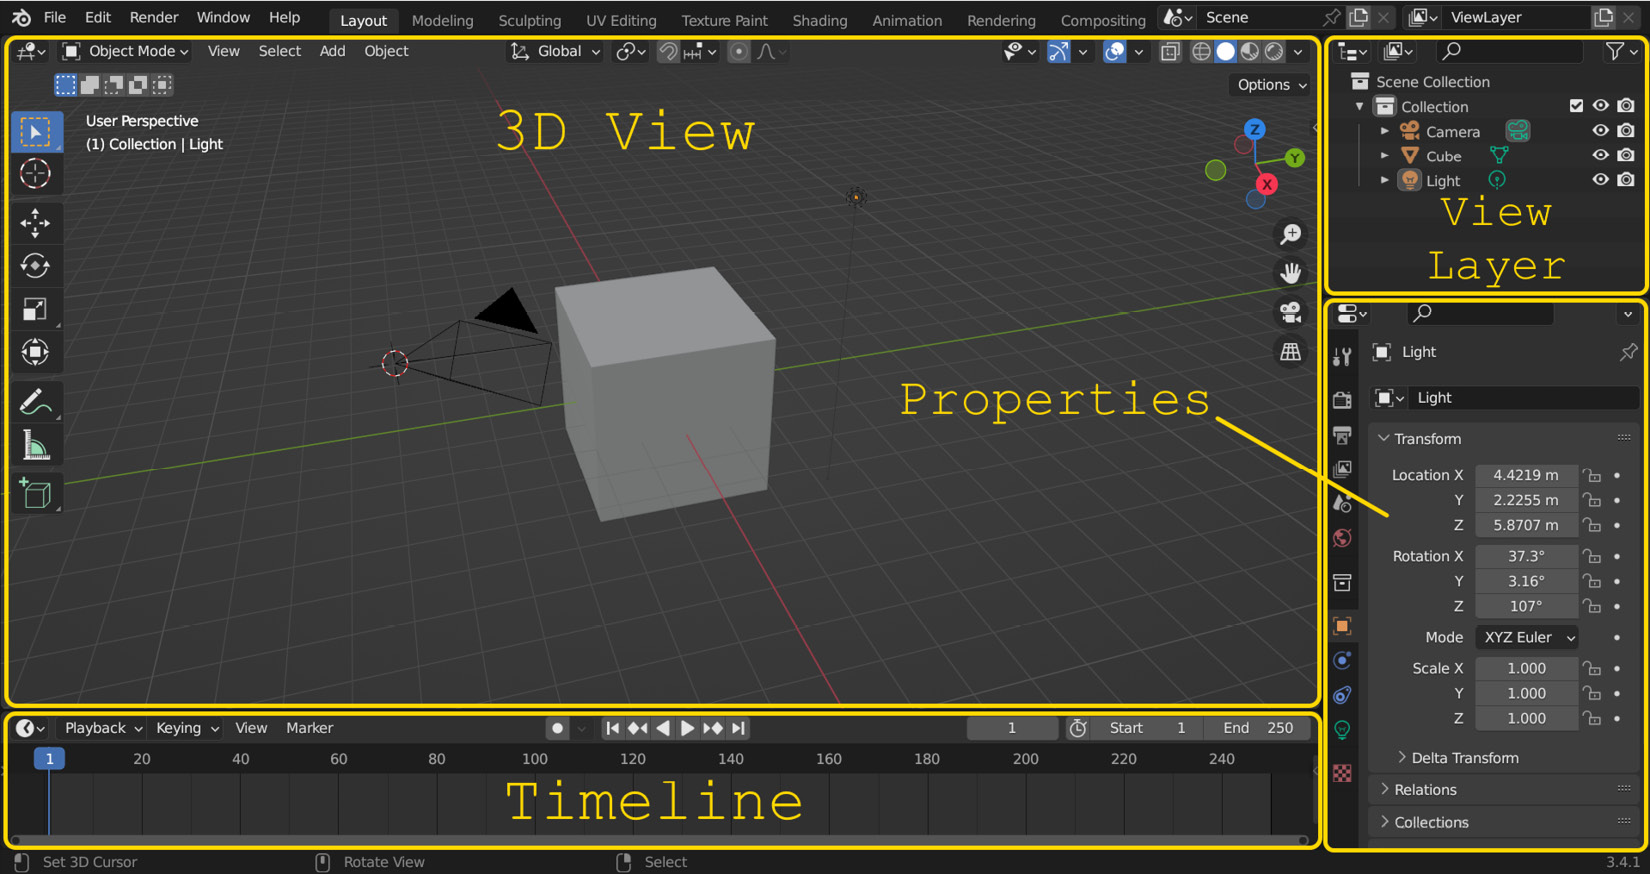
Figure 1.1 – Default Blender workspace

Figure 1.1 – Default Blender workspace

To work with materials, we will need some different windows. To save time, we can avoid having to open these windows manually by clicking on the Shading button on the bar at the top of the screen, as shown in Figure 1.2.

The Shading workspace has some new useful windows for texturing and creating materials. We now have a Shader Editor window, which we...

lock icon The rest of the chapter is locked
Register for a free Packt account to unlock a world of extra content!
A free Packt account unlocks extra newsletters, articles, discounted offers, and much more. Start advancing your knowledge today.
Unlock this book and the full library FREE for 7 days
Get unlimited access to 7000+ expert-authored eBooks and videos courses covering every tech area you can think of
Renews at $19.99/month. Cancel anytime
Banner background image