Search icon CANCEL
Subscription
0
Cart icon
Your Cart (0 item)
Close icon
You have no products in your basket yet
Save more on your purchases! discount-offer-chevron-icon
Savings automatically calculated. No voucher code required.
Arrow left icon
Explore Products
Best Sellers
New Releases
Books
Videos
Audiobooks
Learning Hub
Newsletter Hub
Free Learning
Arrow right icon
timer SALE ENDS IN
0 Days
:
00 Hours
:
00 Minutes
:
00 Seconds
Arrow up icon
GO TO TOP
Unity 5.x By Example

You're reading from   Unity 5.x By Example An example-based practical guide to get you up and running with Unity 5.x

Arrow left icon
Product type Paperback
Published in Mar 2016
Publisher Packt
ISBN-13 9781785888380
Length 402 pages
Edition 1st Edition
Languages
Tools
Arrow right icon
Author (1):
Arrow left icon
Alan Thorn Alan Thorn
Author Profile Icon Alan Thorn
Alan Thorn
Arrow right icon
View More author details
Toc

Table of Contents (10) Chapters Close

Preface 1. The Coin Collection Game – Part 1 FREE CHAPTER 2. Project A – the Collection Game Continued 3. Project B – the Space Shooter 4. Continuing the Space Shooter 5. Project C – a 2D Adventure 6. Continuing the 2D Adventure 7. Project D – Intelligent Enemies 8. Continuing with Intelligent Enemies Index

Terrain construction


Now let's start sculpting the terrain. With the terrain object selected, click the leftmost palette icon from the Object Inspector (the Raise/Lower terrain tool), available from the Terrain component. This lets you select brush shapes to paint terrain details. Select a soft, round brush and use a large brush size (using the Brush Size slider), along with the Opacity setting to set brush strength. Click and drag over the terrain to paint landscape details. Create some hills and mountains for the landscape. See Figure 7.7. Remember, you can hold down the Shift key while clicking to reverse (or lower) the terrain painting, if needed.
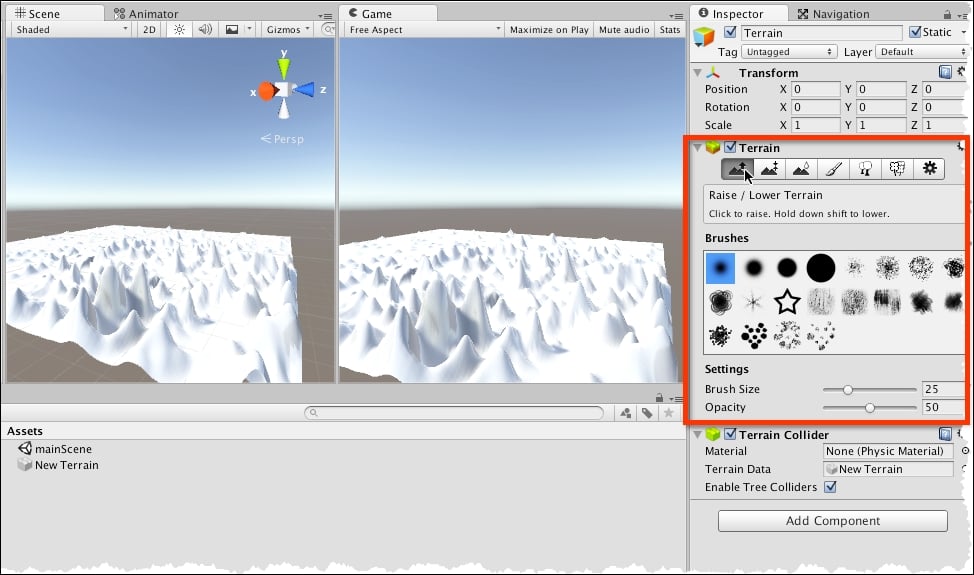
Figure 7.7: Viewing and editing the terrain settings

If the terrain appears too rough to be natural, you can easily smooth out details by switching to the Smooth Height tool. To do this, click on the third button in the Terrain component. See Figure 7.8. When you select this tool, you can choose the Brush Shape, Brush Size, and Opacity as before...

lock icon The rest of the chapter is locked
Register for a free Packt account to unlock a world of extra content!
A free Packt account unlocks extra newsletters, articles, discounted offers, and much more. Start advancing your knowledge today.
Unlock this book and the full library FREE for 7 days
Get unlimited access to 7000+ expert-authored eBooks and videos courses covering every tech area you can think of
Renews at $19.99/month. Cancel anytime
Banner background image