Moodle is a web application; so, you will need a web server in order to run it. In this section, we will be configuring a local development server that can run on your local machine.
Running a local Moodle
Moodle architecture - the LAMP/WAMP stack
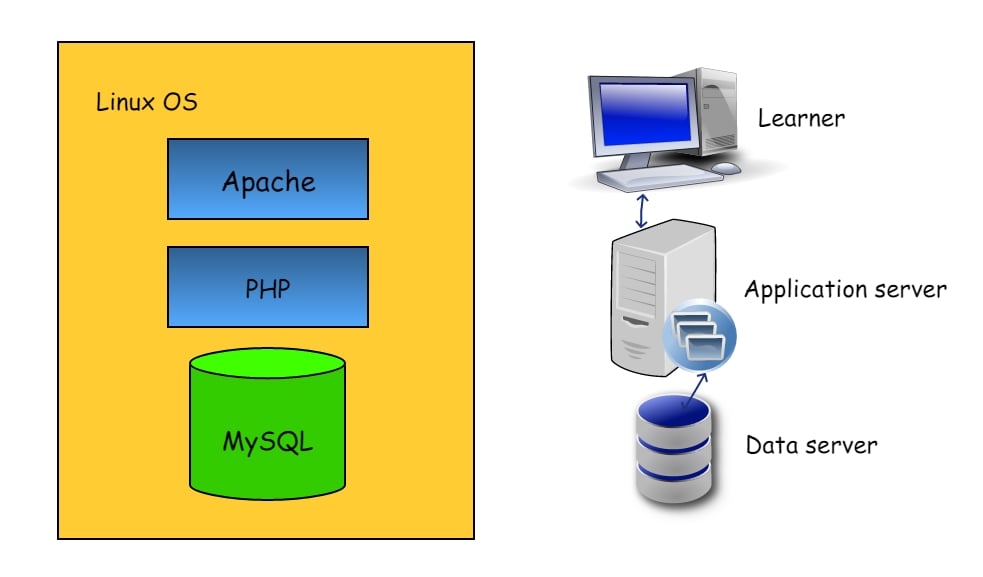
Moodle is a web application running typically (but not exclusively) in a web browser. A Moodle user interacts with a user interface on a client computer. The client requests resources from the application server (generally known as middleware) that provides the requested resources. It can do so by calling on another server, known as the data server. The data server provides the application server with the data it requires:

Check out https://en.wikipedia.org/wiki/LAMP_(software_bundle) for more information on the stack.
Generally, this architecture is referred to either as a WAMP stack or LAMP stack, the W or L referring to Windows or Linux, depending on the operating system you are running. A is for the web server Apache, M for the database server MySQL, and P for PHP, the scripting language Moodle is authored in. It should be noted that other web servers and databases are available and Moodle will run quite happily on them; refer to the online Moodle documentation.
Setting up an Internet ready Moodle server is beyond the scope of this book--see Moodle 3.0 Administration, also from Packt, for details. Instead, we will install a local web server running on Windows, using WampServer.
Installing WampServer
The WampServer development stack can be downloaded from http://www.wampserver.com/en/. Ensure that you download either the 32-bit or 64-bit version to suit your computer. Also, ensure that you run the install with Administrator privileges as both Apache and MySQL run as Windows services and the installer will require elevated privileges to install these. Once installed and running, the WampServer icon will be visible in the taskbar--green means everything is operating as it should and your local web server is up and running:

WampServer and Skype
Do you use Skype on your development machine? If so, you will likely experience a configuration conflict between the Apache instance in WampServer and Skype as Apache attempts to use ports 80 (for HTTP) and 443 (for HTTPS) to display web pages. By default, Skype is configured to use both these ports as alternatives for data transfer, so you will need to reconfigure Skype accordingly:
- Open Skype and click on the Tools menu option and slide down to Options....
- Select Advanced and then click on Connection.
- Uncheck the Use port 80 and 443 as alternatives for incoming connections option and press Save.
- Restart Skype.
Setting up an Integrated Development Environment (IDE)
As discussed earlier, the Moodle application consists of a great number of text scripts that can, in practice as well as theory, be edited with any simple text editor. However, you will be far better off using an integrated development environment for your development. An IDE will contain tools for code completion and code insight; for example, if you have forgotten the name of a class method, or if you need quick access to a function declaration, or the instances where a variable is used.
Perhaps more importantly, IDEs contain integrated debugging tools that allow you to step through the code as it runs (more on this later). The examples in this book use a special PHP version of the Eclipse IDE called Eclipse PDT, which can be downloaded from http://www.eclipse.org/pdt/.
Configuring the Eclipse IDE
Once installed, there are a number of recommended configuration preferences to change, and these are outlined in the Moodle developer documentation at https://docs.moodle.org/dev/Setting_up_Eclipse#Setting_the_preferences_for_Moodle_development.
Once the development environment is configured, we need to consider how we will debug any code we write. For that, we need to set up and configure remote debugging, which we discuss next.
Configuring remote debugging
We will use the Chrome browser for development using the integrated JavaScript, CSS, and HTML debugging tools. To debug PHP scripts, we will need to install and configure a PHP remote debugger. The debugger we will use is called Xdebug--https://xdebug.org/index.php. Xdebug needs to be installed and configured in three places:
- The web server (Apache running our local development server)
- The development environment (Eclipse)
- The browser (Chrome)
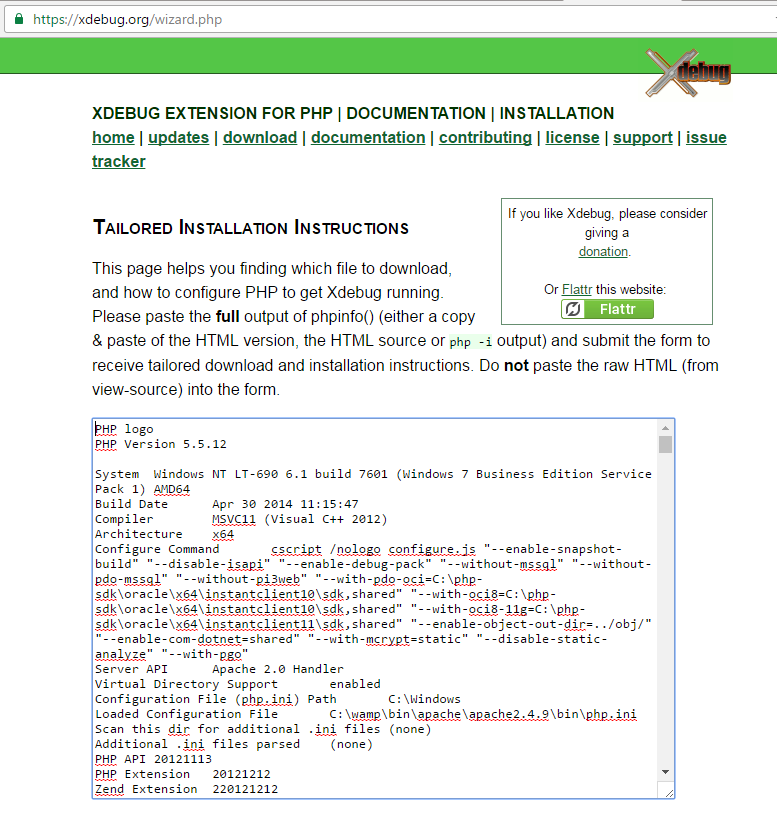
The first step is to configure Xdebug in Apache. In order to determine which version of Xdebug is required, you will need to obtain a copy of the full output from phpinfo()--refer to http://php.net/manual/en/function.phpinfo.php--and paste that into https://xdebug.org/wizard.php, as follows:

Press the Analyse my phpinfo() output button at the bottom of the page for instructions on how to download and configure Xdebug.
Next, we need to configure Xdebug in the IDE. Instructions are available in the Eclipse documentation at https://wiki.eclipse.org/Debugging_using_XDebug.
Finally, we need to install an Xdebug plugin into the browser. For Chrome, we will be using Xdebug helper. Check out https://github.com/mac-cain13/xdebug-helper-for-chrome for details, but the helper itself is easily installed through the Chrome Web Store (you can find relevant links on the GitHub page).


