Search icon CANCEL
Subscription
0
Cart icon
Your Cart (0 item)
Close icon
You have no products in your basket yet
Save more on your purchases now! discount-offer-chevron-icon
Savings automatically calculated. No voucher code required.
Arrow left icon
Explore Products
Best Sellers
New Releases
Books
Videos
Audiobooks
Learning Hub
Conferences
Free Learning
Arrow right icon
Arrow up icon
GO TO TOP
Microsoft Power Platform Functional Consultant: PL-200 Exam Guide

You're reading from   Microsoft Power Platform Functional Consultant: PL-200 Exam Guide Learn how to customize and configure Microsoft Power Platform and prepare for the PL-200 exam

Arrow left icon
Product type Paperback
Published in Dec 2020
Publisher Packt
ISBN-13 9781838985684
Length 648 pages
Edition 1st Edition
Arrow right icon
Author (1):
Arrow left icon
Julian Sharp Julian Sharp
Author Profile Icon Julian Sharp
Julian Sharp
Arrow right icon
View More author details
Toc

Table of Contents (34) Chapters Close

Preface 1. Section 1: Introduction
2. PL-200 Exam FREE CHAPTER 3. Section 2: Microsoft Dataverse
4. Power Platform 5. Data Modeling 6. Business Rules 7. Classic Workflows 8. Managing Data 9. Dataverse Settings 10. Security 11. Section 3: Power Apps
12. Model-Driven Apps 13. Canvas Apps 14. Portal Apps 15. Section 4: Automation
16. Power Automate Flows 17. Business Process Flows 18. UI Flows 19. Section 5: Power Virtual Agents
20. Creating Chatbots 21. Configuring Chatbots 22. Section 6: Integrations
23. Power BI 24. AI Builder 25. Microsoft 365 Integration 26. Application Life Cycle Management 27. Tips and Tricks 28. Practice Test 1 29. Answers to Practice Test 1 30. Practice Test 2 31. Answers to Practice Test 2 32. Assessments 33. Other Books You May Enjoy

Creating a classic workflow

The creation and editing of classic workflows are not available in the Power Apps maker portal. You need to edit your solution in the solution explorer by using the Switch to classic option.

You create and edit classic workflows from within the process node of the solution explorer, as shown in the following screenshot:
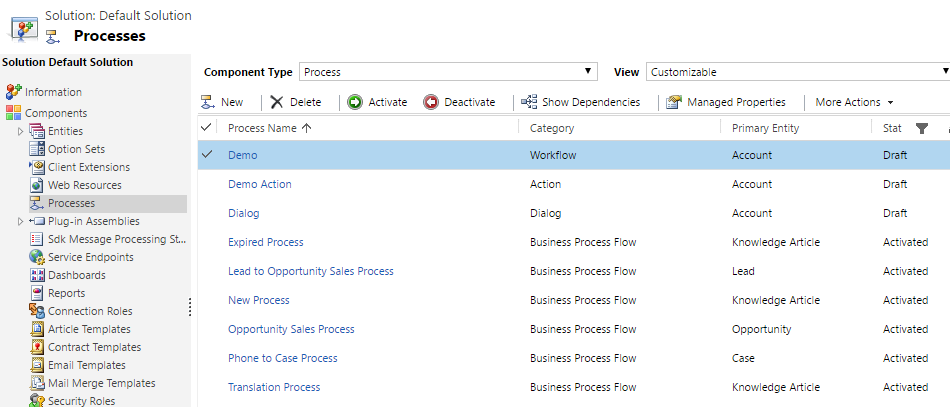
Figure 5.7 – Process node in the solution explorer

To create a classic workflow, click on the New button in the toolbar. The following window is opened:
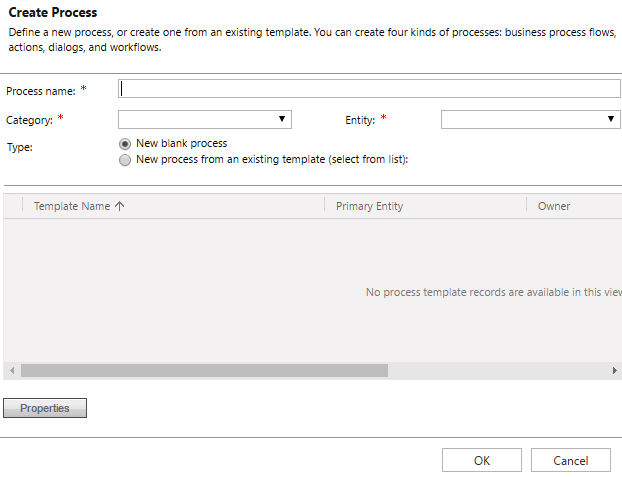
Figure 5.8 – Create Process window

You need to go through the following steps:

  1. Enter a name for the process that summarizes its purpose.
  2. Select the category. This is the process type.
  3. Select the entity the process is associated with.
Once you click on OK, you cannot change the process type or the entity.

Once you click on OK, the process is created, and the workflow editor opens, and you can set the trigger conditions in the properties of the editor and add your steps...

lock icon The rest of the chapter is locked
Register for a free Packt account to unlock a world of extra content!
A free Packt account unlocks extra newsletters, articles, discounted offers, and much more. Start advancing your knowledge today.
Unlock this book and the full library FREE for 7 days
Get unlimited access to 7000+ expert-authored eBooks and videos courses covering every tech area you can think of
Renews at €18.99/month. Cancel anytime