Using Zabbix user roles
Since Zabbix 6.0, we can create user roles within our Zabbix system. By creating our own user roles in Zabbix, it’s possible to provide additional permission settings. In older Zabbix versions, we had the ability to assign one of three user types:
- Users
- Admin
- Super admin
What these user types did in earlier releases was restrict what Zabbix users could see in the frontend. This was always pre-defined though.
Although these user groups are still in Zabbix, with the addition of user roles that we can create ourselves, we can set up our own frontend-related restrictions, making it possible to only show certain parts of the UI to certain Zabbix users. This is done by limiting access to certain permissions a user group has by default as well as respecting the user group-related permissions.
Getting ready
For this recipe, we will need a Zabbix server, preferably the one set up in the previous recipe. In the previous recipe, we set up different user groups to provide for different permissions on host groups. Completely separate from the user group, we will apply certain user roles to our users to determine what they can see in the UI. Let’s check out how to set up our user roles.
How to do it...
- First, navigate to the Zabbix frontend and go to Users | User roles. This will show us the default user roles as you know them from older Zabbix versions:
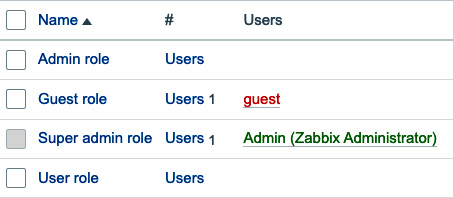
Figure 2.8 – The default Zabbix User roles configuration window
- Here, we can click on the blue Create user role button in the top-right corner.
- We’ll set up a new user role called
User+ role. This role will be for Zabbix users with only read permissions, but who need more access than just the Monitoring, Inventory, and Reports navigational elements.
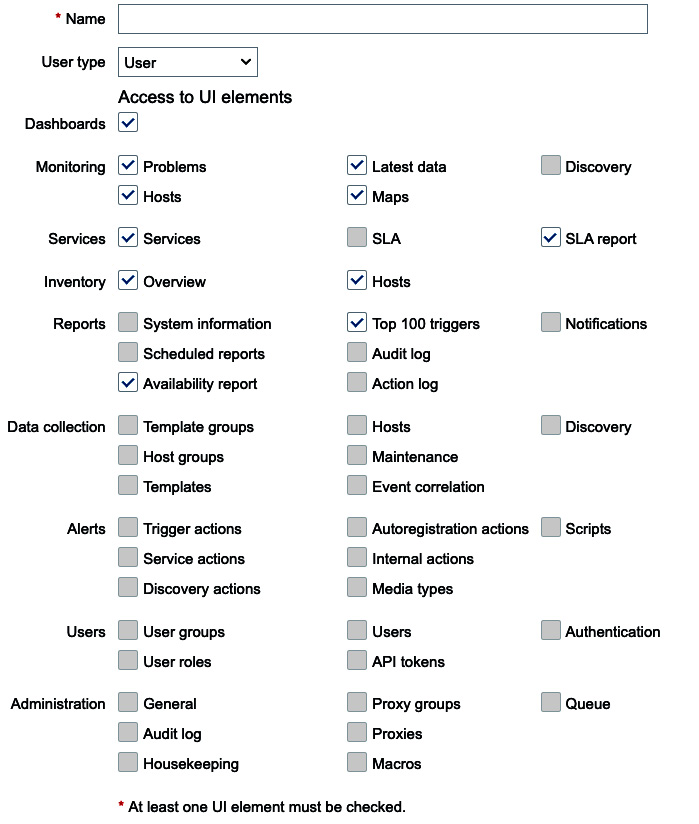
Figure 2.9 – The top part of a new Zabbix User role configuration window
- First things first, make sure to enter
User+ roleinto the Name field. - Let’s focus on the part where it states Access to UI elements first. When User is selected for User type, we are not able to add access rights to the user role. So, let’s change the User type by selecting Admin in the dropdown.
- I specifically want this user role named
User+ roleto have the ability to access the maintenance page. Setting this up will look like this:
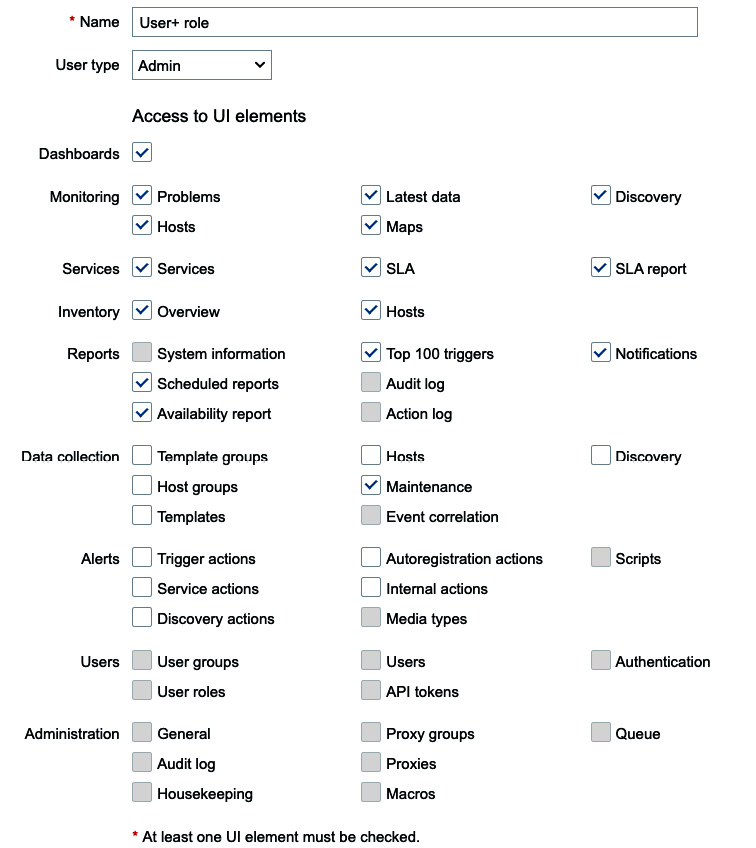
Figure 2.10 – A new Zabbix User+ role with access to Maintenance
- Make sure to also change the Access to actions section of the form by deselecting Manage scheduled reports as follows:
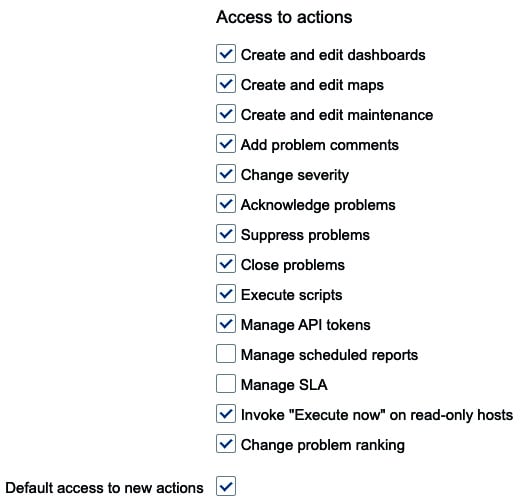
Figure 2.11 – A new Zabbix User+ role with correct Access to actions settings
- Last, but not least, click on the blue Add button at the bottom of the form to add this new user role.
How it works...
First, let’s break down the options we have when creating user roles in Zabbix:
- Name: We can set a custom name for our user role here.
- User type: User types still exist in Zabbix 6, although they are now assigned through user roles. There’s still a limit to what can be seen by a certain user type, for example the
Usertype will never have more than read access and theSuper admintype is still unrestricted when it comes to permissions. - Access to UI elements: Here, we can restrict what a user can see on the Zabbix UI when they are assigned to this user role.
- Access to services: Service or SLA monitoring can be restricted here, as we might not want all users to have access to it.
- Access to modules: Custom Zabbix frontend modules are fully integrated into the user role system, meaning we can select what frontend modules a Zabbix user can see.
- Access to API: The Zabbix API can be restricted to certain user roles. For example, you might only want a specific API user role, limiting the rest of the users’ access to the Zabbix API.
- Access to actions: In Zabbix user roles, certain actions can be limited, including the ability to edit dashboards, maintenance API tokens, and more.
Now, let’s look at what we’ve changed between the user role called User role and the user role called User+ role. The default user role called User role has the following access to UI elements:
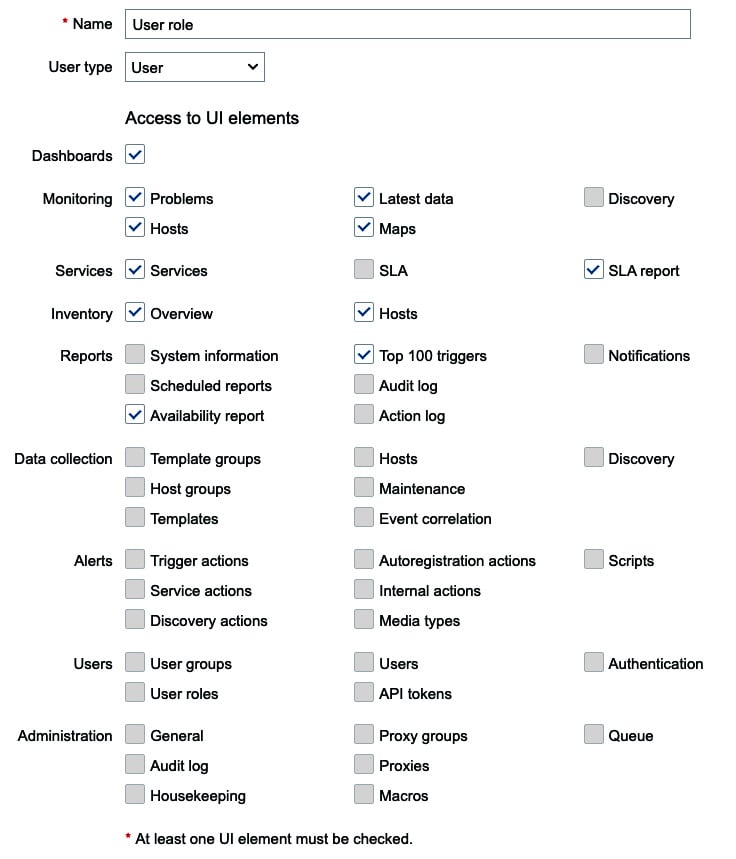
Figure 2.12 – Default Zabbix user role called User role Access to UI elements
By default, we have three user roles in Zabbix 6, which mirror the available user types. The user role we see here in Name mirrors the user type we have called User. It gives us access to the UI elements seen above, restricting the user role called User role to only be able to see certain things and make no configuration changes.
For example, it’s considered an impactful permission to be able to set Maintenance. Because of course, you could restrict important notifications by setting Maintenance. But here comes the catch, what if you explicitly want a Zabbix user to only be able to read information but still not have access to configuration pages? In Zabbix 5.0, this wasn’t possible because you could only select the User, Admin, or Super admin types, immediately giving access to the entire configuration section when using the Admin and Super admin user types.
Now, let’s see what we did by creating a new user role called User+ role:
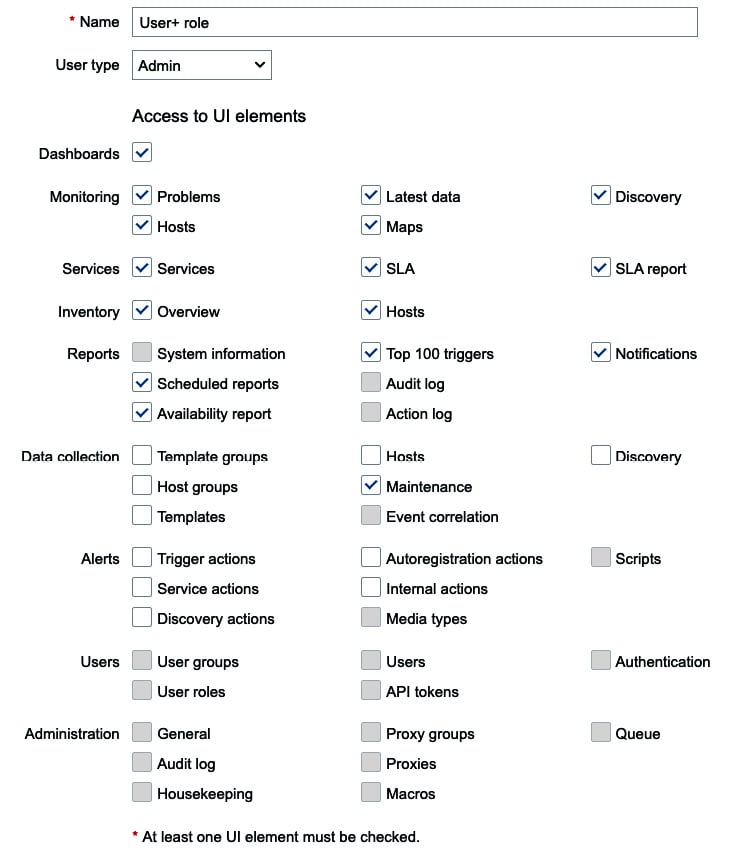
Figure 2.13 – New Zabbix user role called User+ role Access to UI elements
Here, we can see what happens if we change the user type to Admin but do not select all the available Access to UI elements. We now have a user role with no access to important configuration pages but with access to Maintenance.
Combining that with the settings for Access to actions, where we added the Create and edit maintenance setting as seen in Figure 2.11, we would have full access to the maintenance settings.
When we assign this role to a user in the next recipe and log in as that user, we will be able to see the following in our Zabbix sidebar:
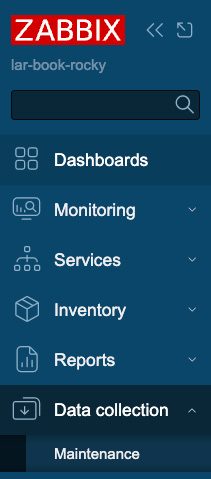
Figure 2.14 – Custom User role Zabbix sidebar
This, of course, is just one of the many types of configurations we can use. We also have the ability to allow Zabbix users access to menus and options through a number of parameters under a bunch of custom user roles. We are free to set this up however we please, adding a lot of user flexibility within Zabbix.
There’s more...
Zabbix is currently in the process of working out user roles further, meaning that some parts might still be missing or you might see issues with them. As it is a new feature, it is constantly being improved and extended. Check out the Zabbix documentation for more information regarding this feature: https://www.zabbix.com/documentation/6.4/en/manual/web_interface/frontend_sections/users/user_roles


