Setting up the development environment
.NET Core is fully cross-platform and can run on Windows, Linux, and macOS, so you can use any of these platforms to develop ASP.NET Core applications. The code samples in this book are written on Windows 11. However, you can run the same code on Linux and macOS.
There are also several IDEs available for ASP.NET Core, such as Visual Studio, Visual Studio Code (VS Code), Visual Studio for Mac, and Rider. In this book, we will mainly use VS Code.
Why not Visual Studio?
Visual Studio is a powerful IDE for the .NET platform. It provides a bunch of tools and features to elevate and enhance every stage of software development. However, VS Code is more lightweight and is open-source and cross-platform. We will use VS Code to understand the concepts of ASP.NET Core, then migrate to Visual Studio to use its rich features. If you are familiar with Visual Studio or any other IDE, feel free to use it.
Here is a list of software, SDKs, and tools you need to install:
- VS Code: https://code.visualstudio.com/download
- .NET 8 SDK: https://dotnet.microsoft.com/en-us/download
Both VS Code and the .NET 8 SDK are cross-platform, so please choose the correct one for your OS. When you install VS Code, please make sure you check the Add to PATH option.
If you use Windows, you may want to install Windows Terminal to run the command line. Windows Terminal is available for Windows 10 and above, and it provides a better user experience. But it is optional because you can also use the command line directly.
Configuring VS Code
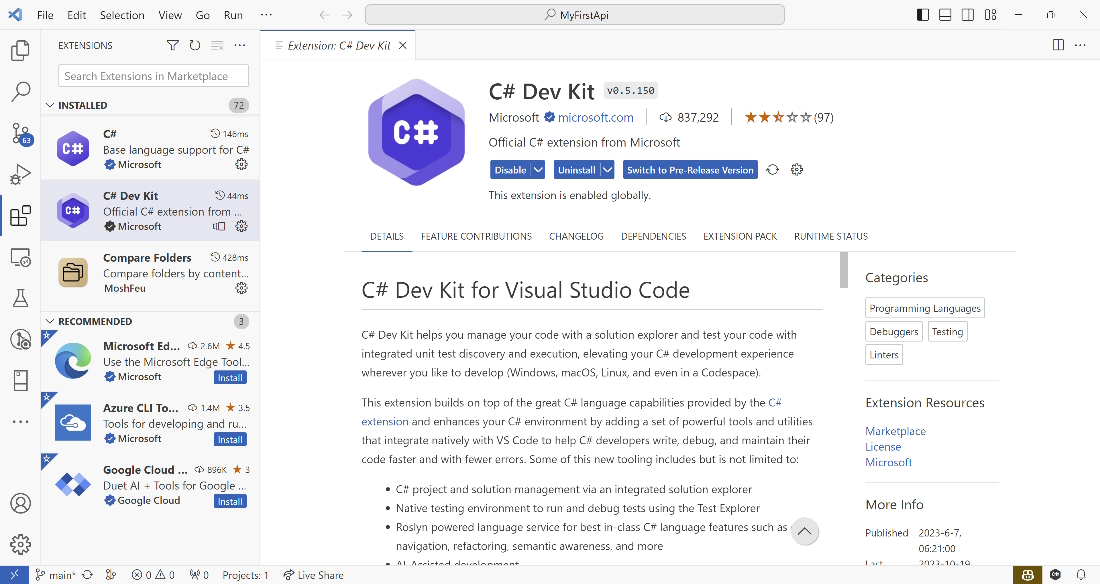
Strictly speaking, VS Code is a code editor. It cannot recognize all the coding languages. Therefore, you’ll need to install some extensions to support your development workflow. You can browse and install extensions by clicking on the Extensions icon in the Activity bar on the left-hand side of the VS Code interface. Then, you will see a list of the most popular extensions on the VS Code Marketplace:

Figure 2.1 – Overview of the C# Dev Kit extension for VS Code
You need to install this extension to support .NET development:
- C# Dev Kit: This is the official C# extension for VS Code provided by Microsoft. When you install C# Dev Kit, the following extensions will automatically be installed:
- C# extension: This extension provides C# language support powered by OmniSharp
- IntelliCode for C# Dev Kit: This extension provides AI-assisted IntelliSense for C#
- .NET Runtime Install Tool: This extension provides a unified way to install local, private versions of the .NET runtime
The C# Dev Kit extension provides a lot of features to help you develop .NET applications. Press Ctrl + Shift + P (on Windows) or Command + Shift + P (on macOS) to open the Command Palette, then type .net to see the commands provided by the C# Dev Kit extension. You can use these commands to create new projects, generate assets for build and debug, run tests, and more.
You can also install the following extensions to improve your productivity:
- EditorConfig for VS Code: This extension provides EditorConfig support for VS Code. EditorConfig helps teams of multiple developers maintain consistent coding styles when working on the same project across various editors and IDEs.
- GitHub Copilot: GitHub Copilot is your AI pair programmer. You can get code suggestions in real-time based on your context and comments in VS Code. This extension is not free, but you can try it for free for 30 days. If you are a student, a teacher, or a maintainer of a popular open-source project, you can get it for free.
To configure EditorConfig, you can create a file named .editorconfig in the root folder of the project. You can find a sample EditorConfig file at https://learn.microsoft.com/en-us/dotnet/fundamentals/code-analysis/code-style-rule-options.
Checking the .NET SDK
Once you install the .NET SDK, you can check the version by running the following command:
dotnet --version
You should be able to see the version number as follows:
8.0.101-rc.2.23502.2
Microsoft releases new versions of .NET SDKs frequently. If you encounter a different version number, that is acceptable.
You can list all available SDKs by running the following command:
dotnet --list-sdks
The preceding command will list all the available SDKs on your machine. For example, it may show the following output if have multiple .NET SDKs installed:
6.0.415 [C:\Program Files\dotnet\sdk]
7.0.402 [C:\Program Files\dotnet\sdk]
8.0.100 [C:\Program Files\dotnet\sdk]
8.0.101 [C:\Program Files\dotnet\sdk]
Multiple versions of .NET SDKs can be installed at the same time. We can specify the version of the .NET SDKs in the project file.
Which version of the SDKs should I use?
Every Microsoft product has a lifecycle. .NET and .NET Core provides Long-term support (LTS) releases that get 3 years of patches and free support. When this book was written, .NET 7 is still supported, until May 2024. Based on Microsoft's policy, even numbered releases are LTS releases. So .NET 8 is the latest LTS release. The code samples in this book are written with .NET 8.0.
To learn more about .NET support policies, please visit https://dotnet.microsoft.com/en-us/platform/support/policy.
We are now prepared to start developing ASP.NET Core applications. Let’s get to work!


