Creating a new user
When someone joins your organization, you will need to create a new user profile so that person can be assigned credentials to your tenant. In this recipe, we'll walk through the steps of creating a single user via the Microsoft 365 Admin Center.
Getting ready
The user creating the account must be an admin with the appropriate role (such as Global Admin).
How to do it…
- Go to the Microsoft 365 Admin Center at http://admin.microsoft.com.
- Select Users > Active users.
- Select Add a user.
- A form will display, in which you enter the user's basic information. Fill in the first section, Set up the basics:

Figure 2.1 – Fields and options for setting up a new user in Office 365
In the Password settings section, it is recommended to allow the tenant to set a temporary password by leaving the default selections checked. You may check Send password in email upon completion and add an email address, or when the setup is complete, you will have a chance to copy the user's credentials.
Click Next to move to the Product licenses section.
- As discussed in Chapter 1, Office 365 Setup and Basic Administration, select the appropriate location and license. Additionally, you can select the Create user without product license (not recommended) option if you would like to assign licenses later:

Figure 2.2 – License options when adding a new user
Click Next to move to the Optional settings section.
From here, you can assign an admin or elevated rights role to the user, or you can add in additional profile information for the user.
- Select the appropriate option by expanding the section and filling in the details:

Figure 2.3 – Optional role and profile information for a new user
- Click Next to move to the Finish section.
- Your user is not yet created. Review the information and click Finish adding:

Figure 2.4 – Confirmation screen for reviewing the details of a new user
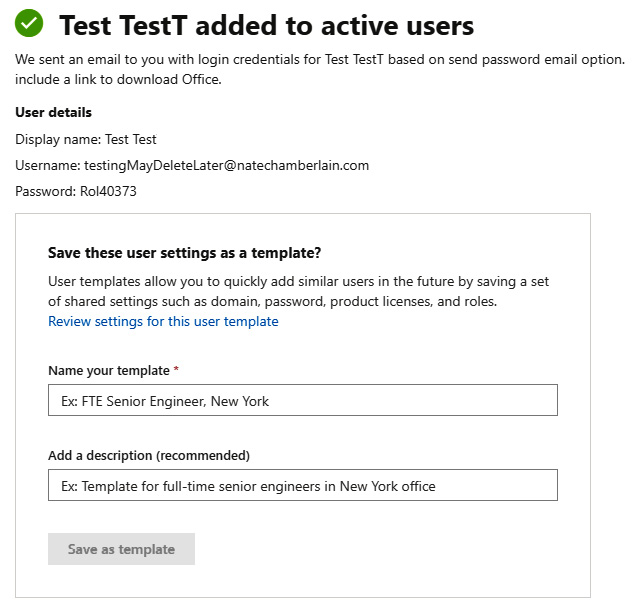
- From this screen, you can copy the User details and provide those to the user:

Figure 2.5 – Optional ability to save a new user's configuration as a template for future new users
How it works…
In this recipe, you created a new user from scratch. User management starts with this action of creating a new user. Once the user has been created and appropriate product licenses applied, the user will have the ability to sign in.


