Active Directory migration (Must know)
We will start with the Active Directory migration. At this point, we have the proven migration plan and tested all procedures in the lab.
Getting ready
The following prerequisites have to be met before we can introduce the first Windows Server 2012 Domain Controller into the existing Active Directory domain:
- In order to add a Windows Server 2012 Domain Controller, the Forest Functional Level (FFL) must be Windows Server 2003.
- ADPREP is part of the domain controller process and the schema will get upgraded during this process. So the account must have the Schema and Enterprise admins privileges to install the first Windows Server 2012 Domain Controller.
- If there is a firewall between the new server and the existing domain controllers, make sure all the RPC high ports are open between these servers. The domain controller installation and replication can be controlled by a static or a range of RPC ports by modifying the registry on the domain controllers.
- The new Windows 2012 server′s primary DNS IP address must be the IP address of an existing domain controller.
- The new server must be able to access the existing Active Directory domain and controllers by NetBIOS and Fully Qualified Domain Name (FQDN).
- If the new domain controller will be in a new site or in a new subnet, make sure to update the Active Directory Sites and Services with this information.
In Windows Server 2012, domain controllers can be remotely deployed by using the Server Manager. The following recipe provides the step-by-step instructions on how to deploy a domain controller in an existing Active Directory environment.
How to do it...
- Install and configure a Windows Server 2012. Refer to the recipes Installing Windows Server 2012 (Must know) and Configuring Windows Server 2012 (Must know) for more details.
- Join the new Windows Server 2012 to the existing Active Directory domain. Refer to the recipe Configuring Windows Server 2012 (Must know) for more details.
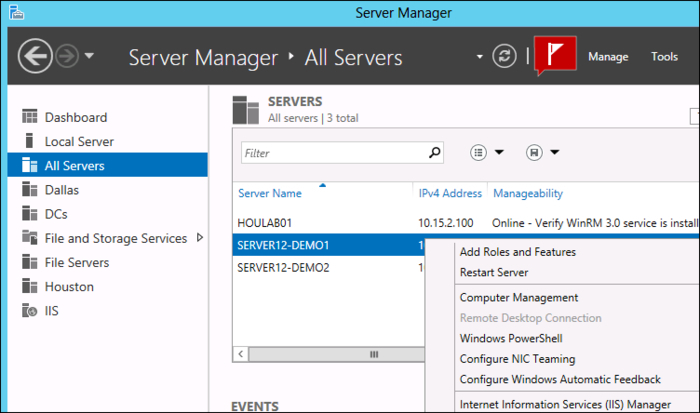
- Open Server Manager. Navigate to the All Servers group in the left-hand side pane.
- From the Server Name box, right-click on the appropriate server and select the Add Roles and Features option. You can also select Add Roles and Features from the Manage menu in the command bar. If the correct server is not listed here, you can manually add it from the Manage tab on the top right-hand side and select Add Server.
- Click on Next on the Welcome window.
- In the Select Installation Type window, select Role based or Feature based installation. Click on Next.
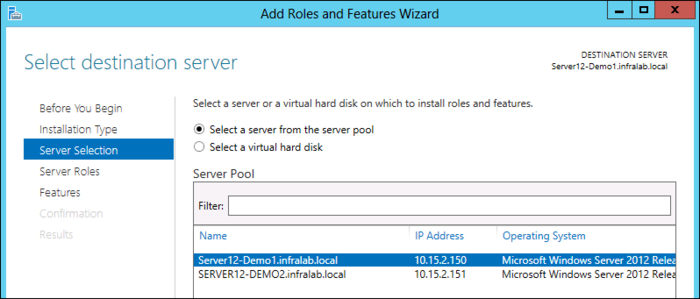
- In the Select destination server window, select Select a server from the server pool option and the correct server from the Server Pool box. Click on Next.
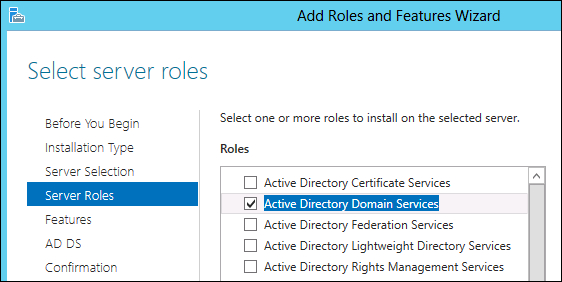
- On the Select server roles window, select Active Directory Domain Services. You will see a pop-up window to confirm the installation of Group Policy Management Tool. It is not required to install the administrative tools on a domain controller. However, this tool is required for the Group Policy Object management and administration. Click on Next.
- Click on Next in the Select features window.
- Click on Next on the Active Directory Domain Services window.
- In the Confirm Installation Selections window, select the Restart the destination server automatically if required option. In the pop-up window click on Yes to confirm the restart option and click on Install. This will begin the installation process.
- You will see the progress on the installation window itself. This window can be closed without interrupting the installation process. You can get the status update from the notification section in the command bar as shown in the following screenshot:
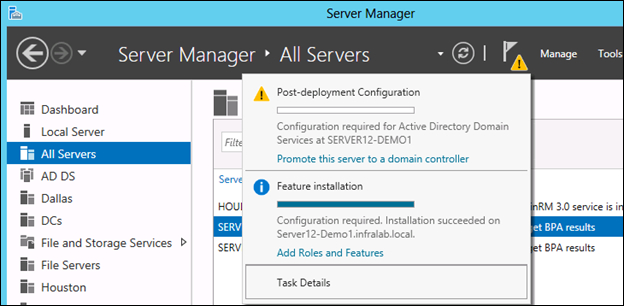
- The Post-deployment Configuration option needs to be completed after the Active Directory Domain Services role installation. This process will promote the new server as a domain controller.
- From the notification window, select Promote this server to a domain controller hyperlink.
- From the Deployment Configuration window, you should be able to:
- Install a new forest
- Install a new child domain
- Add an additional domain controller for an existing domain
- Specify alternative credentials for the domain controller promotion, and so on
- Since our goal is to install an additional domain controller to an existing domain, select the Add a domain controller to an existing domain option. Click on Next.

- In the Domain Controller Options window, you will see the following options:
- Domain Name System (DNS) server
- Global Catalog (GC)
- Read only Domain controller (RODC)
- Site name:
- Type the Directory Service Restore Mode (DSRM) password
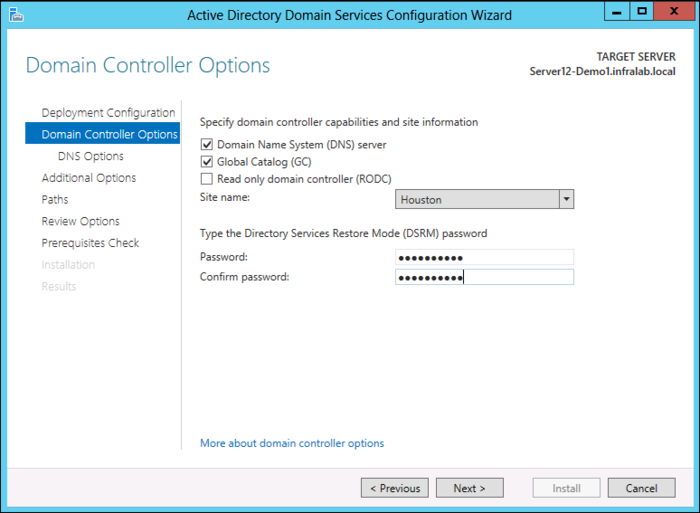
- Select Domain Name System (DNS) server and Global Catalog (GC) checkboxes and provide the Directory Services Restore Mode (DSRM) password. Click on Next.
- Click on Next on the DNS Options window.
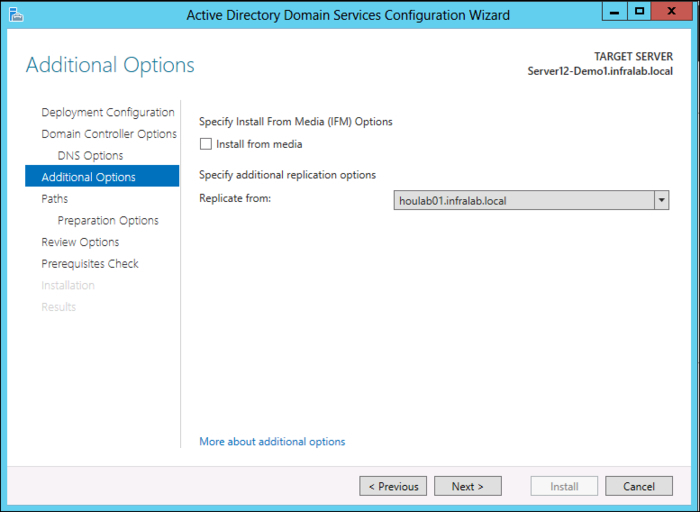
- In the Additional Options window you will see the following options:
- Install from media
- Replicate from
- Accept the default options unless you have technical reasons to modify these. Click on Next.
- In the Paths window, you can specify the AD Database, Log, and SYSVOL locations. Select the appropriate locations and then click on Next.
Note
Review the Microsoft Infrastructure Planning and Design (IPD) guides for best practices recommendations. For performance improvements, it is recommended to place database, log, and so on in separate drives.
- Click on Next on the Preparation Options window. During this process the Active Directory Schema and Domain Preparation will happen in the background.
- You should be able to review the selected option on the next screen. You can export these settings and configurations to a PowerShell script by clicking on the View Script option in the bottom-right corner of the screen. This script can be used for future domain controller deployments.
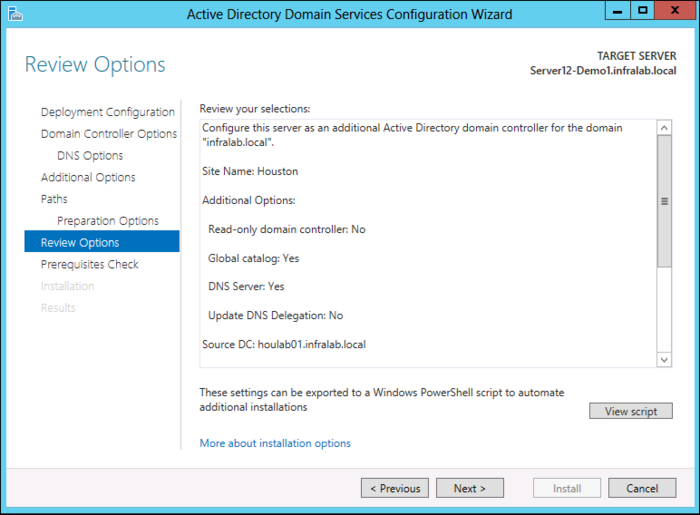
- Click on Next to continue with the installation.
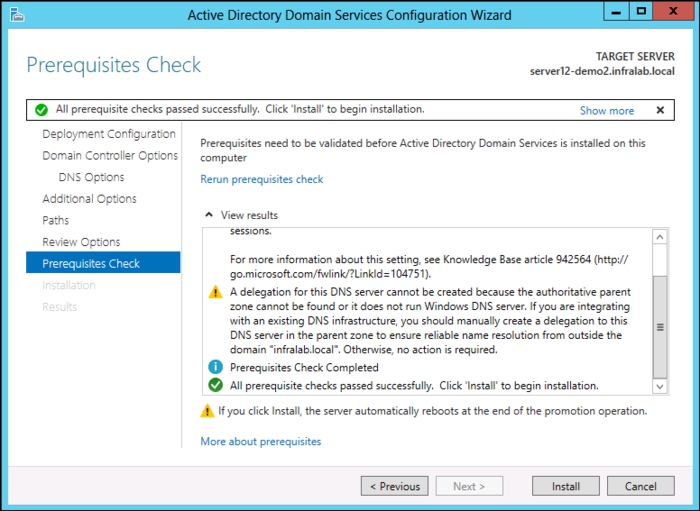
- The prerequisite checking process will happen in the background. You will see the result in the Prerequisites Check window. This is a new enhancement in Windows Server 2012. Review the result and click on Install.
- The progress of the domain controller promotion will display on the Installation window.
- The following warning message will be displayed on the destination server before it restarts the server:

Note
You can review the %systemroot%\debug\dcpromo.log and %SystemRoot%\debug\netsetup.log log files to get more information about DCPROMO and domain join-related issues.
How it works...
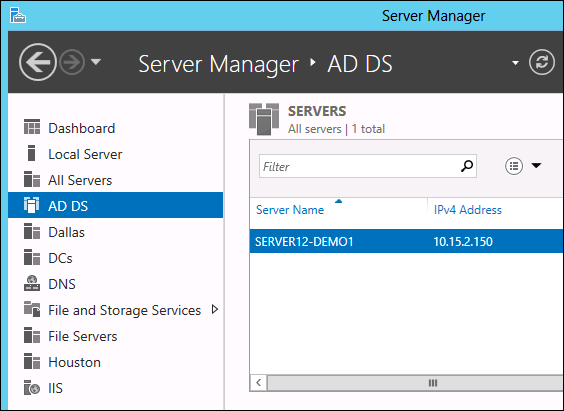
The preceding process adds an additional domain controller in the exiting Active Directory forest. At this time the current Active Directory environment has both Windows Server 2008/R2 and Windows Server 2012 domain controllers. This is technically called a mixed mode environment. The Server Manager will be updated with the new roles and features on this server as shown in the following screenshot:
There′s more...
If you are planning to perform an in-place upgrade of a domain controller (the first Windows Server 2012 Domain Controller), the Active Directory Schema and Domain Preparation (ADPREP) commands need to be run manually. The ADPrep.exe tool is available in the D:\Support\Adprep\ folder in the Windows Server 2012 installation media. Keep in mind that the ADPREP tool is only available in a 64-bit version. After the schema upgrade, the schema version can be manually verified by using the following dsquery command:
dsquery * cn=schema,cn=configuration,dc=domain,dc=com -scope base -attr objectVersion

The objectVersion value is 56 for the Windows Server 2012 schema.
Note
You can also identify objectVersion based on the LDIF filename. The latest Sch56.ldf filename indicates that schema version as 56. Their files are available in the D:\Support\Adprep\ folder.
The Group Policy Preparation (/gprep) is not a requirement while adding Windows Server 2012 Domain Controllers to the existing domain. However, in order to use the Result Set of Policy (RSoP) in planning mode, the /gprep process needs to be completed by using the adprep/gpprep command. The Read Only Domain Controller Preparation (adprep /rodocprep) process needs to be completed before you can add the Read Only Domain Controllers (RODC).
Note
You can review the ADPREP log file (%windir%\System32\Debug\Adprep\Logs) to get more information about ADPREP-related issues.
The health of the domain controller and domain can be verified by using native tools such as DCDiag. Microsoft has a new tool called ADRELSTATUS (Active Directory Replication Status Tool) to verify and monitor Active Directory replication. As a best practice it is recommended to have multiple domain controllers for the same domain. You can use the same procedure to add more domain controllers. It is also recommended to install Remote Server Administration Tools on a Windows 8 machine to administer Active Directory instead of directly logging on to a domain controller.


