Before we start building web applications or web servers using Swift, it's a good idea to understand the basics of how they work. What is HTTP? What is a request and a response? What does it look like? These are some of the questions that will be answered in this section. To reinforce the concepts, we will try to go through the steps of what happens when a user types a URL in the browser.
How do the web servers work?
User requesting a web page
When a user goes to the browser and types a URL, what exactly is happening?
- The browser tries to look up the IP address of the domain name in the URL by getting it from the DNS Server. Think of DNS as a directory mapping the domain name to the IP Address.
- Once the browser has the IP Address, it sends a HTTP request to that IP Address on port 80. If the URL is secure (HTTPS), then the request is sent to port 443. A simple HTTP request that is sent in plain text format looks like this:
GET /hello.html HTTP/1.1. - The request also contains headers that are shared to pass additional information about the request, such as authentication information, cookies, or the type of the browser making the request.
- The request is routed through all of the routers to the final destination, which is an application or web server serving web pages.
- The server looks at the request and figures out what type of request it is. In our simple example, we made a GET request. The following types of request are supported by the web/application server: GET, POST, PUT, PATCH, DELETE, and HEAD.
- The server also looks at the request and figures out what path is being requested. In our example, we are requesting a web page at the /hello.html path.
- In the request, we specify the protocol we are using, which is the HTTP/1.1 protocol. Currently HTTP/2 is also available and certain browsers that support it will make a request with it.
- The request can also contain headers that contain extra information from the browser for the server to figure out how to respond. After the header section, the request is followed by two empty new lines that tell the server that it has received the entire request message and now it is time for the server to respond.
- The server then will either generate the hello.html page or serve it from disk. The web servers that serve HTML pages from disk are called static web servers while the web servers that dynamically generate content are called application servers as they have some business logic to generate the HTML content dynamically based on the type and the user requesting it.
- The server replies back to the request with a response. The response format is similar to the request where the first few lines are called the response headers and they are key value pairs of metadata, followed by two new lines, and then followed by the HTML response or plain text response from the server.
- The server closes the connection, which tells the browser that it has received all of the response and then it renders the HTML or plain text in the browser.
Mobile application requesting data
Similar to how the browser requests a web page from the web server, a mobile application can request data in JSON or XML format from the application server via HTTP or HTTPS. It uses the same protocol to send similar types of requests with headers followed by two new line characters and gets a reply back in the same format with headers followed by two new lines and data as plain text in JSON format.
HTTP request and response
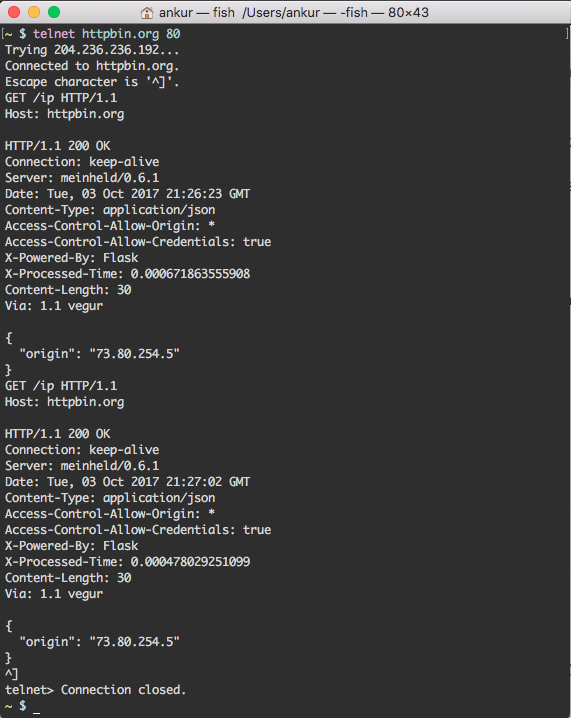
To see all of this in action, let's make all of the requests that the browser does behind the scenes using telnet, which is a command-line tool used to connect to a host, and send messages to it on a port, which is exactly what the browser does. We will do the following in the Terminal:
- Connect to a host called httpbin.org, which is a free HTTP server sending back fake data for testing and learning purpose. To make a HTTP request via telnet, we need to connect on port 80 using the following command. If you do not have the telnet command installed locally on your macOS, install it using the brew package manager:
$ telnet httpbin.org 80
- This should print out the following, saying it is trying to connect to an IP address, which is the IP it got from the DNS server for this domain, httpbin.org:
Trying 54.243.145.223...
Connected to httpbin.org.
Escape character is '^]'.
- Enter the HTTP request followed by the header(s) to get our IP address as the response from the server. We need to type the following in the Terminal in our telnet session. Make sure to add two new lines at the end that will mark the end of our request to the server:
GET /ip HTTP/1.1
Host: httpbin.org
- After you enter the second new line, you will get back a response which is an HTTP response from the application server. The format is similar to the request where the headers are followed by the two new lines and then by the content, as follows:
HTTP/1.1 200 OK
Connection: keep-alive
Server: meinheld/0.6.1
Date: Tue, 03 Oct 2017 21:26:23 GMT
Content-Type: application/json
Access-Control-Allow-Origin: *
Access-Control-Allow-Credentials: true
X-Powered-By: Flask
X-Processed-Time: 0.000671863555908
Content-Length: 30
Via: 1.1 vegur

{
  "origin": "73.80.254.5"
}
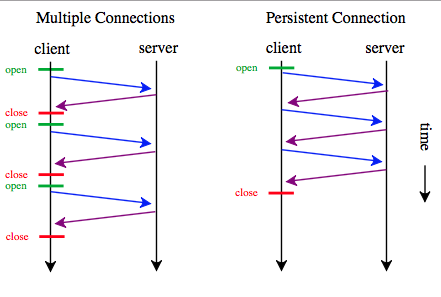
Servers can pass back a header value of Connection: keep-alive, which keeps the telnet client connected to the server even after it prints the response. Without this header line, the telnet client would disconnect after printing to the console. Browsers also obey this and reuse the live connection to send other HTTP requests via the same connection.
To verify this, we can send another GET request to /ip by passing the same request and header value followed by two new lines:

This exercise was designed to show you how HTTP works behind the scenes. You should now have a better understanding of how the browser or mobile applications make the request to our server and how we can respond back so that the browser or applications can accept and understand the web page or data passed back. It also touched on different parts of the HTTP request and response, such as the request signature, which contains the headers followed by two new lines and the response signature, which contains the headers followed by the two new lines, and finally followed by the text (for HTML/XML or JSON) or binary content (for images or videos).
I hope this gives you a better understanding of the request response cycle and how the server can deliver a better network performance by keeping the connection alive via the keep-alive header. The following diagram shows how a persistent connection with keep-alive can help make the web application or transfer data quickly, as it does not need to establish a connection every time:


