Search icon CANCEL
Subscription
0
Cart icon
Your Cart (0 item)
Close icon
You have no products in your basket yet
Save more on your purchases! discount-offer-chevron-icon
Savings automatically calculated. No voucher code required.
Arrow left icon
Explore Products
Best Sellers
New Releases
Books
Videos
Audiobooks
Learning Hub
Free Learning
Arrow right icon
Arrow up icon
GO TO TOP
Arduino Robotic Projects

You're reading from   Arduino Robotic Projects Build awesome and complex robots with the power of Arduino.

Arrow left icon
Product type Paperback
Published in Aug 2014
Publisher
ISBN-13 9781783989829
Length 240 pages
Edition Edition
Languages
Tools
Arrow right icon
Author (1):
Arrow left icon
Richard Grimmett Richard Grimmett
Author Profile Icon Richard Grimmett
Richard Grimmett
Arrow right icon
View More author details
Toc

Table of Contents (21) Chapters Close

Arduino Robotic Projects
Credits
About the Author
About the Reviewers
www.PacktPub.com
Preface
1. Powering on Arduino FREE CHAPTER 2. Getting Started with the Arduino IDE 3. Simple Programming Concepts Using the Arduino IDE 4. Accessing the GPIO Pins 5. Working with Displays 6. Controlling DC Motors 7. Controlling Servos with Arduino 8. Avoiding Obstacles Using Sensors 9. Even More Useful Sensors 10. Going Truly Mobile – the Remote Control of Your Robot 11. Using a GPS Device with Arduino 12. Taking Your Robot to Sea 13. Robots That Can Fly 14. Small Projects with Arduino Index

Enabling an XBee interface in the Arduino IDE


Let's first set up the Arduino IDE for XBee that will be connected to your Arduino. Once you have connected all the shields to your Arduino, simply connect your Arduino with the USB cable to one of the computers. Bring up the Arduino IDE and then type in the following code into the sketch window:
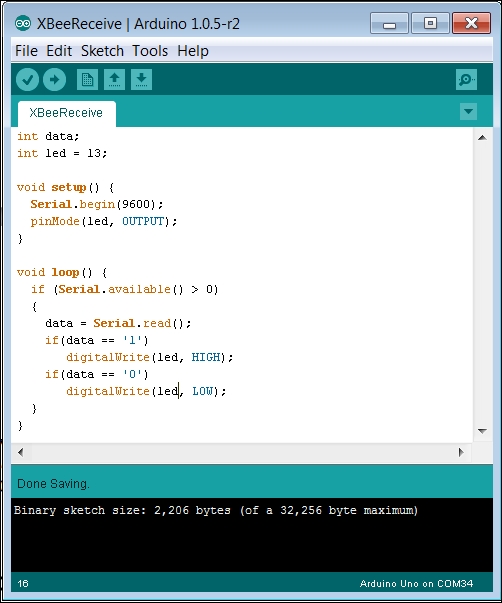
This sketch is quite simple; you can turn on the on-board LED with remote commands, 1 to turn it on and 0 to turn it off. Once you have compiled and uploaded this code, disconnect the USB cable from the computer. You'll need to physically change a switch setting on the wireless shield so that the device will now accept commands from your XBee controller. It is on the opposite end of the shield and looks like the following image:
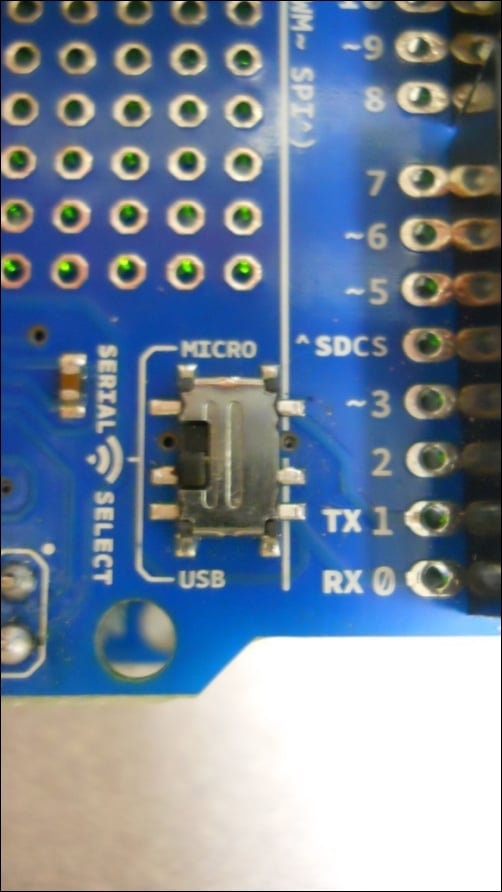
When you are programming the device, you'll want this switch to be in the USB location. When you are ready to communicate with the device, you'll want to switch this to the MICRO setting. So, change it to the MICRO setting once...

lock icon The rest of the chapter is locked
Register for a free Packt account to unlock a world of extra content!
A free Packt account unlocks extra newsletters, articles, discounted offers, and much more. Start advancing your knowledge today.
Unlock this book and the full library FREE for 7 days
Get unlimited access to 7000+ expert-authored eBooks and videos courses covering every tech area you can think of
Renews at $19.99/month. Cancel anytime
Banner background image