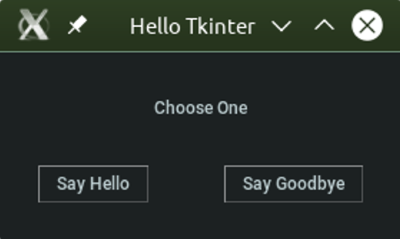
Of course, without any interactivity, this is just a message box. Let's add something for the user to do with our application. Bring the source code back up and change the __init__ method to look like this:
class Window(tk.Tk):
  def __init__(self):
    super().__init__()
    self.title("Hello Tkinter")

    self.label = tk.Label(self, text="Choose One")
    self.label.pack(fill=tk.BOTH, expand=1, padx=100, pady=30)

    hello_button = tk.Button(self, text="Say Hello",
                             command=self.say_hello)
    hello_button.pack(side=tk.LEFT, padx=(20, 0), pady=(0, 20))

    goodbye_button = tk.Button(self, text="Say Goodbye",
                               command=self.say_goodbye)
    goodbye_button.pack(side=tk.RIGHT, padx=(0, 20), pady=(0, 20))
Our label has changed to say Choose one to indicate that the user can now interact with the application by selecting one of the two buttons to click. A button in Tkinter is created by adding an instance of the Button widget.
The Button widget is exactly what you would imagine; something the user can click on to execute a certain piece of code. The text displayed on a Button is set via the text attribute, much like with a Label, and the code to run when clicked is passed via the command argument.
Our two buttons are placed within our main window using pack. This time, we use the side keyword argument. This tells the geometry manager where to place the item inside the window. Our hello_button will go on the left, and our goodbye_button will go on the right.
We also use padx and pady to give some spacing around the buttons. When a single value is given to these arguments, that amount of space will go on both sides. When a tuple is passed instead, the format is (above, below) for pady and (left, right) for padx. You will see in our example that both buttons have 20 pixels of padding below them; our leftmost button has 20 pixels of padding to its left, and our rightmost has 20 pixels to its right. This serves to keep the buttons from touching the edge of the window.
We now need to define the functions which will run when each button is pressed. Our Say Hello button calls say_hello and our Say Goodbye button calls say_goodbye. These are both methods of our Window class and so are prefixed with self. Let's write the code for these two methods now:
def say_hello(self):
  self.label.configure(text="Hello World!")

def say_goodbye(self):
  self.label.configure(text="Goodbye! \n (Closing in 2 seconds)")
  self.after(2000, self.destroy)
In say_hello, we will update the text of our label widget to Hello World! as it was before. We can change attributes of Tkinter widgets using the configure method. This then takes a keyword argument and value, just like when we created them initially.
Our say_goodbye method will also update the label's text and then close the window after two seconds. We achieve this using the after method from our Tk widget (which we have subclassed into Window). This method will call a piece of code after a certain amount of time has elapsed (in milliseconds).
The destroy method can be called on any Tkinter widget, and will remove it from the application. Destroying the main window will cause your application to exit, so use it carefully.
Leave the if __name__ == "__main__" block as it was before and give this application a try. You should see now that both buttons will do something. It may not look like many lines of code, but we have now covered quite a lot of the things a GUI application will need to do. You may be getting the following output:

We have provided user interactivity with Button widgets and seen how to link a button press to a piece of code. We've also covered updating elements of the user interface by changing the text displayed in our Label widget. Performing actions outside of the main loop has also happened when we used the after method to close the window. This is an important aspect of GUI development, so we will revisit this later.


