Search icon CANCEL
Subscription
0
Cart icon
Your Cart (0 item)
Close icon
You have no products in your basket yet
Save more on your purchases! discount-offer-chevron-icon
Savings automatically calculated. No voucher code required.
Arrow left icon
Explore Products
Best Sellers
New Releases
Books
Videos
Audiobooks
Learning Hub
Free Learning
Arrow right icon
Arrow up icon
GO TO TOP
Learning Salesforce Lightning Application Development

You're reading from   Learning Salesforce Lightning Application Development Build and test Lightning Components for Salesforce Lightning Experience using Salesforce DX

Arrow left icon
Product type Paperback
Published in Jul 2018
Publisher Packt
ISBN-13 9781787124677
Length 458 pages
Edition 1st Edition
Arrow right icon
Author (1):
Arrow left icon
Mohit Shrivatsava Mohit Shrivatsava
Author Profile Icon Mohit Shrivatsava
Mohit Shrivatsava
Arrow right icon
View More author details
Toc

Table of Contents (17) Chapters Close

Preface 1. Introduction to the Lightning Component Framework FREE CHAPTER 2. Exploring Salesforce DX 3. Lightning Component Building Blocks 4. The Lightning JavaScript API 5. Events in the Lightning Component Framework 6. Lightning Data Service and Base Components 7. Using External JavaScript Libraries in Lightning Components 8. Debugging Lightning Components 9. Performance Tuning Your Lightning Component 10. Taking Lightning Components out of Salesforce Using Lightning Out 11. Lightning Flows 12. Making Components Available for Salesforce Mobile and Communities 13. Lightning Navigation and Lightning Console APIs 14. Unit Testing Lightning Components 15. Publishing Lightning Components on AppExchange 16. Other Books You May Enjoy

Setting up a Salesforce developer organization to enable the building of Lightning Components

Before we start building Lightning Components, there are some things that need to be done to your developer organization.

If you have not signed up for a Developer organization yet, you can get one for free at https://developer.Salesforce.com/signup
  1. Enabling My domain is a necessary step, and if you have not enabled it, then it's not possible to test your Lightning Component. To enable My domain, the navigation path is Setup | Company Settings | My Domain. Register for a domain name, walk through the wizard, and make sure you deploy the new domain to all users. The following screenshot shows the navigation path and also the end result once My Domain is enabled:
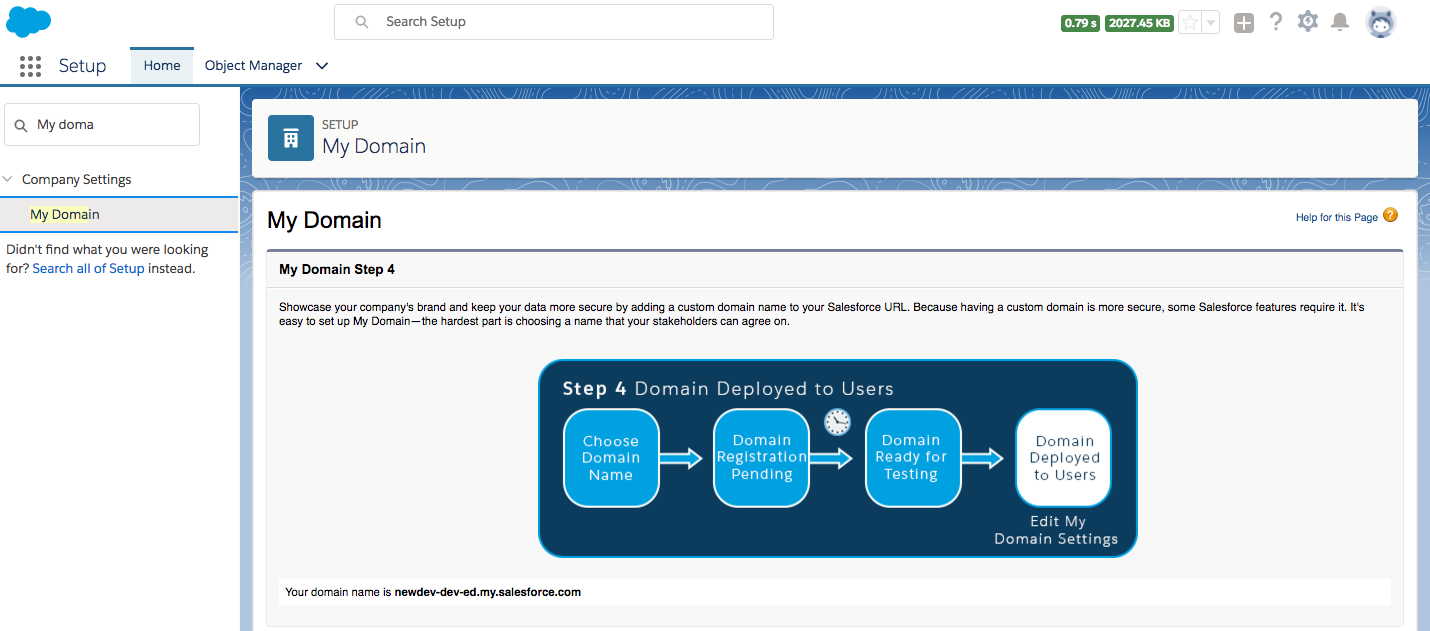
The preceding screen is for deploying My Domain to users
  1. Disabling caching for development purposes is very important. Lightning Experience performs caching to improve performance, and this may interfere with the testing of Lightning Components because your code changes might not immediately reflect upon page reload.
  2. The navigation path to disable caching is Setup| Security | Session Settings. The following screenshot shows the checkbox that needs to be unchecked:
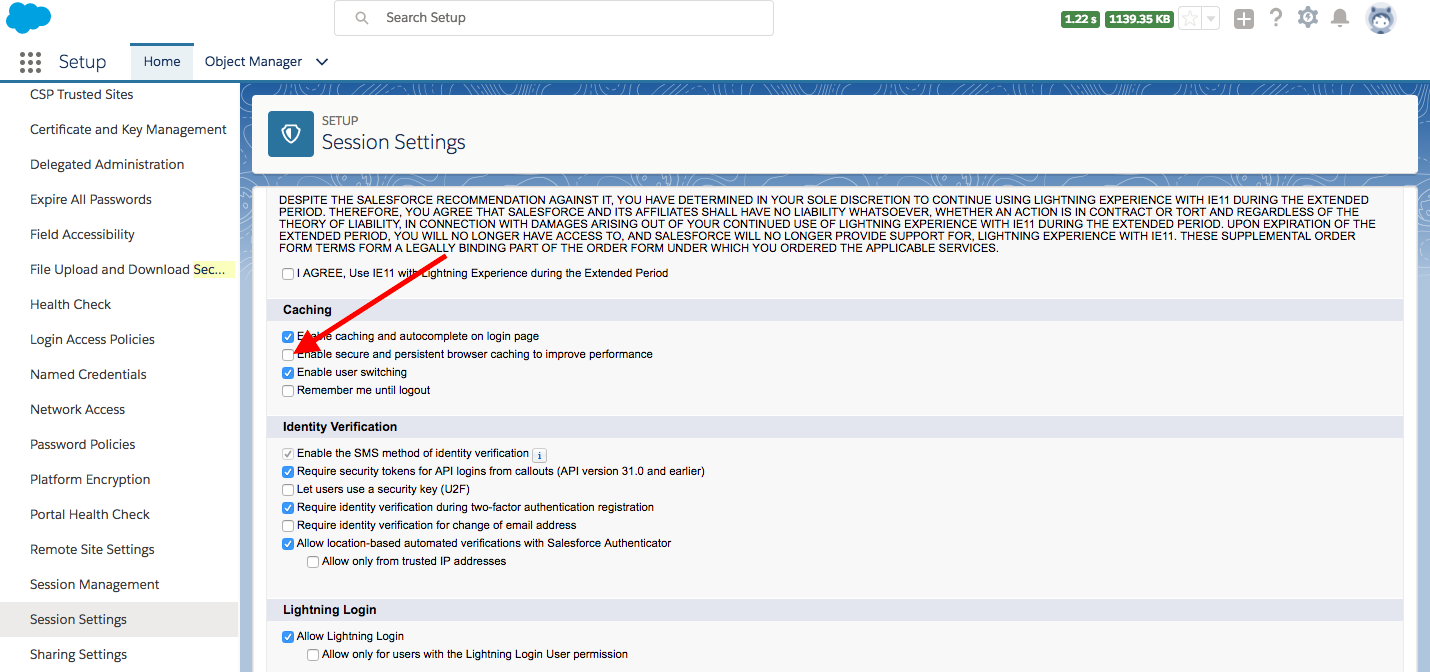
This is how you can disable persistent cache in salesforce environment for Lightning Component development Purpose
For production, these settings need to be enabled to improve performance.

Creating a simple hello world Lightning Component

The aim of the section is to demonstrate how to build a simple Lightning Component via the Salesforce Developer Console. We will also explore how to create a simple application to test our component.

The simplest way to create a Lightning Component is to use the Salesforce Developer Console. In later chapters, we will get familiar with source-driven development and the use of an Integrated Development Editor (IDE). For now, let's use the Salesforce Developer Console:

  1. Open the Salesforce Developer Console:
  1. Use the File menu to create a new Lightning Component:
  1. Name the component. Let's name it HelloWorld for now.
  2. Enter the following code in the component markup and save it (command + S):
<aura:component > 
HelloWorld
</aura:component>
  1. Let's test this on the browser. To test this, we will need to create a Lightning Application. Go to the File menu, as we did in step 2, to create a Lightning Application. Let's name the application HelloWorldApp, enter the following code, and save it (command + S). Notice we have used the HelloWorld component in the aura:application tag to reference the component.
<aura:application >
<c:HelloWorld/>
</aura:application>
  1. Click on Preview in the application and make sure the browser renders HelloWorld. The following screenshot shows the preview and the application:
  1. You will see that there was a unique URL generated as Salesforce_domain/c/HelloWorldApp.appNotice that c is the default namespace. For a managed package application, your organization may have a namespace and then the namespace is used in the URL generated instead of c. Also, note that Salesforce_domain is the domain name of your Salesforce instance. The following screenshot shows how the component markup is rendered on the browser:
You have been reading a chapter from
Learning Salesforce Lightning Application Development
Published in: Jul 2018
Publisher: Packt
ISBN-13: 9781787124677
Register for a free Packt account to unlock a world of extra content!
A free Packt account unlocks extra newsletters, articles, discounted offers, and much more. Start advancing your knowledge today.
Unlock this book and the full library FREE for 7 days
Get unlimited access to 7000+ expert-authored eBooks and videos courses covering every tech area you can think of
Renews at $19.99/month. Cancel anytime
Banner background image