To run this recipe, you need to complete the Reviewing the Hyperledger Fabric architecture and components recipe in this chapter to install Hyperledger Fabric with samples and binaries on the AWS EC2 instance.
Building the Fabric network
How to do it...
There is a Build your first network (BYFN) sample installed with Hyperledger Fabric. We will use that to provision a sample Hyperledger Fabric network that consists of two organizations, each maintaining two peer nodes, and a solo ordering service. To do this, follow these steps:
- Log in as a default user and execute the byfn.sh script to generate certificates and keys for the network:
        $ cd ~
        $ sudo chmod 777 -R fabric-samples
        $ cd fabric-samples/first-network
        $ sudo ./byfn.sh generate
- Bring up the Fabric network by executing the byfn.sh script using the up option:
        $ cd ~
        $ cd fabric-samples/first-network
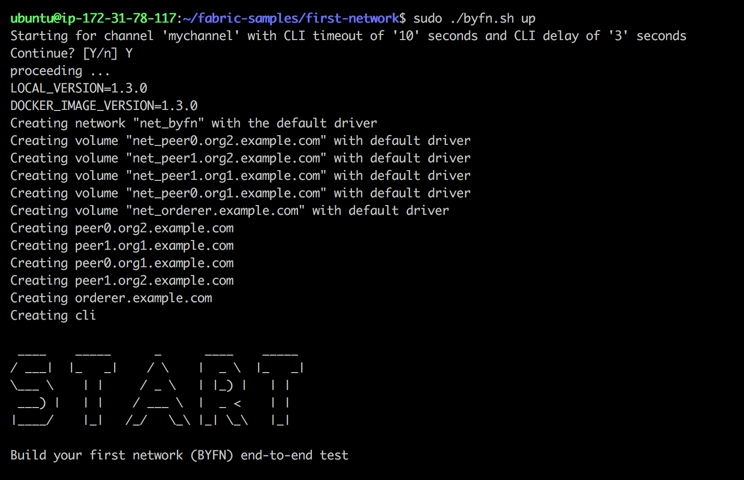
        $ sudo ./byfn.sh up
You should see the following output, which states that the network has started successfully:

- Bring down the Fabric network by executing the byfn.sh script using the down option to shut down and clean up the network. This kills the containers, removes the crypto material and artifacts, and deletes the chaincode images. The following code shows how to do this:
        $ cd ~
        $ cd fabric-samples/first-network
        $ sudo ./byfn.sh down
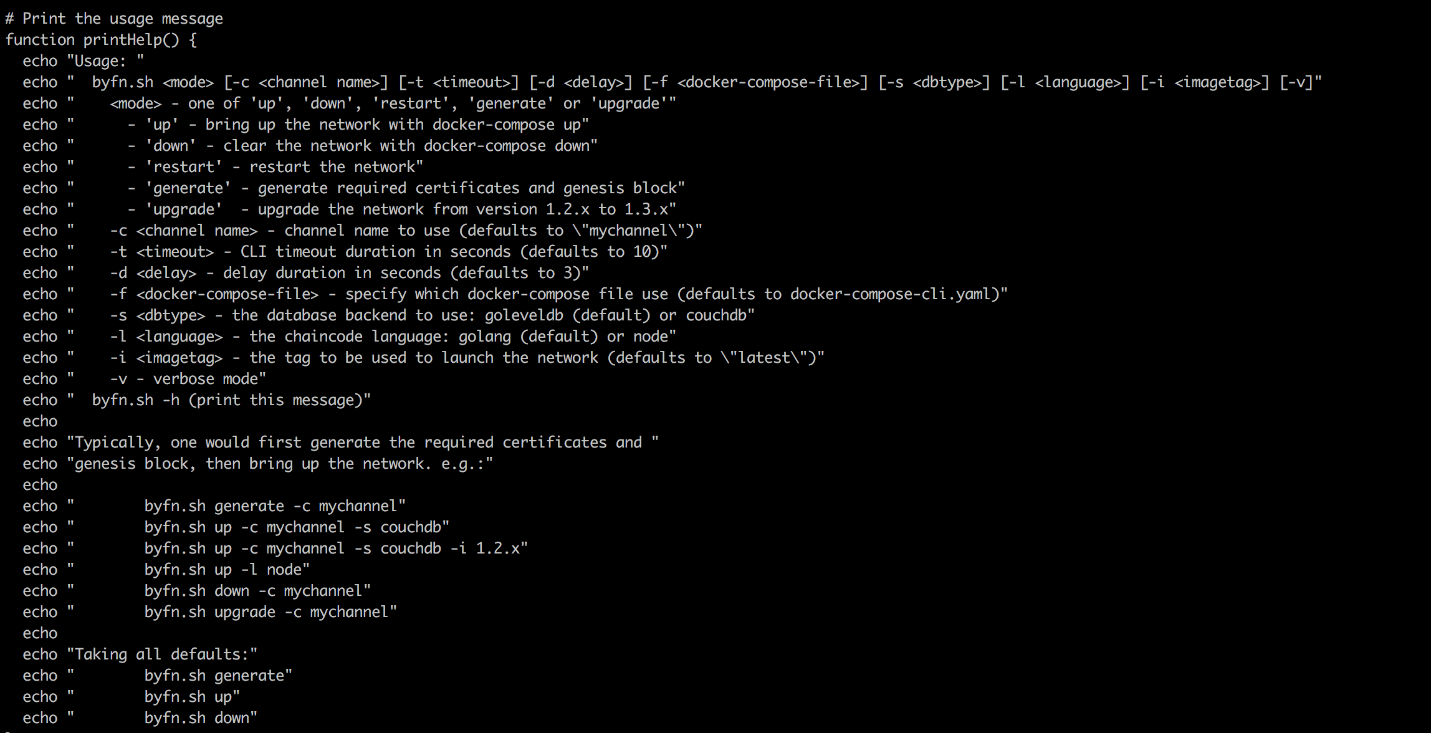
Let's review the byfn.sh script, shown as follows. This script is well documented, and you should read about it in detail to understand each execution step during the network startup process:

We will review and exam the Hyperledger Fabric byfn.sh script using the command-line interface.
- Use the tool for crypto and certificate generation, called cryptogen, which uses a YAML configuration file as the base to generate the certificates:
        OrdererOrgs:
          - Name: Orderer
            Domain: example.com
            Specs:
              - Hostname: orderer
         PeerOrgs:
          - Name: Org1
            Domain: org1.example.com
            EnableNodeOUs: true
            Template:
              Count: 2
            Users:
              Count: 1
           - Name: Org2
            Domain: org2.example.com
            EnableNodeOUs: true
             Template:
              Count: 2
            Users:
              Count: 1
The following command will generate the YAML file:
        $ cd ~
        $ cd fabric-samples/first-network
        $ sudo ../bin/cryptogen generate --config=./crypto-config.yaml
On execution of the previous command, you will find a new directory crypto-config is created, and inside there are directories that correspond to ordererOrganizations and peerOrganizations. We have two organizations, ( Org1.example.com and Org2.example.com ) network artifacts.
- Let's generate the configuration transaction. The tool to generate the configuration transaction is called configtxgen. The artifacts generated in this step are the orderer genesis block, the channel configuration transaction, and one anchor peer transaction for each peer organization. There will also be a configtx.yaml file that is broken into several sections: profiles (describe the organizational structure of the network), organizations (the details regarding individual organizations), orderer (the details regarding the orderer parameters), and application (application defaults—not needed for this recipe).
The profiles that are needed for this recipe are shown as follows:
        Profiles:

            TwoOrgsOrdererGenesis:
                <<: *ChannelDefaults
                Orderer:
                    <<: *OrdererDefaults
                    Organizations:
                        - *OrdererOrg
                    Capabilities:
                        <<: *OrdererCapabilities
                Consortiums:
                    SampleConsortium:
                        Organizations:
                            - *Org1
                            - *Org2
            TwoOrgsChannel:
                Consortium: SampleConsortium
                Application:
                    <<: *ApplicationDefaults
                    Organizations:
                        - *Org1
                        - *Org2
                    Capabilities:
                        <<: *ApplicationCapabilities
Let's go with the detailed command-line steps to understand what is happening:
        $ export FABRIC_CFG_PATH=$PWD
        $ sudo ../bin/configtxgen -profile TwoOrgsOrdererGenesis -
        outputBlock ./channel-artifacts/genesis.block
        $ export CHANNEL_NAME=mychannel
        $ sudo ../bin/configtxgen -profile TwoOrgsChannel
          -outputCreateChannelTx ./channel-artifacts/channel.tx
          -channelID $CHANNEL_NAME
        $ sudo ../bin/configtxgen -profile TwoOrgsChannel
          -outputAnchorPeersUpdate ./channel-artifacts/Org1MSPanchors.tx
          -channelID $CHANNEL_NAME -asOrg Org1MSP
        $ sudo ../bin/configtxgen -profile TwoOrgsChannel
          -outputAnchorPeersUpdate ./channel-artifacts/Org2MSPanchors.tx
          -channelID $CHANNEL_NAME -asOrg Org2MSP
Here, we write the blockchain genesis block, create the first channel transaction, and write anchor peer updates. You may not care how exactly it is done, but this is how Fabric is built from the bottom up. You can see that four new files are generated and stored in the channel-artifacts directory:
- genesis.block
- channel.tx
- Org1MSPanchors.tx
- Org2MSPanchors.tx
- The Docker Compose tool is used to bring up Docker containers. We use docker-compose-cli.yaml to keep track of all Docker containers that we bring up:
        $ cd ~
        $ cd fabric-samples/first-network
        $ sudo docker-compose -f docker-compose-cli.yaml up -d
- We have brought up six nodes: cli, orderer.example.com, peer0.org1.example.com, peer0.org2.example.com, peer1.org1.example.com, and peer1.org2.example.com:

- Use the peer CLI to set up the network. Using the peer command line within the Docker CLI container for this step, we will create the channel using channel.tx so that peers can join the channel. Please note that some commands are extremely long as we need to set up peer environment variables (note that the default is peer0.org1), as follows:
        $ cd ~
        $ cd fabric-samples/first-network
        $ sudo docker exec -it cli bash
        $ export CHANNEL_NAME=mychannel

        $ peer channel create -o orderer.example.com:7050 -c
        $CHANNEL_NAME -f ./channel-artifacts/channel.tx --tls --
         cafile/opt/gopath/src/github.com/hyperledger/fabric/peer/
        crypto/ordererOrganizations/example.com/orderers/
        orderer.example.com/msp/tlscacerts/tlsca.example.com-cert.pem
        $ peer channel join -b mychannel.block

        // for peer0.org2
        $ CORE_PEER_MSPCONFIGPATH=/opt/gopath/src/github.com/hyperledger/
        fabric/peer/crypto/peerOrganizations/org2.example.com/
         users/Admin@org2.example.com/msp
        CORE_PEER_ADDRESS=peer0.org2.example.com:7051
        CORE_PEER_LOCALMSPID="Org2MSP"
        CORE_PEER_TLS_ROOTCERT_FILE=/opt/gopath/src/github.com/
        hyperledger/fabric/peer/crypto/peerOrganizations/org2.example.com/
        peers/peer0.org2.example.com/tls/ca.crt
        $ peer channel join -b mychannel.block

        // for peer1.org1
        CORE_PEER_MSPCONFIGPATH=/opt/gopath/src/github.com/
        hyperledger/fabric/peer/crypto/peerOrganizations/
        org1.example.com/users/Admin@org1.example.com/msp
        CORE_PEER_ADDRESS=peer1.org1.example.com:7051
        CORE_PEER_LOCALMSPID="Org1MSP"
        CORE_PEER_TLS_ROOTCERT_FILE=/opt/gopath/src/github.com/
        hyperledger/fabric/peer/crypto/peerOrganizations/
        org1.example.com/peers/peer1.org1.example.com/tls/ca.crt
        peer channel join -b mychannel.block

        // for peer1.org2
CORE_PEER_MSPCONFIGPATH=/opt/gopath/src/github.com/hyperledger/fabric/peer/crypto/peerOrganizations/org2.example.com/users/Admin@org2.example.com/msp CORE_PEER_ADDRESS=peer1.org2.example.com:7051 CORE_PEER_LOCALMSPID="Org2MSP" CORE_PEER_TLS_ROOTCERT_FILE=/opt/gopath/src/github.com/hyperledger/fabric/peer/crypto/peerOrganizations/org2.example.com/peers/peer1.org2.example.com/tls/ca.crt peer channel join -b mychannel.block
This will create a connection between all four peers:

- Update the anchor peer on each organization. We use the files we created in the Installing Hyperledger Fabric on AWS section (Org1MSPanchors.tx and Org2MSPanchors.tx) and apply them to Peer0 of both Org1 and Org2:
        $ peer channel update -o orderer.example.com:7050 -c $CHANNEL_NAME
        -f ./channel-artifacts/Org1MSPanchors.tx --tls --cafile
        /opt/gopath/src/github.com/hyperledger/fabric/peer/crypto/
        ordererOrganizations/example.com/orderers/orderer.example.com/
        msp/tlscacerts/tlsca.example.com-cert.pem

        $ CORE_PEER_MSPCONFIGPATH=/opt/gopath/src/github.com/hyperledger/
        fabric/peer/crypto/peerOrganizations/org2.example.com/
        users/Admin@org2.example.com/msp
        CORE_PEER_ADDRESS=peer0.org2.example.com:7051
        CORE_PEER_LOCALMSPID="Org2MSP"
        CORE_PEER_TLS_ROOTCERT_FILE=/opt/gopath/src/github.com/
        hyperledger/fabric/peer/crypto/peerOrganizations/
        org2.example.com/peers/peer0.org2.example.com/tls/ca.crt
        peer channel update -o orderer.example.com:7050 -c
        $CHANNEL_NAME -f ./channel-artifacts/Org2MSPanchors.tx
        --tls --cafile /opt/gopath/src/github.com/hyperledger/fabric/peer/
        crypto/ordererOrganizations/example.com/orderers/
        orderer.example.com/msp/tlscacerts/tlsca.example.com-cert.pem
- Using the CLI, we need to install the chaincode to peer0 Org1 and peer0 Org2. The chaincode is specified in the -p option in the command and the chaincode name is mycc. This is shown in the following code:
$ peer chaincode install -n mycc -v 1.0 -p github.com/chaincode/chaincode_example02/go/

$ CORE_PEER_MSPCONFIGPATH=/opt/gopath/src/github.com/hyperledger/fabric/peer/crypto/peerOrganizations/org2.example.com/users/Admin@org2.example.com/msp CORE_PEER_ADDRESS=peer0.org2.example.com:7051 CORE_PEER_LOCALMSPID="Org2MSP" CORE_PEER_TLS_ROOTCERT_FILE=/opt/gopath/src/github.com/hyperledger/fabric/peer/crypto/peerOrganizations/org2.example.com/peers/peer0.org2.example.com/tls/ca.crt peer chaincode install -n mycc -v 1.0 -p github.com/chaincode/chaincode_example02/go//orderers/orderer.example.com/msp/tlscacerts/tlsca.example.com-cert.pem
- Instantiate the chaincode from peer0.org2. We will use -c to initialize this with a value of 100, and b with 200. We use -p to define the endorsement policy. This is shown in the following code:
$ CORE_PEER_MSPCONFIGPATH=/opt/gopath/src/github.com/hyperledger/fabric/peer/crypto/peerOrganizations/org2.example.com/users/Admin@org2.example.com/msp CORE_PEER_ADDRESS=peer0.org2.example.com:7051 CORE_PEER_LOCALMSPID="Org2MSP" CORE_PEER_TLS_ROOTCERT_FILE=/opt/gopath/src/github.com/hyperledger/fabric/peer/crypto/peerOrganizations/org2.example.com/peers/peer0.org2.example.com/tls/ca.crt peer chaincode instantiate -o orderer.example.com:7050 --tls --cafile /opt/gopath/src/github.com/hyperledger/fabric/peer/crypto/ordererOrganizations/example.com/orderers/orderer.example.com/msp/tlscacerts/tlsca.example.com-cert.pem -C $CHANNEL_NAME -n mycc -v 1.0 -c '{"Args":["init","a", "100", "b","200"]}' -P "AND ('Org1MSP.peer','Org2MSP.peer')"
- Execute a query on peer0 Org1 on the a value. We should get the correct value of 100 back:
$ peer chaincode query -C $CHANNEL_NAME -n mycc -c '{"Args":["query","a"]}'

- Using the CLI, create a transaction by invoking chaincode. In this example, we will move 10 from a to b. Install chaincode on peer1 org2, and then query from peer1 org2 for the latest value of a:
$ CORE_PEER_MSPCONFIGPATH=/opt/gopath/src/github.com/hyperledger/fabric/peer/crypto/peerOrganizations/org2.example.com/users/Admin@org2.example.com/msp CORE_PEER_ADDRESS=peer1.org2.example.com:7051 CORE_PEER_LOCALMSPID="Org2MSP" CORE_PEER_TLS_ROOTCERT_FILE=/opt/gopath/src/github.com/hyperledger/fabric/peer/crypto/peerOrganizations/org2.example.com/peers/peer1.org2.example.com/tls/ca.crt peer chaincode install -n mycc -v 1.0 -p github.com/chaincode/chaincode_example02/go/

$CORE_PEER_MSPCONFIGPATH=/opt/gopath/src/github.com/hyperledger/fabric/peer/crypto/peerOrganizations/org2.example.com/users/Admin@org2.example.com/msp CORE_PEER_ADDRESS=peer1.org2.example.com:7051 CORE_PEER_LOCALMSPID="Org2MSP" CORE_PEER_TLS_ROOTCERT_FILE=/opt/gopath/src/github.com/hyperledger/fabric/peer/crypto/peerOrganizations/org2.example.com/peers/peer1.org2.example.com/tls/ca.crt peer chaincode query -C $CHANNEL_NAME -n mycc -c '{"Args":["query","a"]}'
This takes some time, but we will eventually receive the result of 90, which is correct after 10 is removed from 100:

This concludes building our first Fabric network. We will look at how to make changes to the existing network and add an organization to a channel in the next recipe.
How it works...
We covered the following steps to build our Fabric network:
- Generating the crypto/certificate using cryptogen
- Generating the configuration transaction using configtxgen
- Bring up the nodes based on what is defined in the docker-compose file
- Using the CLI to set up the first network
- Using the CLI to install and instantiate the chaincode
- Using the CLI to invoke and query the chaincode
This recipe helps you to understand the Hyperledge Fabric components and shows how we can quickly set up a Hyperledger Fabric network using sample chaincode (mycc). You should be able to modify the scripts and run other samples, such as fabcar and marble02, which are provided under the fabric-sample/chaincode directory.
Fabric provides the following commands used in the byfn.sh script. In the following chapters and recipes, these commands will be used to operate and manage the Fabric network environment:
- peer: Operates and configures a peer
- peer chaincode: Manages chaincode on the peer
- peer channel: Manages channels on the peer
- peer node: Manages the peer
- peer version: Returns the peer version
- cryptogen: Utility for generating crypto material
- configtxgen: Creates configuration data, such as the genesis block
- configtxlator: Utility for generating channel configurations
- fabric-ca-client: Manage identities
- fabric-ca-server: Manages the fabric-ca server
Now that we have set up our first network, let's add an organization to the channel.


