Search icon CANCEL
Subscription
0
Cart icon
Your Cart (0 item)
Close icon
You have no products in your basket yet
Save more on your purchases! discount-offer-chevron-icon
Savings automatically calculated. No voucher code required.
Arrow left icon
Explore Products
Best Sellers
New Releases
Books
Videos
Audiobooks
Learning Hub
Free Learning
Arrow right icon
Arrow up icon
GO TO TOP
Hands-On Dashboard Development with QlikView

You're reading from   Hands-On Dashboard Development with QlikView Practical guide to creating interactive and user-friendly business intelligence dashboards

Arrow left icon
Product type Paperback
Published in Mar 2019
Publisher Packt
ISBN-13 9781838646110
Length 156 pages
Edition 1st Edition
Arrow right icon
Author (1):
Arrow left icon
Abhishek Agarwal Abhishek Agarwal
Author Profile Icon Abhishek Agarwal
Abhishek Agarwal
Arrow right icon
View More author details
Toc

Creating a document

Here, we will look at the different ways by which we can create a new document in QlikView. We will look at how to save and close a document, and, finally, we will look at how we can reopen the recently-created document. So, let's go into QlikView and see these things in action:

  1. As we saw in the previous section, the New document button, located at the bottom-right of the screen, can be used to create a document for use in QlikView. So, let's go ahead and click on that now:
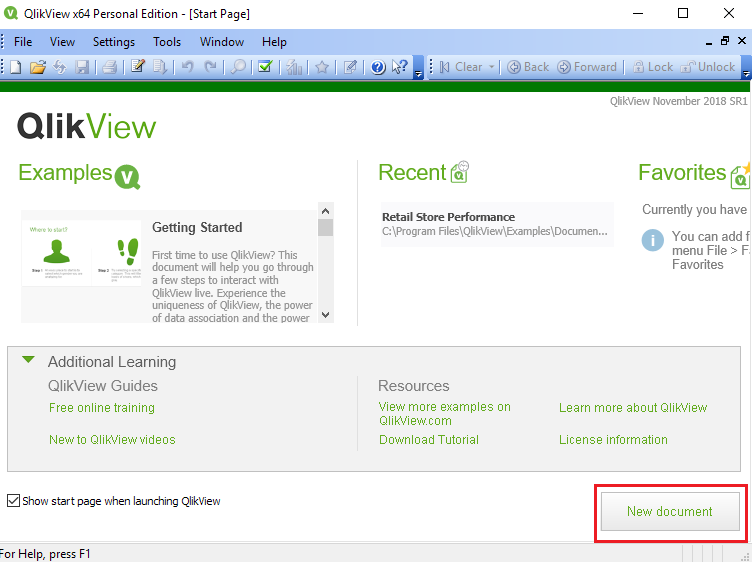
Another option is to go into the toolbar and click on the first icon, which is New. Yet another option you have is to go into File and click New from the drop-down menu there.

Once you create a new document, the Getting Started wizard will appear and ask you to create a new document. This wizard is divided into multiple categories, such as Data source, Data presentation, Save file, Choose chart type, Populate chart, and Selections. All of these are very standard operations within QlikView. However, once you gain some experience, you will see that this wizard doesn't offer the options that you really want. So, generally, we are going to avoid this. We want to perform all of these operations, but in our own customized way.

  1. Before we save, we will go into the User Preferences settings and uncheck the Show wizard option, as shown in the following screenshot:
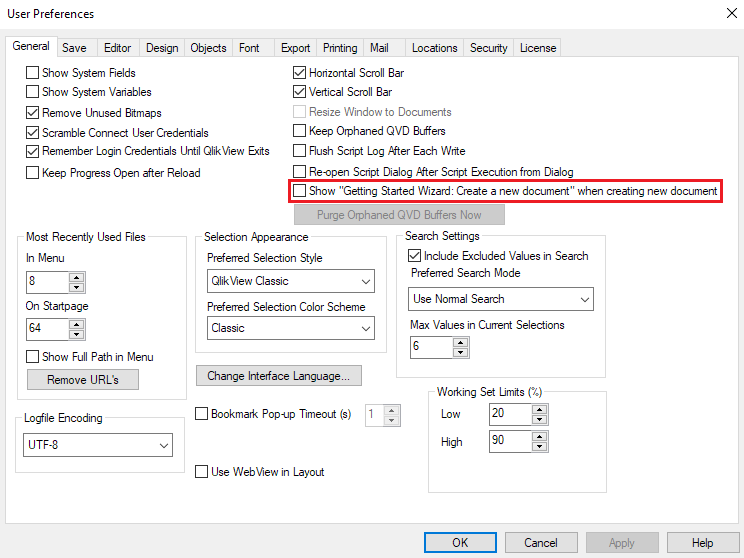
  1. We will test this out now. We can see the document name is QV1 by looking at the top of the window. With the shortcut Ctrl + N, we will create a new document, which will be automatically named QV2, as seen in the title pane.

So, these are the various options that you have whenever you are creating a new document, and it is my recommendation that the wizard is not a very good option. This is because there are a number of things that, as a QlikView developer, you need to do, and it's pretty easy to do it in a custom way, rather than following a standard method, as the latter does not allow us to completely utilize all the QlikView functionality that you, as a developer, want to use.

Saving the document

Once we have created a new document, the next option we will check out is saving the document. For that, we again have multiple options.

The first option is to go into the toolbar and press the Save button there, as shown in the following screenshot:

Another option is going into the File menu and clicking Save, or pressing the shortcut Ctrl + S.

So, let's go ahead and click Save. Once we click Save, it will ask you where you want to save this QlikView document. We can save it wherever required, so I will select QV1 and save it.

Once I save it, I am pretty much done, and I can close the window. Whenever we close the document, we need to close the entire application. There are several ways to close the application, similar to opening the document.

Let's go ahead and summarize the topics that we have just covered. We have looked at the different ways to create a new document, we have looked at how we can save and close a document, and then, finally, we have looked at how to reopen a recently-created document. In the next section, we will look at QlikView in depth and its important terminologies.

lock icon The rest of the chapter is locked
Register for a free Packt account to unlock a world of extra content!
A free Packt account unlocks extra newsletters, articles, discounted offers, and much more. Start advancing your knowledge today.
Unlock this book and the full library FREE for 7 days
Get unlimited access to 7000+ expert-authored eBooks and videos courses covering every tech area you can think of
Renews at $19.99/month. Cancel anytime
Banner background image