Search icon CANCEL
Subscription
0
Cart icon
Your Cart (0 item)
Close icon
You have no products in your basket yet
Save more on your purchases now! discount-offer-chevron-icon
Savings automatically calculated. No voucher code required.
Arrow left icon
Explore Products
Best Sellers
New Releases
Books
Videos
Audiobooks
Learning Hub
Conferences
Free Learning
Arrow right icon
Arrow up icon
GO TO TOP
Swift Cookbook

You're reading from   Swift Cookbook Over 60 proven recipes for developing better iOS applications with Swift 5.3

Arrow left icon
Product type Paperback
Published in Feb 2021
Publisher Packt
ISBN-13 9781839211195
Length 500 pages
Edition 2nd Edition
Languages
Tools
Arrow right icon
Authors (3):
Arrow left icon
Chris Barker Chris Barker
Author Profile Icon Chris Barker
Chris Barker
Keith D. Moon Keith D. Moon
Author Profile Icon Keith D. Moon
Keith D. Moon
Keith Moon Keith Moon
Author Profile Icon Keith Moon
Keith Moon
Arrow right icon
View More author details
Toc

Table of Contents (14) Chapters Close

Preface 1. Swift Building Blocks 2. Mastering the Building Blocks FREE CHAPTER 3. Data Wrangling with Swift Control Flow 4. Generics, Operators, and Nested Types 5. Beyond the Standard Library 6. Building iOS Apps with Swift 7. Swift Playgrounds 8. Server-Side Swift 9. Performance and Responsiveness in Swift 10. SwiftUI and Combine Framework 11. Using CoreML and Vision in Swift 12. About Packt 13. Other Books You May Enjoy

Building an image capture app

In this first recipe, we're going to create an app that captures either an image from your camera roll or an image taken from your camera. This will set up our iOS app ready for us to incorporate CoreML to detect objects in our photos.

Getting ready

For this recipe, you'll need the latest version of Xcode available from the Mac App Store.

How to do it...

With Xcode open, let's get started:

  1. Create a new project in Xcode. Go to File | New | Project | iOS App.
  2. In Main.storyboard, add the following:
    1. Add UISegmentedControl with two options (Photo / Camera Roll and Live Camera).
    2. Next, add a UILabel view just underneath.
    3. Add a UIImageView view beneath that.
    4. Finally, add a UIButton component.
  3. Space these accordingly using AutoLayout constraints with UIImageView being the prominent object:
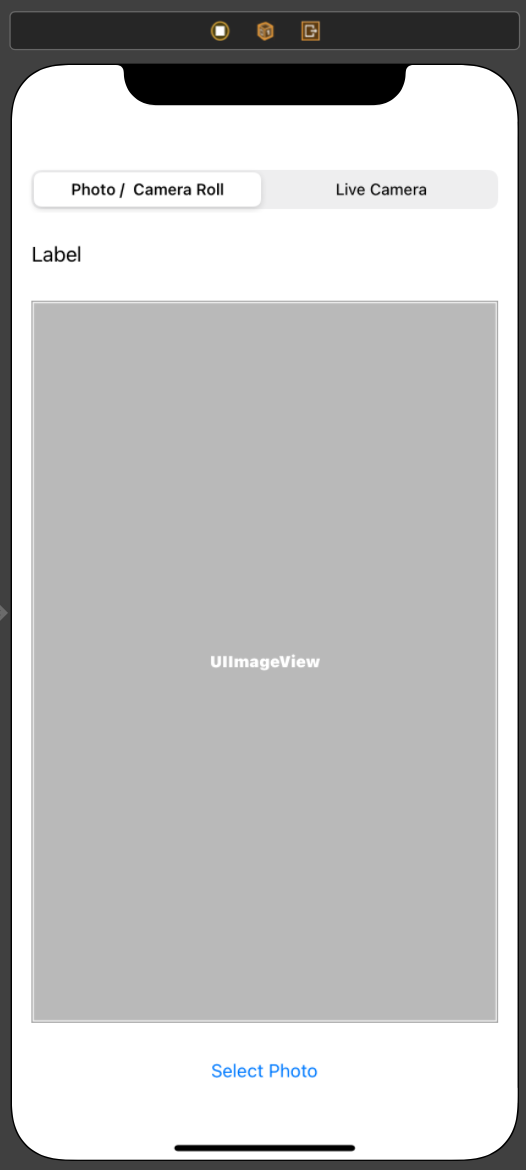
Figure 11.1 – Camera/photo app
  1. Once we have this in place, let's hook these up to our ViewController.swift file:
@IBOutlet weak var imageView...
lock icon The rest of the chapter is locked
Register for a free Packt account to unlock a world of extra content!
A free Packt account unlocks extra newsletters, articles, discounted offers, and much more. Start advancing your knowledge today.
Unlock this book and the full library FREE for 7 days
Get unlimited access to 7000+ expert-authored eBooks and videos courses covering every tech area you can think of
Renews at $19.99/month. Cancel anytime