Making changes in the Properties tab, HUD, and Canvas
Motion is all about allowing you to make changes to the elements in your project. Some of these changes will be animation tweaks while others will be regular scaling and repositioning tasks. Let's take a look at a different way of changing the scale and position of a still image.
How to do it...
With a blank Motion project open, navigate to the File Browser by clicking it on the left-hand side of the interface, or press Command + 1.
Locate a still image file on your system that is large enough for your project's settings.
With the still selected, choose Import from the top of the File Browser.
Select the still image in the Layers tab and press F1 to go to the Properties tab of the Inspector.
Adjust the Position, Rotation, and Scale settings of the still to your liking.
Click the reset arrow at the top of the Transform section to reset all of the properties, as shown in the following screenshot:

If your photo was larger than your project's properties, it may now be larger than your Canvas. Motion's default method when importing photos is to scale them down to fit the project. When you reset a still image, it goes to its original scale value. If this is the case, all you need to do is scale the photo down until it fits nicely in the Canvas window.
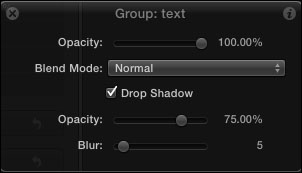
With the photo selected, go to the Window menu and select Show HUD:

The Head Up Display (HUD) is a semi-transparent floating window that shows certain properties of a selected layer, filter, or behavior. In certain instances, it provides us with quick access to some of the most used parameters of the current selection. In the case of this still, it gives us Opacity and Blend Mode. Adjust the Opacity value to around
80. Go to the Edit menu and choose Undo.With the still selected, notice the bounding box around your photo. If you can't see it because the photo is full-frame, press Command + - to zoom out on your Canvas. We can manipulate several Transform category properties directly in the Canvas, and this bounding box allows us to do just that.
Drag any side corner of the image and scale the image down. Notice how the image doesn't scale uniformly unlike how it did in the Inspector. Press Command + Z to undo.
Hold down the Shift key and grab the side corner again. Notice how the image scales uniformly. Press Command + Z to undo.
Press F1 to open the Properties tab of the Inspector. Hold down the Shift + Option key and click the side corner again. Scale the image downwards while paying attention to the Inspector. Notice how the scale updates. Also notice that by pressing Shift + Option not only does the object scale uniformly, but it also scales from the center.
There's more...
Some of you may have noticed the i icon at the upper-right hand corner of the HUD, as shown in the following screenshot:

By clicking it, we got to the Inspector. Whenever you work in Motion and the HUD doesn't have what you're looking for, go to the Inspector for more options.
Also, when we held down the Shift and Option modifier keys, we were able to scale our photo uniformly from the center. The general rule is this: modifier keys can make our life easier when trying to manipulate properties in the Canvas and the HUD.
For example, if you try to rotate your image in the Canvas by dragging the circle to the right of the center and hold down Shift, we can force our still to move in 45 degree increments.
In the HUD, sometimes when you try to adjust properties, the slider moves too fast. If you Option + click the line, you can then move properties in smaller increments.


