Using the GLFW library
The GLFW library hides all the complexity of creating windows, graphics contexts, and surfaces, and getting input events from the operating system. In this recipe, we build a minimalistic application with GLFW and OpenGL to get some basic 3D graphics out onto the screen.
Getting ready
We are building our examples with GLFW 3.3.4. Here is a JSON snippet for the Bootstrap script so that you can download the proper library version:
{
  "name": "glfw",
  "source": {
    "type": "git",
    "url": "https://github.com/glfw/glfw.git",
    "revision": "3.3.4"
  }
}
The complete source code for this recipe can be found in the source code bundle under the name of Chapter2/01_GLFW.
How to do it...
Let's write a minimal application that creates a window and waits for an exit command from the user. Perform the following steps:
- First, we set the GLFW error callback via a simple lambda to catch potential errors:
#include <GLFW/glfw3.h> ... int main() { glfwSetErrorCallback( []( int error, const char* description ) { fprintf( stderr, "Error: %s\n", description ); }); - Now, we can go forward to try to initialize GLFW:
  if ( !glfwInit() )
     exit(EXIT_FAILURE);
- The next step is to tell GLFW which version of OpenGL we want to use. Throughout this book, we will use OpenGL 4.6 Core Profile. You can set it up as follows:
glfwWindowHint(GLFW_CONTEXT_VERSION_MAJOR, 4); glfwWindowHint(GLFW_CONTEXT_VERSION_MINOR, 6); glfwWindowHint( GLFW_OPENGL_PROFILE, GLFW_OPENGL_CORE_PROFILE); GLFWwindow* window = glfwCreateWindow( 1024, 768, "Simple example", nullptr, nullptr); if (!window) { glfwTerminate(); exit( EXIT_FAILURE ); } - There is one more thing we need to do before we can focus on the OpenGL initialization and the main loop. Let's set a callback for key events. Again, a simple lambda will do for now:
glfwSetKeyCallback(window, [](GLFWwindow* window, int key, int scancode, int action, int mods) { if ( key == GLFW_KEY_ESCAPE && action == GLFW_PRESS ) glfwSetWindowShouldClose( window, GLFW_TRUE ); }); - We should prepare the OpenGL context. Here, we use the GLAD library to import all OpenGL entry points and extensions:
  glfwMakeContextCurrent( window );
  gladLoadGL( glfwGetProcAddress );
  glfwSwapInterval( 1 );
Now we are ready to use OpenGL to get some basic graphics out. Let's draw a colored triangle. To do that, we need a vertex shader and a fragment shader, which are both linked to a shader program, and a vertex array object (VAO). Follow these steps:
- First, let's create a VAO. For this example, we will use the vertex shader to generate all vertex data, so an empty VAO will be sufficient:
  GLuint VAO;
  glCreateVertexArrays( 1, &VAO );
  glBindVertexArray( VAO );
- To generate vertex data for a colored triangle, our vertex shader should look as follows. Those familiar with previous versions of OpenGL 2.x will notice the
layoutqualifier with the explicit location value forvec3 color. This value should match the corresponding location value in the fragment shader, as shown in the following code:static const char* shaderCodeVertex = R"( #version 460 core layout (location=0) out vec3 color; const vec2 pos[3] = vec2[3]( vec2(-0.6, -0.4), vec2(0.6, -0.4), vec2(0.0, 0.6) ); const vec3 col[3] = vec3[3]( vec3(1.0, 0.0, 0.0), vec3(0.0, 1.0, 0.0), vec3(0.0, 0.0, 1.0) ); void main() { gl_Position = vec4(pos[gl_VertexID], 0.0, 1.0); color = col[gl_VertexID]; } )";Important note
More details on OpenGL Shading Language (GLSL) layouts can be found in the official Khronos documentation at https://www.khronos.org/opengl/wiki/Layout_Qualifier_(GLSL).
We use the GLSL built-in
gl_VertexIDinput variable to index into thepos[]andcol[]arrays to generate the vertex positions and colors programmatically. In this case, no user-defined inputs to the vertex shader are required. - For the purpose of this recipe, the fragment shader is trivial. The location value of
0of thevec3 colorvariable should match the corresponding location in the vertex shader:static const char* shaderCodeFragment = R"( #version 460 core layout (location=0) in vec3 color; layout (location=0) out vec4 out_FragColor; void main() { out_FragColor = vec4(color, 1.0); }; )"; - Both shaders should be compiled and linked to a shader program. Here is how we do it:
  const GLuint shaderVertex =    glCreateShader(GL_VERTEX_SHADER);
  glShaderSource(    shaderVertex, 1, &shaderCodeVertex, nullptr);
  glCompileShader(shaderVertex);
  const GLuint shaderFragment =    glCreateShader(GL_FRAGMENT_SHADER);
  glShaderSource(shaderFragment, 1,    &shaderCodeFragment, nullptr);
  glCompileShader(shaderFragment);
  const GLuint program = glCreateProgram();
  glAttachShader(program, shaderVertex);
  glAttachShader(program, shaderFragment);
  glLinkProgram(program);
  glUseProgram(program);
For the sake of brevity, all error checking is omitted in this chapter. We will come back to it in the next Chapter 3, Getting Started with OpenGL and Vulkan.
Now, when all of the preparations are complete, we can jump into the GLFW main loop and examine how our triangle is being rendered.
Let's explore how a typical GLFW application works. Perform the following steps:
- The main loop starts by checking whether the window should be closed:
while ( !glfwWindowShouldClose(window) ) { - Implement a resizable window by reading the current width and height from GLFW and updating the OpenGL viewport accordingly:
     int width, height;
     glfwGetFramebufferSize(
       window, &width, &height);
     glViewport(0, 0, width, height);
Important note
Another approach is to set a GLFW window resize callback via
glfwSetWindowSizeCallback(). We will use this later on for more complicated examples. - Clear the screen and render the triangle. The
glDrawArrays()function can be invoked with the empty VAO that we bound earlier:glClearColor(1.0f, 1.0f, 1.0f, 1.0f); glClear(GL_COLOR_BUFFER_BIT); glDrawArrays(GL_TRIANGLES, 0, 3);
- The fragment shader output was rendered into the back buffer. Let's swap the front and back buffers to make the triangle visible. To conclude the main loop, do not forget to poll the events with
glfwPollEvents():glfwSwapBuffers(window); glfwPollEvents(); }
- To make things nice and clean at the end, let's delete the OpenGL objects that we created and terminate GLFW:
  glDeleteProgram(program);
  glDeleteShader(shaderFragment);
  glDeleteShader(shaderVertex);
  glDeleteVertexArrays(1, &VAO);
  glfwDestroyWindow(window);
  glfwTerminate();
  return 0;
}
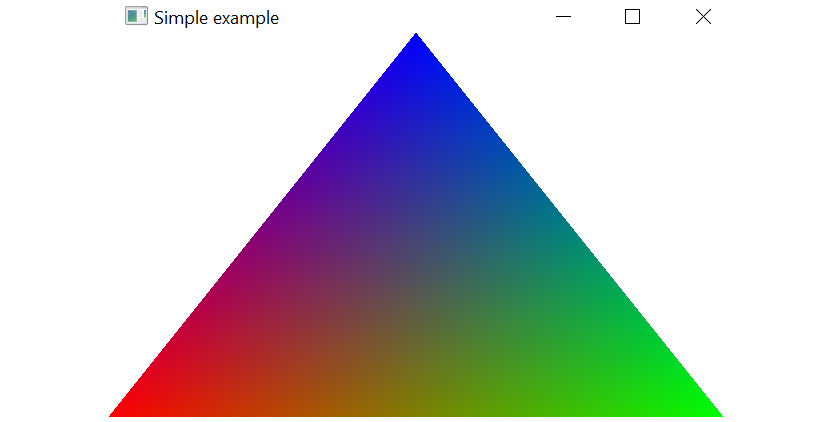
Here is a screenshot of our tiny application:

Figure 2.1 – Our first triangle is on the screen
There's more...
The GLFW setup for macOS is quite similar to the Windows operating system. In the CMakeLists.txt file, you should add the following line to the list of used libraries: -framework OpenGL -framework Cocoa -framework CoreView -framework IOKit.
Further details about how to use GLFW can be found at https://www.glfw.org/documentation.html.


