Reviewing your shots and cutting it all together
The Cut page has some fantastic features that allow you to quickly review and edit video footage together. We will go through each step one at a time, but in reality, once you have mastered these tools, each step will only take seconds to execute, making your edit much speedier.
Reviewing your footage
You might recall how we used the mouse to scrub through each video clip’s content quickly. However, this can be time-consuming if we must do this for every clip. I am glad to say that Resolve has a far more efficient way to review all your video footage at once, using Source Tape mode.
Source Tape
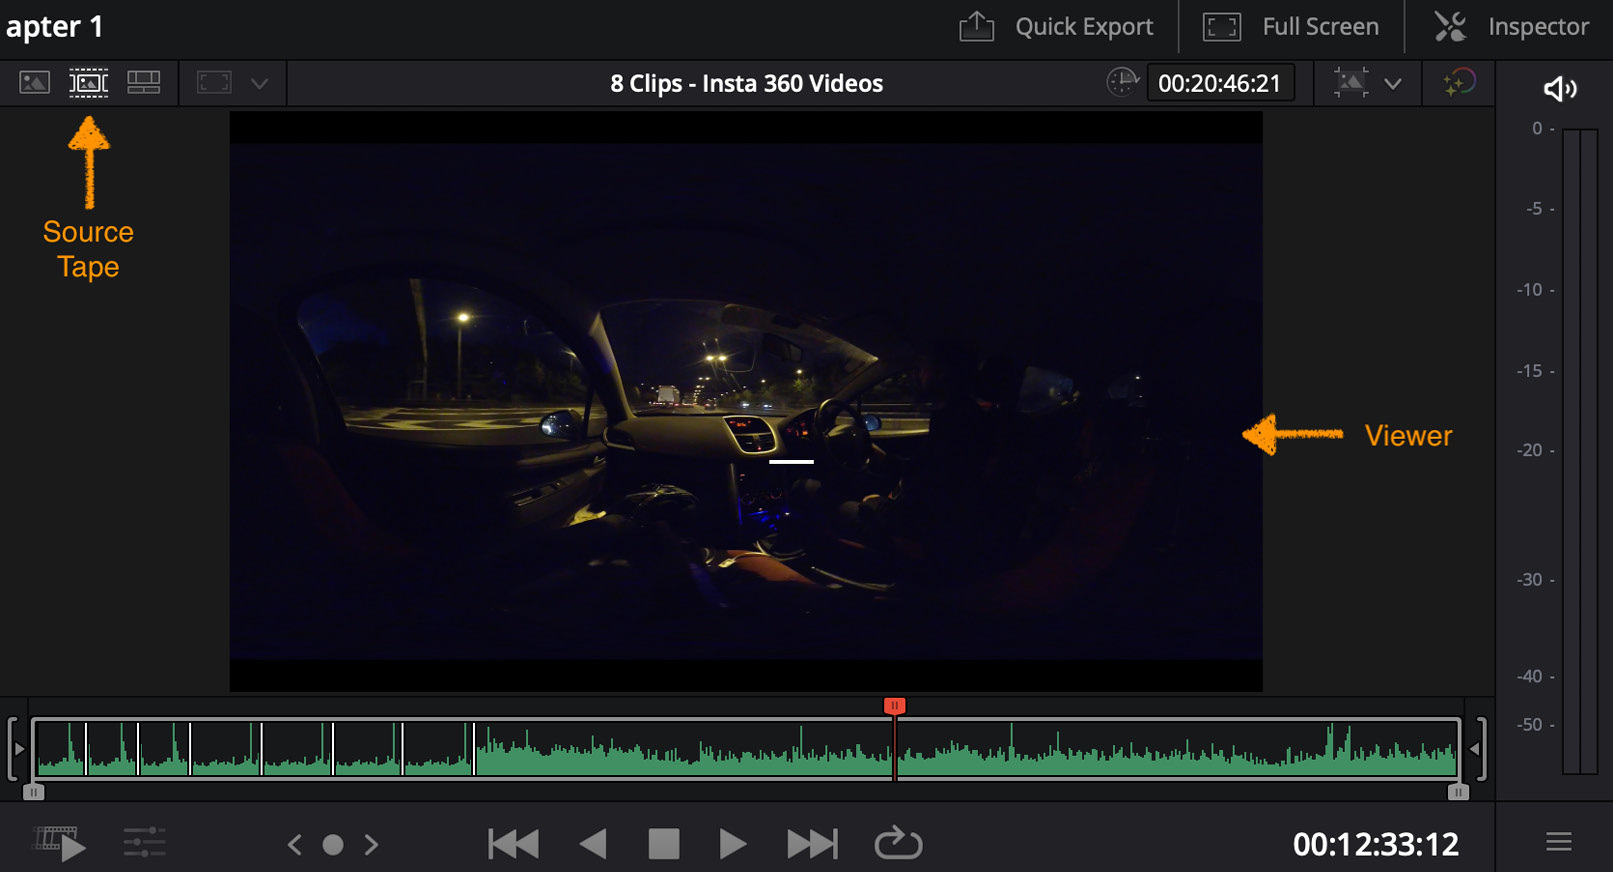
Source Tape (Figure 1.10) is a way to watch all your “Source” video footage together at the same time as if playing it as one continuous video tape, hence the name Source Tape.
Let’s see how it works.

Figure 1.10: Source Tape Viewer mode
- Select the Cut page.
- In the top-left corner of the media viewer, select the Source Tape button (Figure 1.10).
- The Viewer (Figure 1.10) will now populate with all the media in the selected bin.
- Scrub through the mini transport Timeline under the Viewer to review all your footage quickly without having to load each individual clip into the Viewer:
- The spacebar will play back footage at normal speed.
- Pressing the spacebar again will stop the video playback.
- Pressing the L key on your keyboard will also play through the footage at normal speed.
- Pressing the L key twice will fast forward twice as fast. Three presses will be 4x as fast, four presses will be 8x as fast, five presses will be 16x as fast, and six presses will be 32x as fast.
- Pressing the J key on your keyboard will play the footage backward.
- Pressing the J key twice will fast reverse twice as fast. Three presses will be 4x as fast, four presses will be 8x as fast, and so on.
Top tip
Although I have focused on using keyboard keys to play back our footage (as it is quicker than clicking back and forth with a mouse), you can use a mouse to click on each of the video playback controls (also called transport controls, Figure 1.10) underneath the Viewer. These are the same symbols you will find on your CD/MP3 or DVD player, if you have one, and they work in the same way.
You will have noticed that, in Source Tape mode, the bin icons have disappeared and been replaced with dates instead. These are the dates when the video footage was created. You can change this view to show the bin names by selecting the Sort button. Let’s do this now.
- Click on the Sort button (Figure 1.11):

Figure 1.11: The Sort button
- From the drop-down list, select Bin.
You can isolate the playback of the footage to just the contents of one bin rather than everything in the Master bin, perhaps to review footage of a bin you have just imported:
- Select a bin from the Master bin using the Bin List icon (Figure 1.9) in the top-left corner of the Media Pool.
- Select Source Tape mode again (if it isn’t already selected).
- Play back and review the footage by pressing the spacebar or the J and L keys.
You will have noticed several things when playing back footage in Source Tape mode:
- What gets played back in Source Tape is dependent upon what bin you have selected
- The vertical lines in the Viewer Transport Timeline (Figure 1.10) represent the beginning and end of clips
- As each clip is played back, it is highlighted (with an orange border) in the Media Pool
Now you can see how useful Source Tape is for reviewing all the footage in your master or selected bins quickly rather than having to select each clip individually.
However, there is an even quicker way within Source Tape that you can use to review your footage, called Fast Review.
Fast Review
Fast Review uses simple Artificial Intelligence (A.I.) to adjust the playback speed of the clip based on the clip length. So, long clips are played back faster, while short clips are played back slower so that you don’t miss them. Let’s try it:
- Make sure Source Tape is selected.
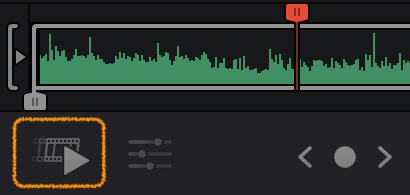
- Select Fast Review (Figure 1.12) from the far left of the playback controls under the Viewer:

Figure 1.12: Fast Review mode
Fast Review gives you a quick and easy way to review your video footage to help you make decisions on what to include in your edit.
Editing your footage together
Before you edit your footage, let’s describe what a Timeline is and how it uniquely works on Resolve’s Cut page.
The Cut page timelines
All editing software has what is called a Timeline. This is a long horizontal strip/line onto which footage (frequently referred to as clips) is dropped, with the time or duration of the edited video displayed along the top of the Timeline.
Timelines
Use of the word Timeline is applied to both the horizontal strip where clips are edited (on the interface) and the name of the file in the Media Pool that contains all your editing decisions.
In this book, to differentiate between the two, we use Timeline for the Timeline interface and timeline for the timeline file in the Media Pool or when talking about timelines in general.
Timecode
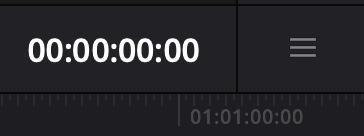
This time is displayed in hours, minutes, seconds, and frames and is called a timecode. It is displayed as HH:MM:SS:FF (Figure 1.13):

Figure 1.13: The Timeline timecode
Upper timeline
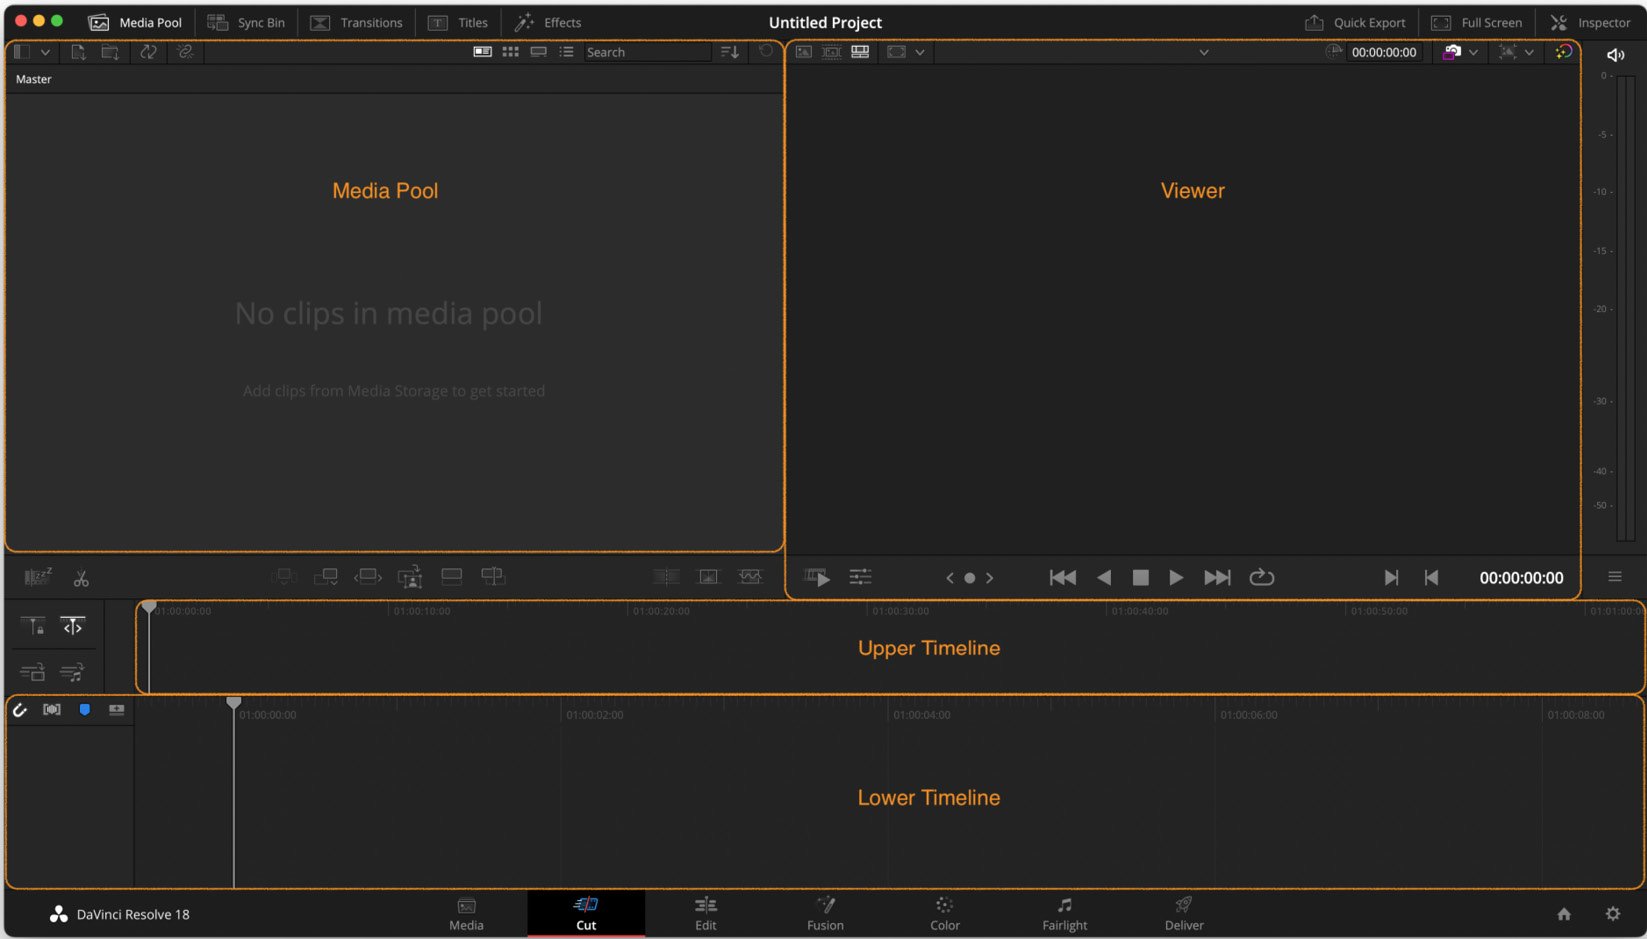
What is unique to the Cut page is that it has two Timelines (Figure 1.14). The topmost Upper Timeline is the overview of your entire edit, which displays the whole duration of your entire video regardless of how long it is and how many clips there are. This is great for quickly navigating to any part of your Timeline and seeing how all your clips are edited together:

Figure 1.14: Cut page Timelines
Lower Timeline
The second Timeline (Lower Timeline), just below the Upper Timeline, is a more traditional editing Timeline that shows you a zoomed-in view of your Upper Timeline, which is a lot easier to see and make your edits with.
Key concept – Timelines, tracks, and shots
In a Timeline, each layer of the video is called a track, and each track is made up of a series of clips representing different camera shots or angles. So, the hierarchy of content goes like this:
Project > Timeline > Track > Clips.
So, a project can have several different Timelines, each Timeline can have several different tracks, and each track can contain several different clips.
Track 1 versus Track 2
On the Cut page, Track 1 (the bottom track) operates differently from Track 2 and above (that is, all the tracks above/on top of Track 1).
Track 1 will automatically shuffle footage (clips) along the Timeline to make room for the new clip – this is called Rippling. This is great for quickly adding clips to the Timeline to get your first overall edit done, also known as a Rough Cut. Whereas any clip added to Track 2 will overwrite any clips already on Track 2. Track 2 is useful for adding additional clips without affecting the duration of your first edit, such as adding cutaways or titles to be shown over existing clips.
Key concept – cutaway
We will cover cutaways in more detail in Chapter 8. However, as a brief overview, a cutaway is footage that is added to the edit that illustrates already existing footage on the Timeline.
An example of this is when a person is being interviewed and they refer to a product they are promoting – this is a good place to add a shot of the product on a track on top of the original interview footage where we continue to hear the interviewee describe the product.
The effect of this would be that the viewer would see the interviewee talk about the product, then see the camera “cut away” to a shot of the product while we still hear the interviewer talking about it. This gives the illusion to the viewer that these shots are happening in real time, as if they are watching a live multi-camera broadcast switching between cameras.
Of course, none of this has to be shot in real time and can all be accomplished in the edit.
Let us see how Track 1 rippling works in practice.
Adding footage to the Timeline – using Track 1
Using the skills you have just learned, use Source Tape and Fast Review to identify five shots you would like to use for your video:
- Using Fast Review, find and identify the followings shots:
- The master shot (a wide shot)
- Two mid shots of your main subject
- Two close-ups (either a reaction shot or a cutaway shot)
- Select your master shot in the Viewer window.
- Click and drag the master shot onto either Timeline.
Now, you have a master shot on the Timeline, which you can use to edit your other shots. All clips can be added to the Timeline by either clicking and dragging directly from the media bin or from the Viewer onto the Timeline.
Key concept – shot types
When making a video, we use different framing conventions called shot types, which add visual interest for the viewer by changing how much of our subject is in the frame. The closer the shot is to the subject (which is usually a person), the more it has an emotional impact on the audience.
The three main shot types are as follows:
• Wide Shot (WS): This shot contains the whole environment within which our subject is positioned and how they interact with it. For example, it could be a person standing in a room, where we see all of their body and their relationship to their environment – that is, their home or workplace. This shot is too wide to invoke much emotion.
• Mid/Medium Shot (MS): The bottom of the frame starts at the waist of our subject and the top of our frame ends just above the head of our subject. That is good for formal interviews.
• Close Up (CU): This is a small detail that is magnified, such as framing just the head and the top of the shoulders of the subject. This is good for showing intense emotion. It could also be a tight frame of our subject’s hands demonstrating a product.
There are many more shot types, but these are the main ones to use when you are just starting out. If you change your mind, you can delete any clip from the Timeline by selecting it with the mouse and pressing the Delete key on your keyboard. Don’t worry – doing this will not delete your original footage as it is still available in the media bin.
Key concept
Editing in Resolve is ”non-destructive,” which means that you can delete clips from the Timeline and even the media bin and still be able to reimport the same media back in.
When you edit, you are not cutting your original footage but a live preview of it. Resolve stores the editing decisions you make (in a database) and then applies them to your final film when you export it.
The timeline playhead
On the Timeline, you will notice a vertical orange line – this is called the playhead (Figure 1.14). The Viewer will show a picture of the frame that is under the playhead on the Timeline. The Timecode display in the bottom-right corner of the Viewer window also shows the timecode for the current frame under the playhead.
You can move the Timeline playhead just like the playhead in the Viewer using the spacebar or the J and L keys.
You can also use the playhead position to tell Resolve where you want to make a cut. Let’s remove the usual dead space at the start of your master shot:
- Position your playhead just before the main action starts in your story.
- If there is dialogue, you can use the audio waveforms at the bottom of the clip as a guide.
- Select Trim Start from the Trim menu (this is called Trim to Playhead in earlier versions of Resolve).
Now your story starts by jumping straight into the action.
Usually, your master shot will be far too long to use by itself, so we will need to break it up to bring visual interest to the viewer.
Find a part of your master shot where your subject has finished their main thought or action. We are going to cut it here, and add a different angle to add visual interest:
- Move the playhead to where you want to make a cut.
- Click on the Split Clips button (Figure 1.15) just below the Media Pool:

Figure 1.15: The edit buttons
You will notice that the master shot has now been split into two. The dotted vertical line shows that the footage is continuous and has no frames missing – this is called a through edit.
Setting in and out points
When editing, we don’t have to add a whole clip to the Timeline. We can trim the footage down to be shorter before we add it to the Timeline by adding In and Out Points. In and out points dictate the start (In) and end (Out) of the footage we are adding to the Timeline.
Now, let’s find an alternative clip to insert between the two clips we already have on the Timeline and trim out any excess footage from our new clip, using in and out points, before adding it to the Timeline:
- In the Media Pool, select a mid-shot clip that matches or enhances the action of the master shot.
- Play the clip in the Viewer until just before any action or speech. Then, press the I key on the keyboard to add an In point for the clip to start at.
- Play the clip forward until just after the last words are said or an action is performed. Then, press the O key on the keyboard to an Out point for the clip to end at.
You will now notice an in and out point marker added to the thumbnail of the clip in the Media Pool, as well as underneath the Viewer. Now, when we put this clip on the Timeline, it will only take the footage in between the in and out points we have marked up on the clip. Now, let us insert this marked-up clip onto the Timeline using a feature called Smart Insert.
Smart Insert
Traditionally, when we add a clip to the Timeline, it will place it where the Timeline playhead is. There is a new feature called Smart Insert in the Cut page that predicts where we want the new clip to go based on how near the playhead is to a pre-existing cut. Let’s use Smart Insert to add our marked-up clip to the Timeline:
- Make sure the playhead is near the cut that we made earlier; it doesn’t need to be precisely placed.
You will notice some arrows bouncing above the cut point. These are Smart Indicators, that is, they are a visual cue to show you where the clip will be inserted when you click on the Smart Insert button.
- Click on the Smart Insert button (the first edit button; see Figure 1.15) from the upper-left corner of the Timeline.
The clip you have chosen has now been trimmed and added to the Timeline at the point where you previously made a cut. You should also notice that the surrounding clips have not been overwritten, but they have been moved further up the Timeline to make room for the new clip – this is called Rippling
Append to End
Now, let’s look at the next edit button (see Figure 1.15) in the editing toolbar underneath the Media Pool, Append.
The Append button places a new clip at the end of our Timeline regardless of where the playhead is placed. This is great for credits or adding footage quickly to the Timeline in chronological order without needing to position the playhead first:
- In the Media Pool, find a new clip that you want to place at the end of the Timeline, such as the final shot of the product you are promoting or the final scene of your short film.
- Click on the Append button.
The new clip has now been placed on the end of the Timeline regardless of the position of your playhead.
Ripple Overwrite
If you want to replace a clip on the Timeline with another clip in the Media Pool, then you can use Ripple Overwrite (the third edit button; see Figure 1.15). This is great if you want to change your mind about the content of your video. When you use Ripple Overwrite, if the new clip is too short, it will ripple the rest of the clips around the new clip to close any resulting gaps. If the new clip is too long, it will ripple the existing clips along the Timeline to make room for the new clip.
Let’s see this in action:
- Select the clip in the Timeline that you want to replace. You can simply place your playhead on the clip to do this.
- Select the new clip in the Media Pool.
- Click on the Ripple Overwrite button.
You should have noticed that the new clip has replaced the old clip on the Timeline, and the Timeline has moved the clips to either side (rippled) of the new clip, reducing or increasing the length of the Timeline, depending on the duration difference between the two clips.
Adding footage to the Timeline – using Track 2
There are no problems with performing your whole edit by only using the Smart Insert, Append, or Ripple Overwrite buttons. However, there will be times when you will need more advanced functions to solve a particular problem; this is where the following edit tools come in.
So far, all of the edits we have been making have been to Track 1 in the Timeline. Whatever edit you make to Track 1 of the Timeline, the clips will always ripple to make room for the new edit. If you want to add clips to the Timeline without the Timeline rippling to make room for the addition, you can add the clips to Track 2, which will not ripple the Timeline, but instead overlays a clip (on Track 2) on top of existing clips (on Track 1).
Close Up
The next Edit tool, Close Up (the fourth edit button; see Figure 1.15), uses Track 2 to add a close-up of the existing footage on Track 1. It does this by taking a zoomed-in view of the clip on your Timeline where your playhead is and adding a 5-second duration clip to Track 2. If the duration between your playhead and the end of the existing clip is shorter than 5 seconds, it will end the new clip at the end of your existing clip.
It is important to note that this is digitally zoomed, so there might be some loss of quality unless you use a clip that has a higher resolution than the Timeline, such as a 4K clip for a 1080p Timeline.
This tool does not have to be used only for close-ups; for example, it can also convert a wide shot into a medium shot.
Let’s take the medium shot that you placed on the Timeline earlier and convert some of it into a close-up:
- Place your playhead on the Timeline over the medium shot clip where you want the close-up to start.
- Click on the Close Up tool button underneath the Media Pool.
You will notice a new close-up shot placed on Track 2 above the existing shot on Track 1.
This is a useful tool to use in an emergency if you’re editing footage where no close-ups were shot and there is no time for a re-shoot.
Place on Top
Now we are familiar with how to place shots on Track 2 so that the Timeline does not become rippled, let us look at another editing tool that uses Track 2 to add alternative footage.
The Place on Top edit button (the fifth button; see Figure 1.15) adds a new clip to Track 2 above the existing clips on Track 1. This is good when adding cutaways or inserting shots to the main edit without affecting the duration of the video on the Timeline.
By default, the Place on Top tool places the new clip onto Track 2 starting at your playhead position on the Timeline.
Let’s see this in practice. We will now add one of our cutaway shots to the Timeline to illustrate the main dialogue in the video:
- Place your playhead in the Timeline where you want your new clip (e.g., a cutaway shot) to begin.
- Select your new clip in the Media Pool.
- Click on the Place on Top button.
You should now have a new clip on Track 2 of your Timeline starting where you had your playhead placed.
Once you have completed your main edit and set the final duration of your video, you can use this tool to add extra shots without affecting the length of your video.
Source Overwrite
The final edit tool underneath the Media Pool is the Source Overwrite button. This button only works if you have more than one clip with overlapping timecodes. If you do not have footage with timecodes, then this button will do nothing. As this is an editing book for beginners, we will ignore this button.
Feel free to practice using these editing tools until you have mastered them by adding and swapping the footage on your Timeline until you are happy with your edit.
In the next section, we will look at how to publish your edited video to social media such as YouTube or Vimeo.


