Creating a QGIS plugin
Plugins are the best way to extend QGIS, as they can be easily updated and reused by other people.
Getting ready
The easiest approach to creating a plugin is to use the Plugin Builder plugin to jumpstart development. You can find it in the main QGIS plugin repository and install it.
How to do it…
Perform the following steps to create a simple plugin that displays a dialog box with a custom message:
- Start QGIS.
- From the Plugins menu, select Plugin Builder and then click on Plugin Builder under the submenu.
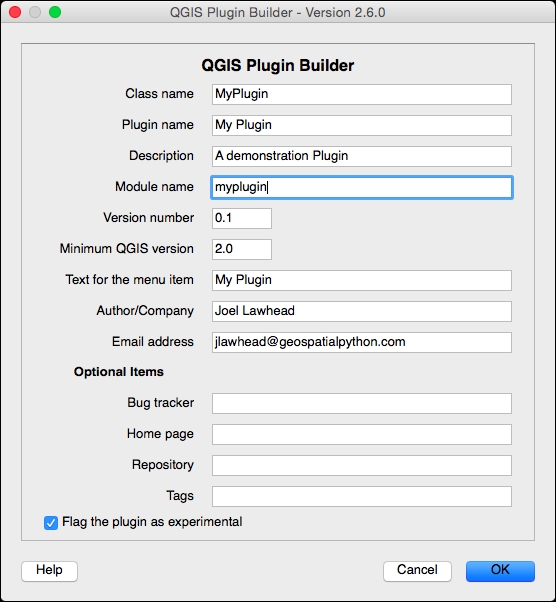
- In the QGIS Plugin Builder dialog, name the class
MyPlugin. - Name the plugin
My Plugin. - Type a short description, such as
A demonstration on building a QGIS Plugin. - Enter
mypluginfor the Module name. - Leave the default version numbers as they are.
- Enter
My Pluginin the Text for the menu item field. - Enter your name and email address for author information.
- Ensure that the checkbox labelled Flag the plugin as experimental is checked, as shown in the following screenshot:

- Click on the OK button.
- A file browser dialog will appear; you can choose a folder in which you want to create your plugin. Select one of the folders called
pluginswithin thepythonfolder in either the main user directory or the QGIS program directory. The following examples are from a Windows machine. You should use the folder in your user directory, which is the preferred place for third-party plugins. QGIS standard plugins go in the main program directory:C:\Documents and Settings\Joel\.qgis2\python\plugins C:\Program Files\QGIS Brighton\apps\qgis\python\plugins
- Close the follow-on Plugin Builder information dialog by clicking on the OK button.
- Using the command prompt, navigate to your new plugin template folder.
- Use the
pyrcc4command to compile the resource file:pyrcc4 –o resources_rc.py resources.qrcTip
If you are on Windows, it is important to use the OSGEO4W shell, which is installed along with QGIS, for the Qt compilation tools to work properly.
- In a text editor, such as Windows Notepad or vi on Linux, open the user interface XML file named
myplugin_dialog_base.ui. - Insert the following XMLfor a custom label near line 31 and just before the last
</widget>tag. Save the file after this edit:<widget class="QLabel" name="label"> <property name="geometry"> <rect> <x>120</x> <y>80</y> <width>201</width> <height>20</height> </rect> </property> <property name="font"> <font> <pointsize>14</pointsize> </font> </property> <property name="text"> <string>Geospatial Python Rocks!</string> </property> </widget>
- Now, compile the
uifile using thepyuic4tool:pyuic4 –o ui_myplugin.py ui_myplugin.ui - Your plugin is now ready. Restart QGIS.
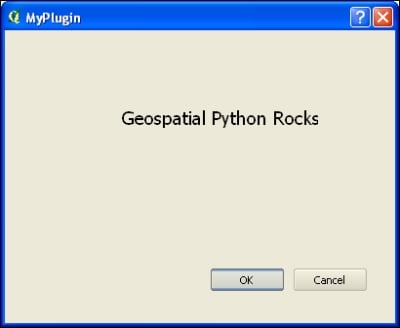
- Select My Plugin from the Plugins menu and then select My Plugin from the submenu to see the dialog you created within QGIS, as shown here:

How it works…
This recipe shows you the bare bones needed to make a working plugin. Although we haven't altered it, the code for the plugin's behavior is contained in myplugin.py. You can change the icon and the GUI, and just recompile any time you want. Note that we must compile the Qt4 portion of the plugin, which creates the dialog box. The entire QGIS GUI is built on the Qt4 library, so the pyrrc4 compiler and pyuic4 is included to compile the GUI widgets.
You can download the completed plugin with both the source and compiled ui and resource files at https://geospatialpython.googlecode.com/svn/MyPlugin.zip.
Note
You can find out more about QGIS plugins, including the purpose of the other files in the directory, in the QGIS documentation at http://docs.qgis.org/testing/en/docs/pyqgis_developer_cookbook/plugins.html.
There's more…
We have edited the myplugin_dialog_base.ui XML file by hand to make a small change. However, there is a better way to use Qt Creator. Qt Creator is a fully-fledged, open source GUI designer for the Qt framework. It is an easy what-you-see-is-what-you-get editor for Qt Widgets, including PyQGIS plugins, which uses the included Qt Designer interface. On Windows, Qt Designer can be found in the QGIS program directory within the bin directory. It is named designer.exe. On other platforms, Qt Designer is included as part of the qt4-devel package.
Note
You can also download Qt Creator, which includes Qt Designer, from http://qt-project.org/downloads.
When you run the installer, you can uncheck all the installation options, except the Tools category to install just the IDE.


