Monolithic Project Billing sample
Let's go ahead and walk through a simple implementation in WPF of the Project Billing application that was introduced at the beginning of this chapter. We will create the UI using a monolithic style.
Note
This will be a WPF application but we are not using RAD (Rapid Application Development) support available in Visual Studio, XAML or WPF project templates as it better demonstrates the monolithic style. If you are not familiar with writing code only WPF applications in this style and want to learn more then see Applications = Code + Markup: A Guide to the Microsoft Windows Presentation Foundation, by Charles Petzold.
Start by creating a solution and then adding a new Console Application project named ProjectBilling.Monolithic to your solution, as shown in the following screenshot:
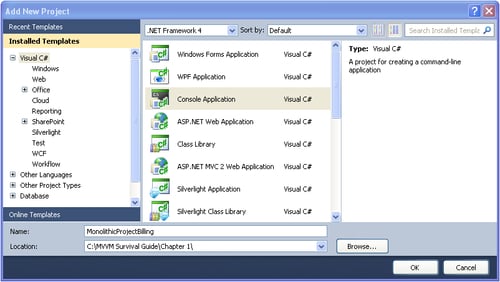
Note
We will convert this console application to a Windows application later in this section but it's not necessary to do so as you can run a WPF application from a console application. Full details are coming later in this section.
Now add a reference to the PresentationFramework, PresentationCore, System.Xaml, and WindowsBase assemblies, as shown in the following screenshot:
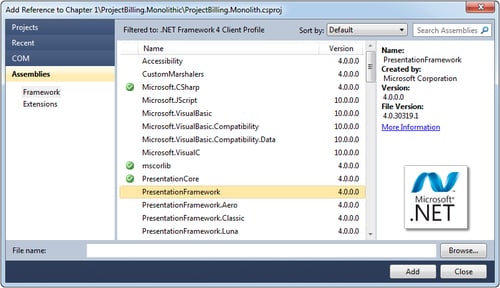
Note
The previous screenshot only shows adding a reference to PresentationFramework. Repeat this process for PresentationCore, System.Xaml, and WindowsBase as well.
Now add a project reference to ProjectBilling.DataAccess, as shown in the following screenshot:
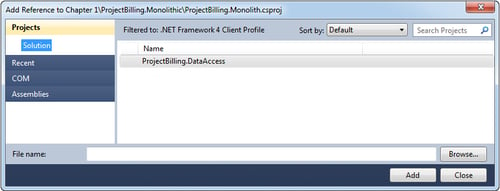
Next, delete Program.cs and add a new class named ProjectsView and add the following code to that file.
Note
Using data service means that technically we are not implementing a monolith as we are introducing a data access layer. This is done to keep the code as short as possible. Keep in mind that a purely monolithic application would not have a separate data access layer. The variation of monolithic design that we are implementing here is commonly referred to as autonomous view.
ProjectsView
The heart of this application is the ProjectsView class. Let's start by making this class a window and bringing in the namespaces we need.
using System;
using System.Windows;
using System.Windows.Controls;
using ProjectBilling.DataAccess;
using System.Windows.Media;

namespace ProjectBilling.UI.Monolithic
{
    sealed class ProjectsView : Window
    {

    }
}
This class now derives from System.Windows.Window, which is what allows it to be displayed as a WPF application. Add a main function to ProjectsView as follows:
[STAThread]
static void Main(string[] args)
{
    ProjectsView mainWindow
        = new ProjectsView();
    new Application().Run(mainWindow);
}
The main function is given the STAThread attribute—which makes it run in a single threaded apartment—which is a requirement of WPF and for interoperability with COM (Component Object Model). The main function simply creates a ProjectsView and then passes it to System.Windows.Application.Run(), which initializes WPF, starts a message loop, and then displays ProjectsView as the application's main window.
Initialization
Most of the work of the application will be done by the ProjectsView constructor and field initializers. Add the following fields to the class:
private static readonly Thickness _margin
    = new Thickness(5);
private readonly ComboBox _projectsComboBox
    = new ComboBox() { Margin = _margin };
private readonly TextBox _estimateTextBox
    = new TextBox()
        { IsEnabled = false, Margin = _margin };
private readonly TextBox _actualTextBox
    = new TextBox()
        { IsEnabled = false, Margin = _margin };
private readonly Button _updateButton = new Button()
    {
        IsEnabled = false,
        Content = "Update",
        Margin = _margin
    };
Here we've created the Project combobox, Estimated Cost and Actual Cost textboxes in addition to the Update button.
Next let's add a constructor with the following code. We'll start by setting the Title and size of the MonolithicProjectBillingWindow instance. We will then call two helper methods that will be covered shortly and also add an event handler for the updateButton.Click event.
Note
This event handler will allow the code to be notified of user input via .NET's built-in support for the Observer pattern that is implemented by .NET events.
public ProjectsView()
{
    Title = "Project";
    Width = 250;
    MinWidth = 250;
    Height = 180;
    MinHeight = 180;

    LoadProjects();

    AddControlsToWindow();

    _updateButton.Click += updateButton_Click;
}
Note
See the Helpers section for methods that are called but not yet defined such as LoadProjects() and AddControlsToWindow().
Event handlers
Most of the rest of the functionality of the application is contained within the event handlers:
The following code will create
projectsComboBox_SelectionChanged(), which is an event handler for theprojectsComboBox.SelectionChangedevent that we will wire up in theLoadProjects()method that was called from the constructor. This code first determines if an item is selected by casting the sender to acomboBox, making sure it isn't null and also that an item is selected.private void projectsListBox_SelectionChanged( object sender, SelectionChangedEventArgs e) { ComboBox comboBox = sender as ComboBox; // If there is a selected item if (comboBox != null && comboBox.SelectedIndex > -1) { UpdateDetails(); } else { DisableDetails(); } }If there is an item selected in
projectsComboBoxthen theUpdateDetails()helper method is called; if no item is selected then theDisableDetails()helper method is called.
updateButton.Click()is shown in the following code:private void updateButton_Click(object sender, RoutedEventArgs e) { Project selectedProject = _projectsComboBox.SelectedItem as Project; if (selectedProject != null) { selectedProject.Estimate = double.Parse(_estimateTextBox.Text); if (!string.IsNullOrEmpty( _actualTextBox.Text)) { selectedProject.Actual = double.Parse( _actualTextBox.Text); } SetEstimateColor(selectedProject); } }updateButton.Click()will fire when the user clicks on the Update button and determine if an item is selected. If an item is selected, it will update the details controls with the details of the selected item. The values to populate the details controls will be fetched from the properties of the details controls which we are currently using for view state. Next updateButton.Click()will call theSetEstimateColor()helper function to update the color of theestimateTextBox(view state) based on whether the estimated cost is higher or lower than the actual cost (view logic).Note
_actualTextBoxis checked for null or empty as it starts out in an empty state and could be empty that state if the user updates only the Estimated Cost but not actual. This validation was provided to keep the application running down the happy path while all other validation have been left out to keep the code short.
Helpers
These private helper methods will add the remaining functionality:
Add the
LoadProjects()method, as shown in the following code:private void LoadProjects() { foreach (Project project in new DataServiceStub().GetProjects()) { _projectsComboBox.Items.Add(project); } _projectsComboBox.DisplayMemberPath = "Name"; _projectsComboBox.SelectionChanged += new SelectionChangedEventHandler( projectsListBox_SelectionChanged); }The
LoadProjects()method will do the following:Fetch the projects to populate the
projectsComboBoxwith data retrieved from persisted state by instantiating a newDataServiceand then callingGetProjects()The results of
GetProjects()are iterated over and added to _projectsComboBoxfor displaySet the
DisplayMemeberPathto "Name" to use theProject.Nameproperty for the displayed text for each project in the_projectsComboBox.ItemscollectionWire up an event handler for the
projectsComboBox.SelectionChangedevent allowing us to update the details view when the user changes the selected project
Add the
AddControlsToWindow()method with the following code:private void AddControlsToWindow() { UniformGrid grid = new UniformGrid() { Columns = 2 }; grid.Children.Add(new Label() { Content = "Project:" }); grid.Children.Add(_projectsComboBox); Label label = new Label() { Content = "Estimated Cost:" }; grid.Children.Add(label); grid.Children.Add(_estimateTextBox); label = new Label() { Content = "Actual Cost:"}; grid.Children.Add(label); grid.Children.Add(_actualTextBox); grid.Children.Add(_updateButton); Content = grid; }The previous code will do the following:
Create a new
UniformGridConfigure the controls we will be using and then add the controls to the grid
Set the grid as the content of the window for display
Add the
GetGrid()method toProjectsViewas follows:private Grid GetGrid() { Grid grid = new Grid(); grid.ColumnDefinitions .Add(new ColumnDefinition()); grid.ColumnDefinitions .Add(new ColumnDefinition()); grid.RowDefinitions .Add(new RowDefinition()); grid.RowDefinitions .Add(new RowDefinition()); grid.RowDefinitions .Add(new RowDefinition()); grid.RowDefinitions .Add(new RowDefinition()); return grid; }This code creates a 2x3
Gridthat is used to create a basic form layout.Note
We are not trying to make this form pretty but are instead trying to focus on the presentation patterns. One of the big benefits of MVVM is that it will allows us to give our view XAML to a designer and have them make it look nice without having the need to involve the developer. We will look at this approach in detail later in this book in Chapter 7, Dialogs and MVVM.
Add the
UpdateDetails()method as follows:private void UpdateDetails() { Project selectedProject = _projectsComboBox.SelectedItem as Project; _estimateTextBox.IsEnabled = true; _estimateTextBox.Text = selectedProject.Estimate.ToString(); _actualTextBox.IsEnabled = true; _actualTextBox.Text = (selectedProject.Actual == 0) ? "" : selectedProject.Actual.ToString(); SetEstimateColor(selectedProject); _updateButton.IsEnabled = true; }The
UpdateDetails()method simply transfers data from theprojectsComboBox.SelectedItem(or master) to the details controls and then updates theestimateTextBoxby callingSetEstimateColor().Add a
DisableDetails()method as follows:private void DisableDetails() { _estimateTextBox.IsEnabled = false; _actualTextBox.IsEnabled = false; _updateButton.IsEnabled = false; }The
DisableDetails()method sets the details controlsIsEnabledtofalsealong with the update button.Add
SetEstimateColor()as follows:private void SetEstimateColor(Project selectedProject) { if (selectedProject.Actual == 0) { this.estimateTextBox.Foreground = _actualTextBox.Foreground; } else if (selectedProject.Actual <= selectedProject.Estimate) { this.estimateTextBox.Foreground = Brushes.Green; } else { this.estimateTextBox.Foreground = Brushes.Red; } }The
SetEstimateColor()method will be called by both event handlers to update the color of Estimated Cost (view state) by examining the Actual Cost and Estimated Cost.
Running the sample
Right-click on the ProjectBilling.Monolithic project and select Properties. Next, set the Output type to Windows Application as shown in the following screenshot:

Tip
If you leave the Project type as Console Application then a Console Window will be displayed while your WPF application runs. This can be useful for debugging as you can write debug messages to the console and easily kill the application using Ctrl + C when debugging.
Finally set ProjectBilling.Monolithic as the startup project by right-clicking on it and selecting Set as StartUp project. Now run the application by hitting F5.
You should now an application as shown in The Project Billing sample application section at the beginning of this chapter.
Takeaways
This code gets the job done, so what's the problem and why is there the need to restructure it?
Poor testability
This code has poor testability as the entire code is tightly coupled to the view and requires the view to fire the events that drive the logic of application. You could change the access modifiers of the methods of ProjectsView to public the help alleviate the situation but then you weaken the design from the
encapsulation and design by contract perspectives.
Note
Encapsulation and design by contract are basic principles of Object-oriented design that are covered extensively on the Web. Please look up for them if you are already not familiar with them.
Poor extensibility and code reuse
If the users wanted a command line or web-interface, all of the code would need to be rewritten. Also, supporting multiple synchronized ProjectView is not possible under this design and would require at a minimum refactoring out a model.
Note
We will demonstrate how adding SoC allows for creating multiple synchronized vs of the model when we get to the MVC section.
Rapid application development
Microsoft puts a lot of development effort into creating Rapid Application Development (or RAD) tools that allow developers to simply drag-and-drop controls onto the IDE's design surface and then allow for configuring the controls' data needs mostly through the IDE's designer. The designer then creates monolithic code to get the job done. These tools make the problems of monolithic design worse by encouraging that style of design and by making it easier to do.
RAD Project Billing sample
This section will walk through rewriting the Project Billing application using RAD tools in Visual Studio.
Start by adding a new WPF Application project to your solution called ProjectBilling.RAD. This project template creates two files for you, App.xaml and MainWindow.xaml.
Next add a project reference to ProjectBilling.DataAccess.
Open MainWindow.xaml in Cider (the WPF designer) by double-clicking on MainWindow.xaml in the Solution Explorer. If they're not already expanded, expand the Toolbox window and the Data Sources window. You should have Visual Studio set up as shown in the following screenshot:
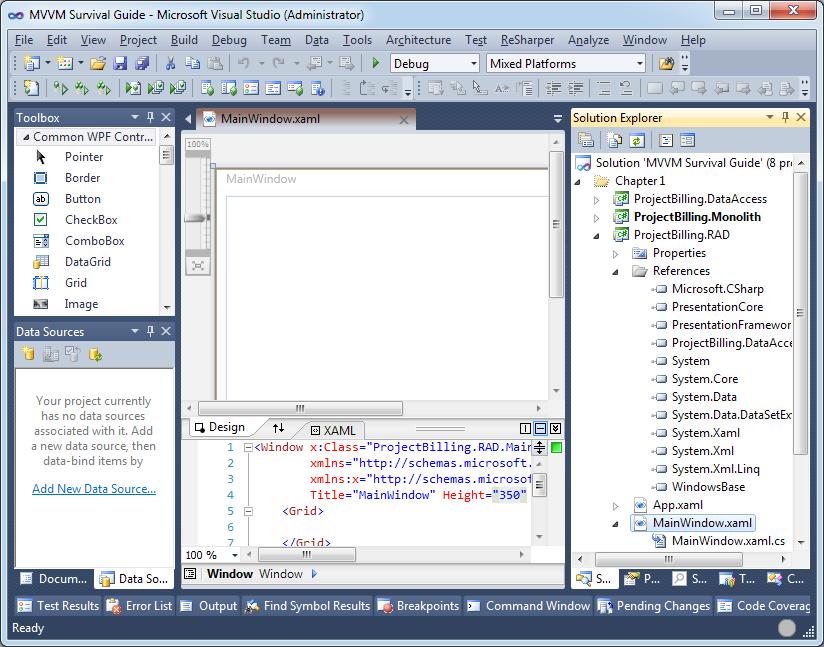
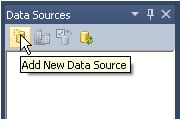
The first step is to add an Object Data Source to connect to DataService.GetProjects(). To do this start by clicking on Add New Data Source in the Data Sources window, as shown in the following screenshot:
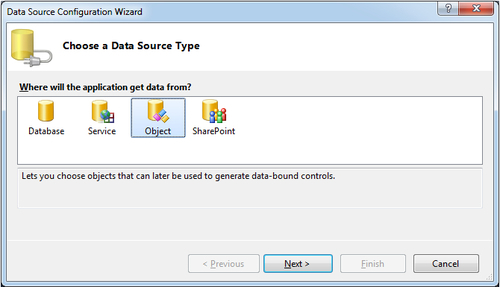
You will now be presented with a dialog that will allow you to specify an Object Data Source, as shown in the following screenshot:
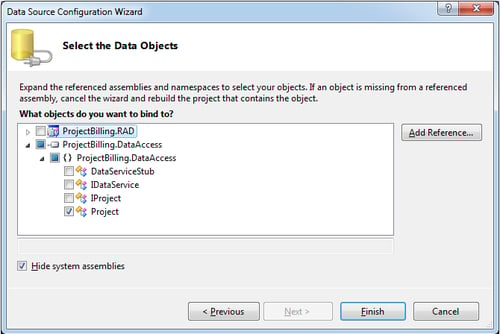
You will now be given the option to select the object that will be your data source. Select the Project class as shown in the following screenshot:
Next, select ComboBox from the Name drop-down menu, as shown in the following screenshot. This will change the type of generated control to be a combobox for the Name property.
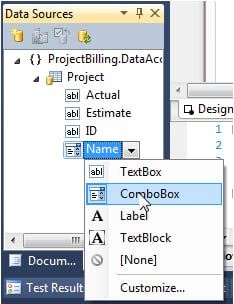
Now drag the Name column onto the designer surface so that Visual Studio can generate some code to create a ComboBox which will be ready to be bound by an IList<Product>.
Change the width of the window to 250 by clicking on the MainWindow and setting the width value in the properties. You should now see something similar to what is shown in the following screenshot:
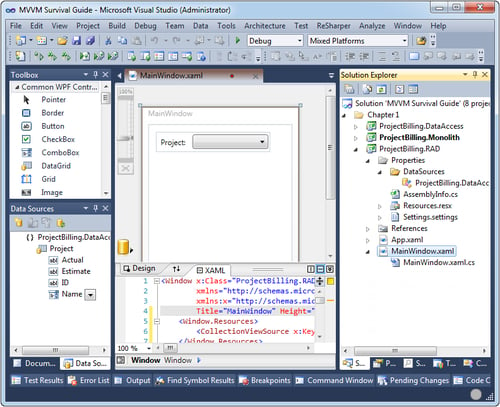
Looking at the XAML in the previous screenshot you will see that some code was generated for you. The important parts are highlighted as follows.
Note
It is assumed that you are familiar with the basics of WPF's data binding as full details fall outside of the scope of this book. However, see Appendix B, Binding at a glance, and/or see Data Binding (WPF) on MSDN (http://msdn.microsoft.com/en-us/library/ms750612.aspx).
<Window x:Class="RadProjectBilling.MainWindow"
        xmlns="http://schemas.microsoft.com/winfx/2006/xaml/presentation"
        xmlns:x="http://schemas.microsoft.com/winfx/2006/xaml"
        Title="MainWindow" Height="350" Width="250"
        mc:Ignorable="d"
        xmlns:d="http://schemas.microsoft.com/expression/blend/2008"
        xmlns:mc="http://schemas.openxmlformats.org/markup-compatibility/2006"
        xmlns:my="clr-namespace: ProjectBilling.DataAccess;assembly=ProjectBilling.DataAccess"
        Loaded="Window_Loaded">
    <Window.Resources>
        <CollectionViewSource x:Key="projectViewSource" d:DesignSource="{d:DesignInstance my:Project, CreateList=True}" />
    </Window.Resources>
    <Grid>
        <Grid DataContext="{StaticResource projectViewSource}"
              HorizontalAlignment="Left"
              Margin="12,12,0,0" Name="grid1"
              VerticalAlignment="Top">
            <Grid.ColumnDefinitions>
                <ColumnDefinition Width="Auto" />
                <ColumnDefinition Width="Auto" />
            </Grid.ColumnDefinitions>
            <Grid.RowDefinitions>
                <RowDefinition Height="Auto" />
            </Grid.RowDefinitions>
            <Label Content="Name:" Grid.Column="0"
                   Grid.Row="0" HorizontalAlignment="Left"
                   Margin="3" VerticalAlignment="Center" />
            <ComboBox DisplayMemberPath="Name" Grid.Column="1"
                      Grid.Row="0" Height="23"
                      HorizontalAlignment="Left"
                      ItemsSource="{Binding}" Margin="3"
                      Name="nameComboBox"
                      VerticalAlignment="Center" Width="120">
                <ComboBox.ItemsPanel>
                    <ItemsPanelTemplate>
                        <VirtualizingStackPanel />
                    </ItemsPanelTemplate>
                </ComboBox.ItemsPanel>
            </ComboBox>
        </Grid>
    </Grid>
</Window>
At the top of the file, there is an event handler added for the Window.Loaded event which is set to Window_Loaded.As you will see soon, Window_Loaded was created in the code behind. Next, a new CollectionViewSource named projectViewSource was added and set to reference to the DataLayer.Project class.
Note
A CollectionViewSource class wraps a data source and allows you to navigate and display the collection based on sort, filter, and group quires.
The grid, grid1, then had its DataContext set to projectViewSource and a ComboBox called nameComboBox was added with its ItemsSource bound to its DataContext with the following code.
ItemsSource="{Binding}"Specifying Binding with no path in a binding expression will cause the binding target to be bound to the combobox's DataContext property.
Note
We will be covering bindings and DataContext in more depth later in this book.
DataContext is an inherited DependencyProperty and inherited DependencyProperties will have their values propagated from parents to children in the
Visual Tree and in this case will result in the DataContext that was set on grid1 being propagated to all of its children including nameComboBox.
Note
For more information on DependencyProperties see Dependency Properties Overview on MSDN (http://msdn.microsoft.com/en-us/library/ms752914.aspx) and for more information on the Visual Tree see Trees in WPF on MSDN (http://msdn.microsoft.com/en-us/library/ms753391.aspx).
If we look in the code behind, MainWindow.xaml.cs, we'll see that projectViewSource has been initialized in Window_Loaded().
private void Window_Loaded(object sender, RoutedEventArgs e)
{

    System.Windows.Data.CollectionViewSource projectViewSource
        = ((System.Windows.Data.CollectionViewSource)
        (this.FindResource("projectViewSource"));
    // Load data by setting the
    // CollectionViewSource.Source property:
    // projectViewSource.Source = [generic data source]
}
There is some commented out code created for you.
// projectViewSource.Source = [generic data source]
By uncommenting the previous line of code, you can easily set the data source to the collection returned by DataServiceStub.GetProjects, as shown in the following code.
Note
You will need to add a using statement for ProjectBilling.DataAccess to the top of the file.
private void Window_Loaded(object sender, RoutedEventArgs e)
{

    System.Windows.Data.CollectionViewSource projectViewSource
        = ((System.Windows.Data.CollectionViewSource)
        (this.FindResource("projectViewSource"));
    // Load data by setting the
    // CollectionViewSource.Source property:
    projectViewSource.Source=new DataServiceStub().GetProjects();

}
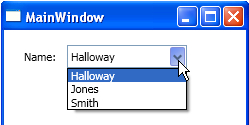
Now if we run the application, we will see that the Name combobox is populated with data shown in the following screenshot:
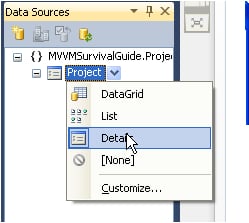
Next we need to add the details controls. The first step is to click on the drop-down menu next to the Project data source in the DataSources window and change its type to Details, as shown in the following screenshot:
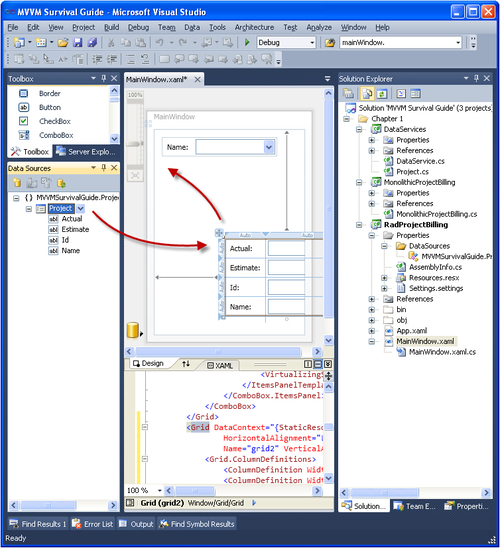
Now we will generate the details controls as shown in the following screenshot:
Perform the following steps:
Drag the Project data source to the MainWindow on the
ciderdesign surface as shown in the previous screenshot. This will create a mini form with the controls for displaying the details.Drag the form that was created by clicking on the drag handles for the grid and move it below the name, as shown in the previous screenshot.
Next, clean up the form by removing the labels, textboxes, and rows that are associated with the
IdandNamelabels.
Now run ProjectBilling.RAD and you should have a working master/details view, as shown in the following screenshot:
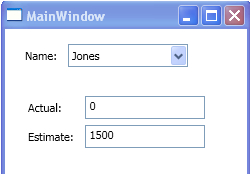
As you can see, it's easy to set up a working master/details form using these tools. It'd need some tweaking to be exactly the same as the monolithic one but I'm sure you get the idea of how this works compared to the monolithic style.
To finish off the application, add a button and change its Content to Update, Name to UpdateButton, IsEnabled to false, and then double-click on the button to create an event handler called UpdateButton_Click().
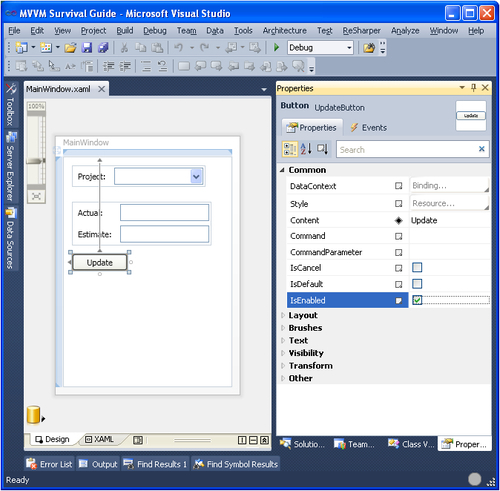
Add the following code to updateButton_Click():
private void UpdateButton_Click(object sender,
    RoutedEventArgs e)
{
    Project selectedProject
        = this.nameComboBox.SelectedItem
        as Project;
    if (selectedProject != null)
    {		        selectedProject.Estimate =
            double.Parse(this.estimateTextBox.Text);
        if (!string.IsNullOrEmpty(
            this.actualTextBox.Text))
        {
            selectedProject.Actual
                = double.Parse(
                    this.actualTextBox.Text);
        }
        SetEstimateColor(selectedProject);
    }
}
This is almost exactly the same code we saw in the previous monolithic example and works exactly the same way.
Next, double-click on the Project combobox to add a SelectionChanged event handler. This will take you from the designer to the newly created event handler. Add the following code to this event handler along with the related SetEstimateColor() method.
Note
You will need to include the System.Windows.Controls and System.Windows.Media namespaces.
private void nameComboBox_SelectionChanged(object sender,
    SelectionChangedEventArgs e)
{
    ComboBox comboBox = sender as ComboBox;

    // If there is a selected item
    if (comboBox != null && comboBox.SelectedIndex > -1)
    {
         Project selectedProject
            = comboBox.SelectedItem as Project;

        SetEstimateColor(selectedProject);
        this.UpdateButton.IsEnabled = true;
    }
    else
    {
        this.estimateTextBox.IsEnabled = false;
        this.actualTextBox.IsEnabled = false;
        this.UpdateButton.IsEnabled = false;
    }
}

private void SetEstimateColor(Project selectedProject)
{
    if (selectedProject.Actual == 0)
    {
        this.estimateTextBox.Foreground
            = Brushes.Black;
    }
    else if (selectedProject.Actual
        <= selectedProject.Estimate)
    {
        this.estimateTextBox.Foreground
            = Brushes.Green;
    }
    else
    {
        this.estimateTextBox.Foreground
            = Brushes.Red;
    }
 }
The previous code is similar to the monolithic code, except shorter. A lot of the code that was used to update the UI before is now not necessary and has been specified as a part of the XAML.
<Window.Resources>
    <CollectionViewSource x:Key="projectViewSource"
            d:DesignSource="{d:DesignInstance my:Project,
                                CreateList=True}" />
</Window.Resources>
The projectViewSource is now doing the work we were manually doing before to move data in and out of our details controls, and that is accomplished through the bindings that have been created for us on the details controls.
<TextBox Grid.Column="1" Grid.Row="0" Height="23"
        HorizontalAlignment="Left" Margin="3"
        Name="actualTextBox"
        Text="{Binding Path=Actual, Mode=TwoWay,
                ValidatesOnExceptions=true,
                NotifyOnValidationError=true}"
        VerticalAlignment="Center" Width="120" />
Each details control will have a binding configured, as shown previously, to allow for two-way communication with the binding source, which in this case is the Project.Actual that is exposed from the projectViewSource CollectionViewSource class.
Takeaways
Looking at the code we just created, we see a situation that is slightly better than with pure monolithic design. The use of a CollectionViewSource reduced the amount of code that was created and that would need to be maintained and tested. However, the ease with which these controls allow for creating monolithic designs makes them an overall negative for those who care about design. We still have all the problems of monolithic code here that result from tight coupling and poor separation of concerns. However, we now have the additional problem of Visual Studio encouraging that type of design and we still can't easily support multiple dynamic views of our session state.
MVC
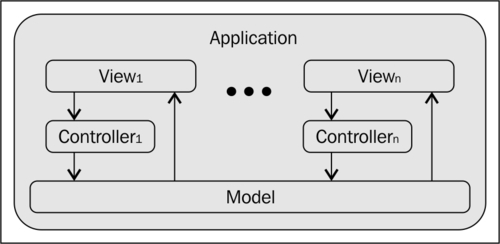
As a result of the problems caused by monolithic design, there has been a movement that started in the 70s towards presentational patterns or "Model View" patterns that provide better SoC and better testability. All this began in 1979 when MVC (Model View Controller) was described by Trygve Reenskaug while he was working on Smalltalk at Xerox PARC. Presentation patterns are notoriously flexible and this flexibility is part of what makes them difficult to master. Because of this there have been numerous versions of the MVC pattern; it's out of the scope of this book to cover all the various types of MVCs. What is important to understand is what these MVC patterns generally looked like and what problems they had which led to MVP. The basic structure of MVC is shown in the following diagram:
Note
Over the years MVC has taken many forms and it has evolved to where it is now common for the controllers to have a larger scope than just one widget, and under this newer style you'd more likely have one controller per form or user control instead of per widget. The sample used in this book makes use of the more modern style with one controller per window.
We will now cover the responsibilities of each of the components mentioned earlier and as part of that discussion you will see where the components introduced in the Monolithic section of this chapter fit into the MVC paradigm.
View
The view is responsible for displaying data and collecting user input. The view gets its data from the model including notifications that data has been updated and needs to be refreshed. These notifications are implemented using an observer pattern.
Note
In .NET, events are an implementation of the observer pattern.
When the user interacts with the view through gestures, the view is responsible for collecting those gestures and forwarding them along to the controller for processing.
Controller
The controller is responsible for taking user input and communicating it to the model for processing.
Note
The controller doesn't have to pass user input directly to the model and in many cases will instead communicate input gestures to a service layer or business logic layer for processing, which will then update the existing model or return a new model depending on the architecture. These details will be covered more extensively in the section titled Layered Design later in this chapter.
The main benefit that the controller provides is the ability to remove as much logic as possible into an external component that can be tested using automated tests.
Note
There are many variations of MVC that we will not be covering where the controller is responsible for collecting input from the user including Model 2, which is the pattern that ASP.NET MVC is based on.
Model
In MVC, the model is the in-memory representation of the data that was retrieved from the persistence store (session state). The model is also responsible for notifying the view of changes in state which is generally done with an observer pattern. Abstracting the model in this way allows for easily sharing session state among views, as we will discover shortly in the MVC Project Billing sample section.
Layered design
The design shown in the previous screenshot is an over-simplification of what is generally done in enterprise applications. Enterprise applications are generally separated into three logical layers as shown in the following diagram:
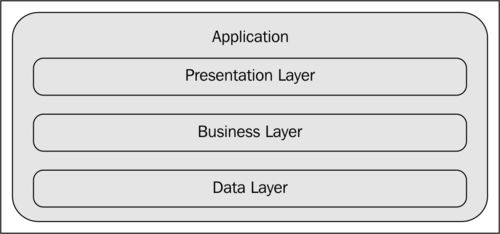
Layering an application in this way provides many benefits including the ability to scale more easily by deploying different layers to different servers and the ability to swap out layers with alternate implementations making the design extensible to change. A full discussion of layered design is outside of the scope of this book. If you'd like to learn more about layered enterprise design then see Chapter 5, Northwind—Commands and User Inputs, and Layered Application Guidelines from Microsoft Application Architecture Guide, 2nd Edition which is freely available online as part of MSDN (http://msdn.microsoft.com/en-us/library/ff650706.aspx).
The layers
The common three-layer design shown in the previous screenshot consists of the following layers:
Presentation layer
The presentation layer is responsible for
Displaying data
Providing feedback to the user
Collecting user input which is passed along to the business logic layer for processing
Separating the presentation in this way provides the benefits of being able to change the UI or provide a second UI without having to duplicate the code in the lower layers if for example you need to provide a thick client, thin client and a command-line version of your application.
Business layer
The business layer or application layer is where the core functionality of the system lives. This logic is called the business logic or domain logic and is applied to the raw data that is fetched from the data access layer for processing. Having the business logic in its own layer allows for scalability as the business logic can be hosted separately from the other layers and allows for extensibility as it provides the flexibility to support multiple types of UIs and multiple types of data stores if needed.
Data layer
The data layer is responsible for pulling data from and pushing data to a data store like a database, service or XML file. Having the data access layer provides the benefit of allowing for change in the data store without having to change code in higher layers.
MVC with layered design
Layered design may seem like a similar idea to MVC and it does have some similar ideas but they are not the same. However, they are generally used together in enterprise architecture, as shown in the following diagram:
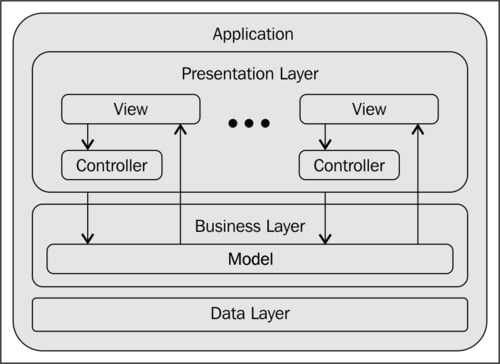
As you can see from the previous screenshot, using MVC with layered design results in having the view and controller as part of the presentation layer and the model as part of the business logic layer.
There are various approaches to how the model and business logic can be structured. Martin Fowler describes the most common approaches on his blog and in his book Patterns of Enterprise Application Architecture. The patterns Martin describes include the following:
Transaction script: This approach organizes business logic in procedures where each procedure handles a single request from the presentation. Under this design you have one large facade that exposes your business logic through its methods.
Domain model: This approach organizes domain logic into an object model of the domain that incorporates both behavior and data. Under this design you have an object graph that mirrors your domain objects and each of these domain or business objects could provide methods for fetching or manipulating data.
Table module: Under this design you'd have a model that mirrors the database tables instead of the domain objects.
We have barely scratched the surface here because there are so many ways of organizing business logic and the model. Covering all of the options available for the business layer and model is outside of the scope of this book. If you are interested in learning more see Patterns of Enterprise Application Architecture by Martin Fowler.
MVC Project Billing sample
The increased SoC that comes from implementing MVC will allow us to implement a slightly better version of Project Billing which will support multiple views of the same data with dynamic updates, as shown in the following screenshot:
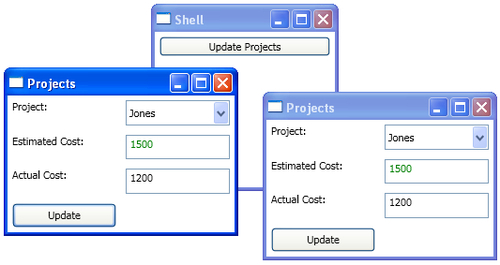
The classes involved in our MVC design are shown in the following screenshot:
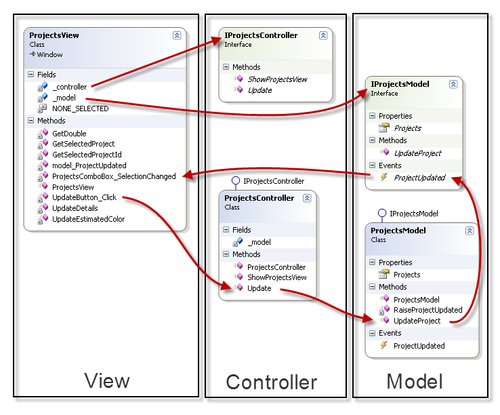
As you can see in the previous screenshot we will have:
ProjectsViewthat keeps a reference to anIProjectsControllerinterface via theProjectsView.controllerfield and will keep a reference to anIProjectsModelinterface via theProjectsView.modelfieldProjectsControllerclass that implementsIProjectsControllerProjectsModelthat implementsIProjectsModel
ProjectsView will use its reference to IProjectController to communicate user gestures to the controller by calling ProjectsView.controller.Update(). Internally this will call ProjectsController.model.UpdateProject().
Note
ProjectsView could call ProjectsView.model.UpdateProject() directly, but then the view logic would not be easily testable.
ProjectsView uses its reference to IProjectModel so that it can observe the IProjectsModel.ProjectUpdated event that will be raised after a call to ProjectModel.UpdateProject() finishes updating the model to provide dynamic synchronization of view state with session state (or model data) across all the ProjectsView instances. This design will make it so that when a user clicks on the Update button, all views that are currently open and viewing the same project will get the update and display the new data.
Let's start by creating a new WPF Application project called MvcProjectBilling. Add a project reference to the ProjectBilling.DataAccess.
Model
Add a new class to ProjectBilling.MVC called ProjectsModel andput the following code in it:
using System;
using System.Collections.Generic;
using System.Linq;
using ProjectBilling.DataAccess;

namespace ProjectBilling.Business.MVC
{
    public interface IProjectsModel
    {
        IEnumerable<Project> Projects { get; set; }
        event EventHandler<ProjectEventArgs> ProjectUpdated;
        void UpdateProject(Project project);
    }

    public class ProjectsModel : IProjectsModel
    {
        public IEnumerable<Project> Projects { get; set; }

        public event EventHandler<ProjectEventArgs>
            ProjectUpdated = delegate { };

        public ProjectsModel()
        {
            Projects = new DataServiceStub().GetProjects();
        }

        private void RaiseProjectUpdated(Project project)
        {
            ProjectUpdated(this,
                new ProjectEventArgs(project));
        }

        public void UpdateProject(Project project)
        {
            Project selectedProject
                = Projects.Where(p => p.ID == project.ID)
                      .FirstOrDefault() as Project;
            selectedProject.Name = project.Name;
            selectedProject.Estimate = project.Estimate;
            selectedProject.Actual = project.Actual;
            RaiseProjectUpdated(selectedProject);
        }
    }

    public class ProjectEventArgs : EventArgs
    {

        public Project Project { get; set; }

        public ProjectEventArgs(Project project)
        {
            Project = project;
        }
    }
}
This code creates a model for consumption by our view. The view uses the observer pattern to get its updates from the model and the controller passes along user input from the view to the model using an IProjectsModel reference.
We have implemented ProjectsModel based on the IProjectModel so that our design is more extensible and allows using dependency injection. Dependency Injection will allow for increased testability as a fake object (mock or stub) can now be provided during unit tests.
The IProjectsModel interface is shown as follows:
    public interface IProjectsModel
    {
        IEnumerable<Project> Projects { get; set; }
        event EventHandler<ProjectEventArgs> ProjectUpdated;
        void UpdateProject(Project project);
    }
IProjectsModel defines the following contract:
Projects: It is a collection of projects that was loaded from persisted stateProjectUpdated: It is an event for notifying when a project has its data updatedUpdateProject(): It is a method for submitting a project to be updated
The ProjectModel class implements the IProjectModelInterface and uses IDataServices.GetProjects() to fetch the data from our persistence service stub.
Note
The following code is the preferred way of defining events and it allows you to avoid having to check for a null event before raising the event. The code is more concise than the more common null checking pattern and also thread safe.
public event EventHandler<ProjectEventArgs>
ProjectUpdated = delegate { };Controller
Add a class to the ProjectsBilling.MVC project called ProjectsController and add the code as follows:
using System;
using ProjectBilling.Business.MVC;
using ProjectBilling.DataAccess;
using System.Windows;

namespace ProjectBilling.UI.MVC
{
    public interface IProjectsController
    {
        void ShowProjectsView(Window owner);
        void Update(Project project);
    }

    public class ProjectsController : IProjectsController
    {
        private readonly IProjectsModel _model;

        public ProjectsController(IProjectsModel projectModel)
        {
            if (projectModel == null)
                throw new ArgumentNullException(
                    "projectModel");
            _model = projectModel;
        }

        public void ShowProjectsView(Window owner)
        {
            ProjectsView view
                = new ProjectsView(this, _model);
            view.Owner = owner;
            view.Show();
        }

        public void Update(Project project)
        {
            _model.UpdateProject(project);
        }
    }
}
We've implemented the controller based on an interface to again take advantage of the benefits of dependency injection. The interface defines the following contract:
ShowProjectsView(): It is a method that allows for displaying aProjectsViewto the userUpdate(): It is a method that allows for updating a project that delegates the updating of the project to the modelNote
It was common in older versions of MVC to have the controller responsible for determining the next view and then to display the view. We demonstrated that in the previous code with
ShowProjectsView(). This is not a responsibility that always is taken on by the controller in MVC.
View
Add a new window to ProjectBilling.MVC called ProjectsView and add the following code to ProjectView.xaml:
<Window x:Class="ProjectBilling.UI.MVC.ProjectsView"
        xmlns="http://schemas.microsoft.com/winfx/2006/xaml/presentation"
        xmlns:x="http://schemas.microsoft.com/winfx/2006/xaml"
        Title="Projects" MinHeight="180" Height="180"
        MinWidth="250" Width="250" Padding="5"
        FocusManager.FocusedElement
            ="{Binding ElementName=ProjectsComboBox}">
    <UniformGrid Columns="2">
        <Label Content="Project:" />
        <ComboBox Name="ProjectsComboBox" Margin="5"
                SelectionChanged
                    ="ProjectsComboBox_SelectionChanged" />
        <Label Content="Estimated Cost:" />
        <TextBox Name="EstimatedTextBox" Margin="5"
                 IsEnabled="False" />
        <Label Content="Actual Cost:" />
        <TextBox Name="ActualTextBox" Margin="5"
                 IsEnabled="False" />
        <Button Name="UpdateButton" Content="Update"
                Margin="5" IsEnabled="False"
                Click="UpdateButton_Click" />
    </UniformGrid>
</Window>
This XAML creates a simple master/details form, like the one shown in the screenshot at the beginning of the MVC Project Billing sample section.
Note
Coverage of the basics of XAML is outside the scope of this book.
Next, add the following code to ProjectsView.xaml.cs. Start by adding the fields that will hold a reference to the model and controller.
using System.Windows;
using System.Windows.Controls;
using System.Windows.Media;
using ProjectBilling.Business.MVC;
using ProjectBilling.DataAccess;

namespace ProjectBilling.UI.MVC
{
    public partial class ProjectsView : Window
    {
        private readonly IProjectsModel _model;
        private readonly IProjectsController _controller
            = null;
        private const int NONE_SELECTED = -1;
    }
}
Initialization
Add the constructor as llows:
public ProjectsView(
    IProjectsController projectsController,
    IProjectsModel projectsModel)
{
    InitializeComponent();
    _controller
        = projectsController;
    _model = projectsModel;
    _model.ProjectUpdated
        += model_ProjectUpdated;
    ProjectsComboBox.ItemsSource
        = _model.Projects;
    ProjectsComboBox.DisplayMemberPath
        = "Name";
    ProjectsComboBox.SelectedValuePath
        = "ID";
}
This constructor allows for dependency injection by taking an interface for the model and controller as parameters. As previously mentioned, this allows for more isolated unit tests as fake objects (mocks or stubs) can be passed in for testing. The constructor:
Wires up the model and controller.
Subscribes to the
_model.ProjectUpdatedevent.Sets the
projectsComboBox.ItemSourcetothis.Model.Projectsand sets theDisplayMemberPathandSelectedValuePathso that they resolve toProject.NameandProject.IDrespectively.
Event handlers
Now we will add some event handlers:
The following
model_ProjectUpdatedcode will execute when theProjectsModel.ProjectUpdatedevent fires:void model_ProjectUpdated(object sender, ProjectEventArgs e) { int selectedProjectId = GetSelectedProjectId(); if (selectedProjectId > NONE_SELECTED) { if (selectedProjectId == e.Project.ID) { UpdateDetails(e.Project); } } }If the project that was updated is currently displayed in the details of this view, then this code will update the details with the project's new data. This allows for multiple synchronized views of the same data.
The
ProjectsComboBox_SelectionChangedevent handler fires when the user changes the selected project in theProjectsComboBox. This event gets the selected project and then updates the details controls with the newly selected project's data and then callsUpdateEstimateColor()to setestimateTextBox.Foregroundto the appropriate color based on the view logic.private void ProjectsComboBox_SelectionChanged( object sender, SelectionChangedEventArgs e) { Project project = GetSelectedProject(); if (project != null) { EstimatedTextBox.Text = project.Estimate.ToString(); EstimatedTextBox.IsEnabled = true; ActualTextBox.Text = project.Actual.ToString(); ActualTextBox.IsEnabled = true; UpdateButton.IsEnabled = true; UpdateEstimatedColor(); } }The
UpdateButton_Clickevent handler fires when a user clicks on the UpdateButton. This event handler simply creates a newProjectpopulated with the details data and then passes that project to the controller for processing.private void UpdateButton_Click(object sender, RoutedEventArgs e) { Project project = new Project() { ID = (int)ProjectsComboBox.SelectedValue, Name = ProjectsComboBox.Text, Estimate = GetDouble( EstimatedTextBox.Text), Actual = GetDouble(ActualTextBox.Text) }; _controller.Udate(project); }
Helpers
Add the code that follows as the private helper methods that are called from the event handlers:
The
UpdateEstimateColorfunction will look at the values of the details controls and update theEstimateTextBox.Foregroundto the appropriate color based on the view logic.private void UpdateEstimatedColor() { double actual = GetDouble(ActualTextBox.Text); double estimated = GetDouble(EstimatedTextBox.Text); if (actual == 0) { EstimatedTextBox.Foreground = ActualTextBox.Foreground; } else if (actual > estimated) { EstimatedTextBox.Foreground = Brushes.Red; } else { EstimatedTextBox.Foreground = Brushes.Green; } }The
UpdateDetailsfunction takes a project and updates the details controls including callingUpdateEstimateColor()to update the color ofestimateTextBox.Foreground.private void UpdateDetails(Project project) { EstimatedTextBox.Text = project.Estimate.ToString(); ActualTextBox.Text = project.Actual.ToString(); UpdateEstimatedColor(); }Next add the following methods which are self explanatory.
private double GetDouble(string text)
{
    return string.IsNullOrEmpty(text) ?
        0 : double.Parse(text);
}

private Project GetSelectedProject()
{
    return ProjectsComboBox.SelectedItem
        as Project;
}

private int GetSelectedProjectId()
{
    Project project = GetSelectedProject();
    return (project == null)
        ? NONE_SELECTED : project.ID;
}
MainWindow
Update
MainWindow.xamlas shown in the following code:<Window x:Class="ProjectBilling.UI.MVC.MainWindow" xmlns="http://schemas.microsoft.com/winfx/2006/xaml/presentation" xmlns:x="http://schemas.microsoft.com/winfx/2006/xaml" Title="Shell" Height="150" Width="150" MinHeight="200" MinWidth="200" FocusManager.FocusedElement ="{Binding ElementName=ShowProjectsButton}"> <StackPanel> <Button Content="Update Projects" Name="ShowProjectsButton" Margin="5" Click="ShowProjectsButton_Click" /> </StackPanel> </Window>This will create a window with one button that says ShowProjects. Double-click on ShowProjects in cider to create an event handler and then add the following code to
MainWindow.xaml.cs.using System.Windows; using ProjectBilling.Business.MVC; namespace ProjectBilling.UI.MVC { /// <summary> /// Interaction logic for MainWindow.xaml /// </summary> public partial class MainWindow : Window { private IProjectsController _controller; public MainWindow() { InitializeComponent(); _controller = new ProjectsController(new ProjectsModel()); } private void ShowProjectsButton_Click(object sender, RoutedEventArgs e) { _controller.ShowProjectsView(this); } } }This code will serve as the main window of the application and will show a new
ProjectsVieweach time the Show Projects button is clicked by callingIProjectsController.ShowProjectsView().
How it works
Run the application now. You will see a window like the one shown in the following screenshot:
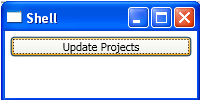
Each time the Show Projects button is clicked, a ProjectsView will be displayed as shown in the following screenshot:
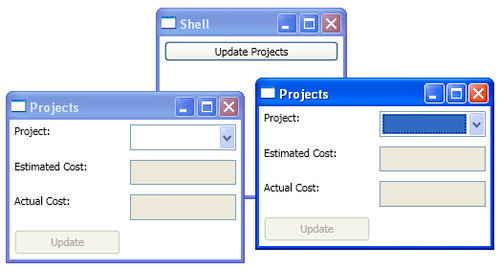
What's interesting about this architecture is that it's now easy to have updates propagate across views as you can see by following these steps:
Select the Jones account in each view.
Change the Actual Cost to be 1700 in one of the windows.
Click on the Update button in the same window that you changed the Actual Cost in.

You will now see that both open ProjectsView windows update and this is because the model has been abstracted away and the views observes the model. When an update occurs, the windows get their updates in the form of events (the observer pattern). You can also set each window with a different project and then try updating a project in one window. Next, verify that the changes display in the second window when you select the updated project.
Takeaways
MVC makes several improvements over the monolithic approach:
The increased SoC created by abstracting out a model allowed for easily supporting multiple synchronized views of the same data.
The controller abstraction allows for increased testability of view interactions (gestures).
However, this design also has the following issues:
The view logic and the view state are both still tightly coupled in the view leaving them difficult to test or share.
If we wanted to do a thin client for the Web in Silverlight, we'd only be able to reuse the model and not the controller and we'd have to duplicate the view logic and view state.
The final less obvious issue with this design deals with memory leaks. Details of the memory leaks follow. You can add code to fix the memory leak situation but I've found on the projects that I've worked on that this is often not done and requires higher maintenance than designs that don't rely on events. Having to go through this extra effort required by .NET events makes MVC less desirable than a pattern like MVVM that doesn't require the use of .NET events.
Memory leaks
In the MVC Project Billing Sample the view observes the Model using .NET events, which are an implementation of the observer pattern. One thing to watch out for when using .NET events is memory leaks. This is because unfortunately in .NET, events only support using strong references and not weak references. The issue here is that when an observer object (view in our example) subscribes to an event on a subject object (model in our example), the subject keeps a reference in the form of a delegate (or function pointer) to the observer. In .NET, memory management is handled by the garbage collector and the garbage collector will not collect any object as long as another object has a strong reference to it. This means that our view subscribing to our model's events will cause those models to hold strong references to the views. These strong references will prevent the garbage collector from collecting the views causing the views to leak.
To see this for yourself, update the previous example as follows. Let's start by adding a button to MainWindow.xaml:
<Button Content="GC Collect"
        Name="GCCollectButton" Margin="5"
        Click="GCCollectButton_Click" />
Next add gcCollectButton_Click to MainWindow.xaml.cs as follows:
private void GCCollectButton_Click(object sender,
    RoutedEventArgs e)
{
    GC.Collect();
    GC.WaitForPendingFinalizers();
    GC.Collect();
}
Note
You will need to add the System namespace to use GC.
This code will call GC.Collect() twice and GC.WaitForPendingFinalizers() once. The .NET garbage collector is non-deterministic so there are no guarantees about when it will collect but I find this combination works pretty well at getting it to collect.
Now let's add a finalizer to ProjectsView.xaml.cs as follows.
Note
Finalizers are called when an object is collected by the garbage collector. Full coverage of .NET memory management is out of the scope of this book. See C# Via CLR by Jeffery Richter for more details.
~ProjectsView()
{
    MessageBox.Show("ProjectsView collected");
}
Now when a ProjectsView instance is collected by the garbage collector, a message box will pop up and we will know that it was collected.
Go ahead, run the application and follow these steps:
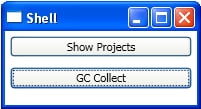
Click on the GC Collect button as shown in the previous screenshot.
Open a few ProjectsViews by clicking on the Show Projects button and then close them.
Click on the GC Collect button, in fact click it a few times. Try all you want, you will not be able to get the finalizers to execute from the views that you created because the
ProjectsModelinstance is holding a reference to them.
You will never see the ProjectsView collected message box displayed under this design. If you used a memory profiler, you'd see that after each window is closed the memory used by the application doesn't decrease.
To fix this situation add the following code to ProjectsView.xaml.cs and then re-run the application repeating the steps listed previously.
protected override void OnClosed(EventArgs e)
{
    base.OnClosed(e);
    _model.ProjectUpdated -= model_ProjectUpdated;
}
Now you will see that when you click on GC Collect the finalizers will execute. This isn't a lot of code to correct this situation but developers do tend to get this wrong from time to time and it can make the code higher maintenance than a design that doesn't require .NET events.
Note
Microsoft recommends using the weak event pattern to deal with this situation (http://msdn.microsoft.com/en-us/library/aa970850.aspx). However, I prefer the WeakEvent class found in CLR via C# by Jeffery Richter because it's a much lower maintenance approach than the weak event pattern and Richter's WeakEvent classes are used almost exactly like regular CLR events, so they require very little training. Please check Richter's blog for the latest version of this code which contains bug fixes to the published version.. These topics will not be covered in this book but feel free to dig deeper on your own.
MVP
MVP or Model View Presenter is a pattern that first appeared at IBM and then emerged more prominently at Taligent in the 1990's. MVP was a derivative of MVC that took a slightly different approach. Under MVP, the view is no longer required to observe the model.
Note
Martin Fowler officially retired the MVP pattern on his blog and replaced it with two variations, Passive View and Supervising Controller. Passive view is what is shown in the following screenshot. Under Supervising Controller, the view still observes the model via an observer but with a much more limited scope than under MVC. For full details see Martin's blog (http://martinfowler.com/eaaDev/ModelViewPresenter.html).
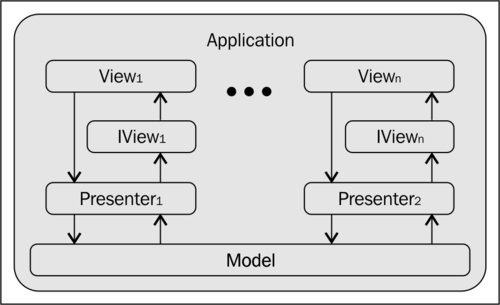
The following diagram shows the basic structure of MVP:
Note
It's more common for presenters to have a larger scope than a single UI widget and to instead have one presenter per form or user control.
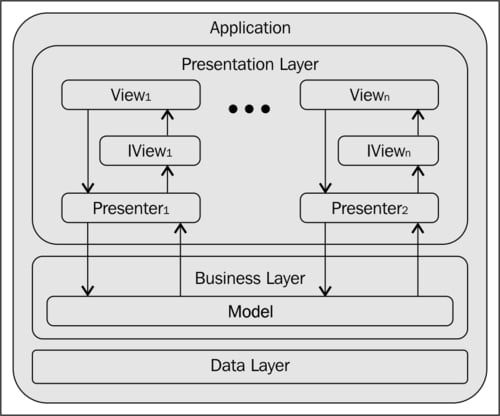
As you can see in the previous diagram, the presenter has taken the place of the controller in the triad and is responsible for moving user input from the view to the model as well as being responsible for updating the view about changes that occur in the model. The presenter communicates with the view through an interface which allows for increased testability as the model can be replaced by a fake object (mock or stub) for unit tests. The following diagram shows MVP in a layered architecture:
MVP Project Billing sample
We will create an application with the classes shown in the following screenshot:
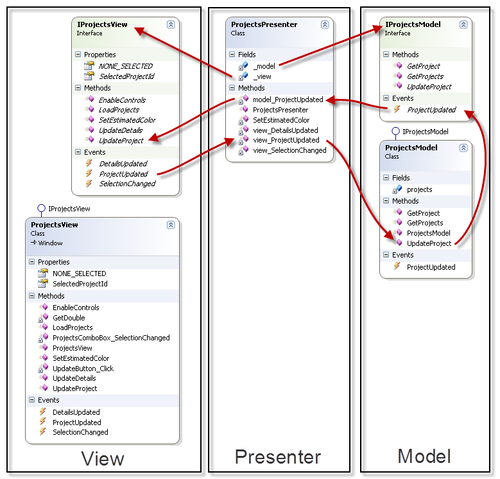
As you can see our view now consists of a class, ProjectsView that implements an interface, IProjectsView. We will be implementing the
Passive View version of MVP and so IProjectsView contains everything needed to update the view and to communicate user gestures into the presenter. This allows for maximum test coverage under the MVP paradigm.
The presenter, ProjectsPresenter, takes an IProjectsView and an IProjectsModel as constructor arguments and keeps references to them in ProjectsPresenter.view and ProjectsPresenter.model respectively as shown previously.
This design requires that communications go through the presenter. For example, when the user clicks on the updateButton, this will cause the IProjectView.ProjectUpdated event to be raised, which will call the ProjectsPresenter.view_ProjectUpdated() event handler. ProjectsPresenter.view_ProjectUpdated will in turn call ProjectsPresenter.model.UpdateProject() which will update the model data and then raise the IProjectsModel.ProjectUpdated event to notify presenters that the model has been updated. The Presenters will then call IView.UpdateProject(), which will take care of updating the view state and applying view logic to set the color of estimateTextBox if necessary. This will allow for dynamic updates to session data across multiple views just like in MVC. However, this design allows for better test coverage than under MVC because the view is passive and we've moved the view logic and view state out of the view and into the presenter. We've also removed direct communication between the view and model and all of the communication is handled through the presenter.
Note
Having no interaction between the model and view is a detail that is specific to the passive view version of MVP. In supervising controller the model and view can still communicate directly.
Let's start by adding a new WPF Application project called ProjectBilling.MVP to the solution and then add a project reference to the ProjectBilling.DataAccess project.
Model
Add a class called ProjectsModel and add the following code:
using System;
using System.Collections.Generic;
using System.Linq;
using ProjectBilling.DataAccess;

namespace ProjectBilling.Business
{
    public class ProjectEventArgs : EventArgs
    {
        public Project Project { get; set; }
        public ProjectEventArgs(Project project)
        {
            Project = project;
        }
    }

    public interface IProjectsModel
    {
        void UpdateProject(Project project);
        IEnumerable<Project> GetProjects();
        Project GetProject(int Id);
        event EventHandler<ProjectEventArgs> ProjectUpdated;
    }

    public class ProjectsModel : IProjectsModel
    {

        private IEnumerable<Project> projects = null;

        public event EventHandler<ProjectEventArgs>
            ProjectUpdated = delegate { };

        public ProjectsModel()
        {
            projects = new DataServiceStub().GetProjects();
        }

        public void UpdateProject(Project project)
        {
            ProjectUpdated(this,
                new ProjectEventArgs(project));
        }

        public IEnumerable<Project> GetProjects()
        {
            return projects;
        }


        public Project GetProject(int Id)
        {
            return projects.Where(p => p.ID == Id)
                .First() as Project;
        }
    }
}
Our ProjectsModel implements the IProjectsModel interface for better testability via dependency injection and implements the following contrct.
UpdateProject(): This method allows for updating a project across the session state. This design could be extended to support updates across persisted state, but covering that is outside the scope of this book.GetProjects(): This method will return all projects in the session state.GetProject(): This method is given a project ID and will return a project from session state.ProjectUpdated: This event will fire when a project has been updated in the session state.
The ProjectEventArgs class is for our events to use to communicate which project has changed.
View
Add a window called ProjectsView and add the following code to ProjectsView.xaml:
<Window x:Class="ProjectBilling.UI.MVP.ProjectsView"
        xmlns="http://schemas.microsoft.com/winfx/2006/xaml/presentation"
        xmlns:x="http://schemas.microsoft.com/winfx/2006/xaml"
        Title="Projects" MinHeight="180" Height="180"
        MinWidth="250" Width="250" Padding="5"
        FocusManager.FocusedElement
            ="{Binding ElementName=ProjectsComboBox}">
    <UniformGrid Columns="2">
        <Label Content="Project:" />
        <ComboBox Name="ProjectsComboBox" Margin="5"
                SelectionChanged
                    ="ProjectsComboBox_SelectionChanged" />
        <Label Content="Estimated Cost:" />
        <TextBox Name="EstimatedTextBox" Margin="5"
                 IsEnabled="False" />
        <Label Content="Actual Cost:" />
        <TextBox Name="ActualTextBox" Margin="5"
                 IsEnabled="False" />
        <Button Name="UpdateButton" Content="Update"
                Margin="5" IsEnabled="False"
                Click="UpdateButton_Click" />
    </UniformGrid>
</Window>
With the exception of the namespace declaration, this XAML file is exactly the same as that found in the MVC ProjectsView.xaml.
Next, add the following code to the ProjectsView.xaml.cs file.
using System;
using System.Collections.Generic;
using System.Linq;
using System.Windows;
using System.Windows.Controls;
using System.Windows.Media;
using ProjectBilling.Business;
using ProjectBilling.DataAccess;

namespace ProjectBilling.UI.MVP
{
    public interface IProjectsView
    {
        int NONE_SELECTED { get; }
        int SelectedProjectId { get; }
        void UpdateProject(Project project);
        void LoadProjects(IEnumerable<Project> projects);
        void UpdateDetails(Project project);
        void EnableControls(bool isEnabled);
        void SetEstimatedColor(Color? color);
        event EventHandler<ProjectEventArgs> ProjectUpdated;
        event EventHandler<ProjectEventArgs> DetailsUpdated;
        event EventHandler SelectionChanged;
    }

    /// <summary>
    /// Interaction logic for ProjectsView.xaml
    /// </summary>
    public partial class ProjectsView : Window, IProjectsView
    {

        public int NONE_SELECTED { get { return -1; } }
            public event EventHandler<ProjectEventArgs>
            ProjectUpdated = delegate { };
        public int SelectedProjectId { get; private set; }

        public event EventHandler SelectionChanged
            = delegate { };
        public event EventHandler<ProjectEventArgs>
            DetailsUpdated = delegate { };

        public ProjectsView()
        {
            InitializeComponent();
            SelectedProjectId = NONE_SELECTED;
        }

    }
}
This code creates the IProjectsView interface, the fields and the events that are needed by ProjectsView. ProjectsView will implement the IProjectView and the contract described as follows:
NONE_SELECTED: This read-only property returns a constant that is used to determine if SelectedProjectID currently has a selectionSelectedProjectId: This read-only property returns the currently selected project IDUpdateProject(): This function allows to update a project in the view state and will take care of updating the details view if neededLoadProjects(): This function allows for populating the projectsComboBox for the first timeUpdateDetails(): This function allows for updating the details viewEnableControls(): This function allows for setting the details controls and theIsEnabledproperty of updateButton to enable and disable these controlsSetEstimatedColor(): This function allows for setting the text color of estimatedTextBoxProjectUpdated: This event will notify the presenter that the user clicked on the updateButtonDetailsUpdated: This event will notify the presenter that the details have changed so that the presenter can update the text color ofestimatedColorSelectionChanged: This event will notify the presenter that the current selection has changed in theprojectsComboBox
Event handlers
Now let's add the event handls that we will need:
The
UpdateButton_Clickfunction will fire when a user clicks on UpdateButton and will create a new project, populate it with the details control data, and then raise theIProjectsView.ProjectUpdatedevent passing the new project to the constructor of the new ProjectEventArgs that is being passed with the event.private void UpdateButton_Click(object sender, RoutedEventArgs e) { Project project = new Project(); project.Estimate = GetDouble(EstimatedTextBox.Text); project.Actual = GetDouble(ActualTextBox.Text); project.ID = int.Parse( ProjectsComboBox.SelectedValue. ToString()); ProjectUpdated(this, new ProjectEventArgs(project)); }The
ProjectsComboBox_SelectionChanged()function will fire when the selection changes in theProjectsComboBoxand it simply raises theIProjectsView.SelectionChangedevent to notify the presenter so that it can update the view as needed.private void ProjectsComboBox_SelectionChanged( object sender, SelectionChangedEventArgs e) { SelectedProjectId = (ProjectsComboBox.SelectedValue == null) ? NONE_SELECTED : int.Parse( ProjectsComboBox.SelectedValue. ToString()); SelectionChanged(this, new EventArgs()); }
Public methods
Add te following public methods:
The
UpdateProjectfunction allows for updating a project in the view state by first finding the project in theProjectsComboBox.ItemsSourceusing a little Linq. It then updates the project and if it's the project that is currently selected, it callsUpdateDetails()to update the details controls.public void UpdateProject(Project project) { // Null checks excluded IEnumerable<Project> projects = ProjectsComboBox.ItemsSource as IEnumerable<Project>; Project projectToUpdate = projects.Where(p => p.ID == project.ID) .First(); projectToUpdate.Estimate = project.Estimate; projectToUpdate.Actual = project.Actual; if (project.ID == SelectedProjectId) UpdateDetails(project); }The
LoadProjectsfunction allowsProjectsas theItemsSourceforprojectsComboBox.public void LoadProjects(IEnumerable<Project> projects) { ProjectsComboBox.ItemsSource = projects; ProjectsComboBox.DisplayMemberPath = "Name"; ProjectsComboBox.SelectedValuePath = "ID"; }The
EnableControlsfunction allows for setting theIsEnabledstate of the details controls andupdateButton.public void EnableControls(bool isEnabled) { EstimatedTextBox.IsEnabled = isEnabled; ActualTextBox.IsEnabled = isEnabled; UpdateButton.IsEnabled = isEnabled; }The
SetEstimatedColorfunction takes a color and will update theestimateTextBox.Foregroundcolor to be the passed in color.public void SetEstimatedColor(Color? color) { EstimatedTextBox.Foreground = (color == null) ? ActualTextBox.Foreground : new SolidColorBrush((Color)color); }Note
Note that this function doesn't contain view logic and that it's the presenter's responsibility to calculate the correct color.
The
UpdateDetailsfunction will update the details controls with the data contained in the project that is passed in.public void UpdateDetails(Project project) { EstimatedTextBox.Text = project.Estimate.ToString(); ActualTextBox.Text = project.Actual.ToString(); DetailsUpdated(this, new ProjectEventArgs(project)); }
Helpers
The model_ProjectUpdated function will get a double from textpassed in taking care of null/empty checks.
private double GetDouble(string text)
{
    return string.IsNullOrEmpty(text)
        ? 0 : double.Parse(text);
}
Presenter
Add a class called ProjetsPresenter and add the following code to it:
using System;
using System.Windows.Media;
using ProjectBilling.Business;
using ProjectBilling.DataAccess;

namespace ProjectBilling.UI.MVP
{
    public class ProjectsPresenter
    {
        private readonly IProjectsView _view = null;
        private readonly IProjectsModel _model = null;

        public ProjectsPresenter(IProjectsView projectsView,
            IProjectsModel projectsModel)
        {
            _view = projectsView;
            _view.ProjectUpdated += view_ProjectUpdated;
            _view.SelectionChanged
                += view_SelectionChanged;
            _view.DetailsUpdated += view_DetailsUpdated;
            _model = projectsModel;
            _model.ProjectUpdated += model_ProjectUpdated;
            _view.LoadProjects(
                _model.GetProjects());
        }

    }
}
As you can see the presenter takes IProjectsView and IProjectsModel as constructor arguments and then subscribes to various events and the loads projects into the view from the model with the following code:
this.view.LoadProjects(
    this.model.GetProjects());
Event handlers
The
view_DetailsUpdatedfunction is called in response to theIProjectsView.DetailsUpdatedevent and simply callsSetEstimateColor()to update the color of theestimateTextBox.Foreground. This allows the view logic to be easily tested.private void view_DetailsUpdated(object sender, ProjectEventArgs e) { SetEstimatedColor(e.Project); }view_SelectionChangedwill be called in response to theIProjectsView.SelectionChangedevent firing performs the view logic of updating the details controls after a the user changes the selected project. Again, this design allows this view logic to be easily tested.private void view_SelectionChanged(object sender, EventArgs e) { int selectedId = _view.SelectedProjectId; if (selectedId > _view.NONE_SELECTED) { Project project = _model.GetProject(selectedId); _view.EnableControls(true); _view.UpdateDetails(project); SetEstimatedColor(project); } else { _view.EnableControls(false); } }model_ProjectUpdatedwill be called in response to theIProjectsModel.ProjectUpdatedevent firing and will allow for propagating the changes to session state made in one view to the other views.private void model_ProjectUpdated(object sender, ProjectEventArgs e) { _view.UpdateProject(e.Project); }The
view_ProjectUpdatedfunction will fire in response to theIProjectsView.ProjectsUpdatedevent and will notify the model so that it can update the project in the session state and also callsSetEstimatedColor()to perform the view logic for updating the color ofestimateTextBox.Foregroundif needed.private void view_ProjectUpdated(object sender, ProjectEventArgs e) { _model.UpdateProject(e.Project); SetEstimatedColor(e.Project); }
Helpers
Now add the following helper method:
The
SetEstimateColorperforms the view logic needed to setestimateColor.Foregroundto the appropriate color and then callsIProjectsView.SetEstimatedColor()to apply the needed color again allowing for the view logic to be easily tested.private void SetEstimatedColor(Project project) { if (project.ID == _view.SelectedProjectId) { if (project.Actual <= 0) { _view.SetEstimatedColor(null); } else if (project.Actual > project.Estimate) { _view.SetEstimatedColor(Colors.Red); } else { _view.SetEstimatedColor(Colors.Green); } } }
Main window
Add the following code to MainWindow.xaml:
<Window x:Class="ProjectBilling.UI.MVP.MainWindow"
        xmlns="http://schemas.microsoft.com/winfx/2006/xaml/presentation"
        xmlns:x="http://schemas.microsoft.com/winfx/2006/xaml"
        Title="Shell" Height="150" Width="200"
        MinHeight="150" MinWidth="200"
        FocusManager.FocusedElement
            ="{Binding ElementName=ShowProjectsButton}">
    <StackPanel>
        <Button Content="Show Projects"
                Name="ShowProjectsButton" Margin="5"
                Click="ShowProjectsButton_Click" />
    </StackPanel>
</Window>
With the exception of the namespace declaration, this XAML code is exactly the same as the one found in the MVC MainWindow.xaml.
Next, add the following code to MainWindow.xaml.cs:
using System.Windows;
using ProjectBilling.Business;

namespace ProjectBilling.UI.MVP
{
    /// <summary>
    /// Interaction logic for MainWindow.xaml
    /// </summary>
    public partial class MainWindow : Window
    {
        private IProjectsModel _model = null;

        public MainWindow()
        {
            InitializeComponent();
            _model = new ProjectsModel();
        }

        private void ShowProjectsButton_Click(object sender,
            RoutedEventArgs e)
        {
            ProjectsView view = new ProjectsView();
            ProjectsPresenter presenter
                = new ProjectsPresenter(view, _model);
            view.Owner = this;
            view.Show();
        }
    }
}
The constructor creates a model that will be shared across all views. The model is used to initialize and update session state.
ShowProjectsButton_Click() will be called when the ShowProjectsButton is clicked and it will instantiate a new view and pass the new view instance as an argument to the constructor for a new ProjectsPresenter instance along with a reference to MainWindow.model. ShowProjectsButton_Click will then show the view by calling view.Show().
How it works
Running the application you will see that it works the same as our previous MVC application.
Takeaways
MVP represents a big improvement over MVC in a few ways:
It provides testable view state and view logic by moving them into the presenter allowing the view logic to be easily tested.
It decouples the view from the model by requiring communication to go through the presenter. Unlike MVC, MVP allows for reuse of the view logic and this is achieved by moving the logic into a presenter and having the presenter communicate with the view through an interface. Now if you wanted to implement a Silverlight version of this application, you would only need to create a view in Silverlight that implements
IProjectsViewand could reuseIProjectsPresenterandIProjectsModel.
However there are still a few issues as follows:
We still use a lot of events, and as shown in the Memory Leaks section previously, events can cause memory leaks and end up causing code to be higher maintenance than a design that doesn't require events.
There is still a lot of untested code in the view.
These short comings are all motivators for MVVM or presentation model and we will look at how MVVM addresses each of these issues in the next chapter.


