Preparing and testing the train script in Python
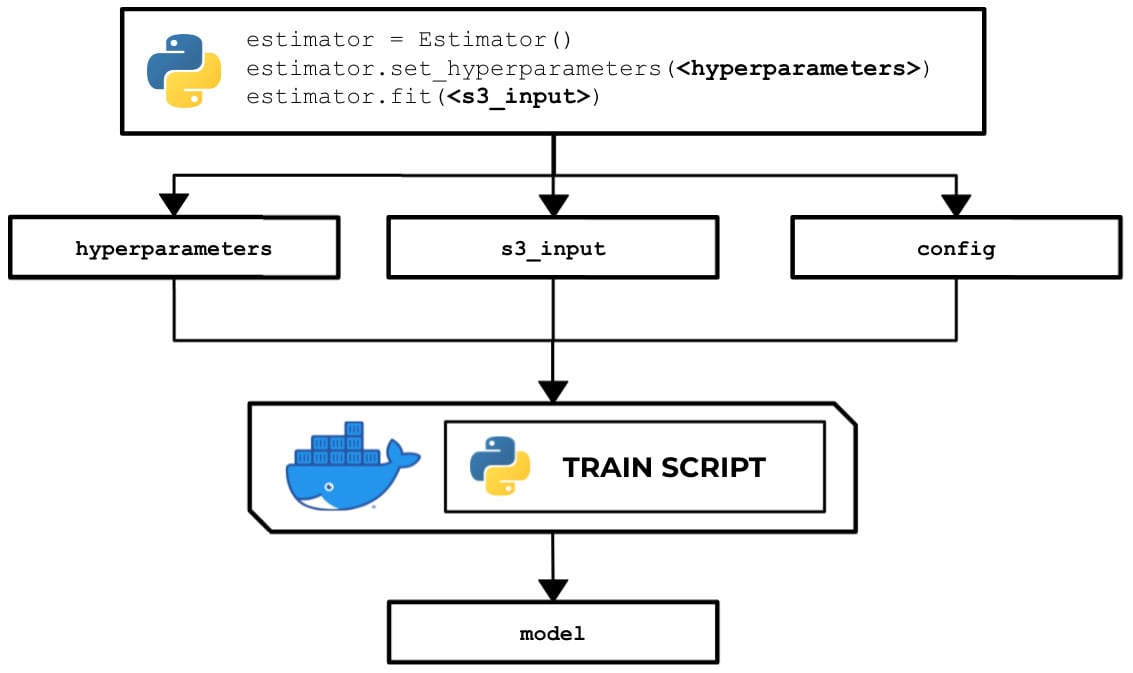
In this recipe, we will write a train script in Python that allows us to train a linear model with scikit-learn. Here, we can see that the train script inside a running custom container makes use of the hyperparameters, input data, and the configuration specified in the Estimator instance using the SageMaker Python SDK:

Figure 2.44 – How the train script is used to produce a model
There are several options when running a training job – use a built-in algorithm, use a custom train script and custom Docker container images, or use a custom train script and prebuilt Docker images. In this recipe, we will focus on the second option, where we will prepare and test a bare minimum training script in Python that builds a linear model for a specific regression problem.
Once we have finished working on this recipe, we will have a better understanding of how SageMaker works behind the scenes. We will see where and how to load and use the configuration and arguments we have specified in the SageMaker Python SDK Estimator.
Getting ready
Make sure you have completed the Setting up the Python and R experimentation environments recipe.
How to do it…
The first set of steps in this recipe focus on preparing the train script. Let's get started:
- Inside the
ml-pythondirectory, double-click thetrainfile to open the file inside the Editor pane:
Figure 2.45 – Empty ml-python/train file
Here, we have an empty
trainfile. In the lower right-hand corner of the Editor pane, you can change the syntax highlight settings to Python. - Add the following lines of code to start the train script to import the required packages and libraries:
#!/usr/bin/env python3
import json
import pprint
import pandas as pd
from sklearn.linear_model import LinearRegression
from joblib import dump, load
from os import listdir
In the preceding block of code, we imported the following:
jsonfor utility functions when working with JSON datapprintto help us "pretty-print" nested structures such as dictionariespandasto help us read CSV files and work with DataFramesLinearRegressionfrom thesklearnlibrary for training a linear model when we run the train scriptjoblibfor saving and loading a modellistdirfrom theosmodule to help us list the files inside a directory
- Define the
PATHSconstant and theget_path()function. Theget_path()function will be handy in helping us manage the paths and locations of the primary files and directories used in the script:PATHS = { 'hyperparameters': 'input/config/hyperparameters.json', 'input': 'input/config/inputdataconfig.json', 'data': 'input/data/', 'model': 'model/' } def get_path(key): return '/opt/ml/' + PATHS[key]If we want to get the path of the
hyperparameters.jsonfile, we can useget_path("hyperparameters")instead of using the absolute path in our code.Important note
In this chapter, we will intentionally use
get_pathfor the function name. If you have been using Python for a while, you will probably notice that this is definitely not Pythonic code! Our goal is for us to easily find the similarities and differences between the Python and R scripts, so we made the function names the same for the most part. - Next, add the following lines just after the
get_path()function definition from the previous step. These additional functions will help us later once we need to load and print the contents of the JSON files we'll be working with (for example,hyperparameters.json):def load_json(target_file): output = None with open(target_file) as json_data: output = json.load(json_data) return output def print_json(target_json): pprint.pprint(target_json, indent=4)
- Include the following functions as well in the train script (after the
print_json()function definition):def inspect_hyperparameters(): print('[inspect_hyperparameters]') hyperparameters_json_path = get_path( 'hyperparameters' ) print(hyperparameters_json_path) hyperparameters = load_json( hyperparameters_json_path ) print_json(hyperparameters) def list_dir_contents(target_path): print('[list_dir_contents]') output = listdir(target_path) print(output) return outputThe
inspect_hyperparameters()function allows us to inspect the contents of thehyperparameters.jsonfile inside the/opt/ml/input/configdirectory. Thelist_dir_contents()function, on the other hand, allows us to display the contents of a target directory. We will use this later to check the contents of the training input directory. - After that, define the
inspect_input()function. This allows us to inspect the contents ofinputdataconfig.jsoninside the/opt/ml/input/configdirectory:def inspect_input(): print('[inspect_input]') input_config_json_path = get_path('input') print(input_config_json_path) input_config = load_json(input_config_json_path) print_json(input_config) - Define the
load_training_data()function. This function accepts a string value pointing to the input data directory and returns the contents of a CSV file inside that directory:def load_training_data(input_data_dir): print('[load_training_data]') files = list_dir_contents(input_data_dir) training_data_path = input_data_dir + files[0] print(training_data_path) df = pd.read_csv( training_data_path, header=None ) print(df) y_train = df[0].values X_train = df[1].values return (X_train, y_train)The flow inside the
load_training_data()function can be divided into two parts – getting the specific path of the CSV file containing the training data, and then reading the contents of the CSV file using thepd.read_csv()function and returning the results inside a tuple of lists.Note
Of course, the
load_training_data()function we've implemented here assumes that there is only one CSV file inside that directory, so feel free to modify the following implementation when you are working with more than one CSV file inside the provided directory. At the same time, this function implementation only supports CSV files, so make sure to adjust the code block if you need to support multiple input file types. - Define the
get_input_data_dir()function:def get_input_data_dir(): print('[get_input_data_dir]') key = 'train' input_data_dir = get_path('data') + key + '/' return input_data_dir - Define the
train_model()function:def train_model(X_train, y_train): print('[train_model]') model = LinearRegression() model.fit(X_train.reshape(-1, 1), y_train) return model - Define the
save_model()function:def save_model(model): print('[save_model]') filename = get_path('model') + 'model' print(filename) dump(model, filename) print('Model Saved!') - Create the
main()function, which executes the functions we created in the previous steps:def main(): inspect_hyperparameters() inspect_input() input_data_dir = get_input_data_dir() X_train, y_train = load_training_data( input_data_dir ) model = train_model(X_train, y_train) save_model(model)
This function simply inspects the hyperparameters and input configuration, trains a linear model using the data loaded from the input data directory, and saves the model using the
save_model()function. - Finally, run the
main()function:if __name__ == "__main__": main()
The
__name__variable is set to"__main__"when the script is executed as the main program. Thisifcondition simply tells the script to run if we're using it as the main program. If this script is being imported by another script, then themain()function will not run.Tip
You can access a working copy of the
trainscript file in the Machine Learning with Amazon SageMaker Cookbook GitHub repository: https://github.com/PacktPublishing/Machine-Learning-with-Amazon-SageMaker-Cookbook/blob/master/Chapter02/ml-python/train.Now that we are done with the train script, we will use the Terminal to perform the last set of steps in this recipe.
The last set of steps focus on installing a few script prerequisites:
- Open a new Terminal:

Figure 2.46 – New Terminal
Here, we can see how to create a new Terminal tab. We simply click the plus (+) button and then choose New Terminal.
- In the Terminal at the bottom pane, run
python3 --version:python3 --version
Running this line of code should return a similar set of results to what is shown in the following screenshot:

Figure 2.47 – Result of running python3 --version in the Terminal
Here, we can see that our environment is using Python version
3.6.9. - Install
pandasusingpip. The pandas library is used when working with DataFrames (tables):pip3 install pandas
- Install
sklearnusingpip. The scikit-learn library is a machine learning library that features several algorithms for classification, regression, and clustering problems:pip3 install sklearn
- Navigate to the
ml-pythondirectory:cd /home/ubuntu/environment/opt/ml-python
- To make the
trainscript executable, run the following command in the Terminal:chmod +x train
- Test the
trainscript in your AWS Cloud9 environment by running the following command in the Terminal:./train
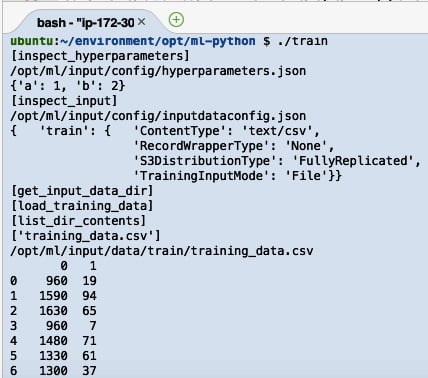
Running the previous lines of code will yield results similar to the following:

Figure 2.48 – Result of running the train script
Here, we can see the logs that were produced by the train script. After the train script has been successfully executed, we expect the model files to be stored inside the /opt/ml/model directory.
Now, let's see how this works!
How it works…
In this recipe, we prepared a custom train script using Python. The script starts by identifying the input paths and loading the important files to help set the context of the execution. This train script demonstrates how the input and output values are passed around between the SageMaker Python SDK (or API) and the custom container. It also shows how to load the training data, train a model, and save a model.
When the Estimator object is initialized and configured, some of the specified values, including the hyperparameters, are converted from a Python dictionary into JSON format in an API call when invoking the fit() function. The API call on the SageMaker platform then proceeds to create and mount the JSON file inside the environment where the train script is running. It works the same way as it does with the other files loaded by the train script file, such as the inputdataconfig.json file.
If you are wondering what is inside the inputdataconfig.json file, refer to the following code block for an example of what it looks like:
{"<channel name>": {"ContentType": "text/csv",
       "RecordWrapperType": "None",
       "S3DistributionType": "FullyReplicated",
       "TrainingInputMode": "File"}}
For each of the input channels, a corresponding set of properties is specified in this file. The following are some of the common properties and values that are used in this file. Of course, the values here depend on the type of data and the algorithm being used in the experiment:
ContentType– Valid Values:text/csv,image/jpeg,application/x-recordio-protobuf, and more.RecordWrapperType– Valid Values:NoneorRecordIO. TheRecordIOvalue is set only when theTrainingInputModevalue is set toPipe. The training algorithm requires theRecordIOformat for the input data, and the input data is not inRecordIOformat yet.S3DistributionType– Valid Values:FullyReplicatedorShardedByS3Key. If the value is set toFullyReplicated, the entire dataset is copied on each ML instance that's launched during model training. On the other hand, when the value is set toShardedByS3Key, each machine that's launched and used during model training makes use of a subset of the training data provided.TrainingInputMode– Valid Values:FileorPipe. When theFileinput mode is used, the entire dataset is downloaded first before the training job starts. On the other hand, thePipeinput mode is used to speed up training jobs, start faster, and requires less disk space. This is very useful when dealing with large datasets. If you are planning to support thePipeinput mode in your custom container, the directories inside the/opt/ml/input/datadirectory are a bit different and will be in the format of<channel name>_<epoch number>. If we used this example in our experimentation environment, we would have directories namedd_1,d_2, … instead inside the/opt/ml/input/datadirectory. Make sure that you handle scenarios dealing with data files that don't exist yet as you need to add some retry logic inside thetrainscript.
In addition to files stored inside a few specific directories, take note that there are a couple of environment variables that can be loaded and used by the train script as well. These include TRAINING_JOB_NAME and TRAINING_JOB_ARN.
The values for these environment variables can be loaded by using the following lines of Python code:
import os
training_job_name = os.environ['TRAINING_JOB_NAME']
We can test our script by running the following code in the Terminal:
TRAINING_JOB_NAME=abcdef ./train
Feel free to check out the following reference on how SageMaker provides training information: https://docs.aws.amazon.com/sagemaker/latest/dg/your-algorithms-training-algo-running-container.html.
There's more…
If you are dealing with distributed training where datasets are automatically split across different instances to achieve data parallelism and model parallelism, another configuration file that can be loaded by the train script is the resourceconfig.json file. This file can be found inside the /opt/ml/input/config directory. This file contains details regarding all running containers when the training job is running and provides information about current_host, hosts, and network_interface_name.
Important note
Take note that the resourceconfig.json file only exists when distributed training is used, so check the existence of this file (as well as other files) before performing the load operation.
If you want to update your train script with the proper support for distributed training, simply use the experiment environment from the Setting up the Python and R experimentation environments recipe and create a dummy file named resourceconfig.json inside the /opt/ml/input/config directory:
{
    "current_host": "host-1",
    "hosts": ["host-1","host-2"],
    "network_interface_name":"eth1"
}
The preceding code will help you create that dummy file.


