Preparing your development machine
There are some prerequisites you need to install before you can start building the code components that we will be using in this book. In the following subsections, we will look at each of these prerequisites in detail and examine the processes required to get these tools installed.
Node.js or npm
The first prerequisite is Node.js or npm; you do not need both because if you install one, the other gets installed as part of it.
Node.js helps users to build scalable applications using an asynchronous event-driven runtime engine.
npm is an open source JavaScript and TypeScript package registry. It has a command-line interface that enables developers to interact with it.
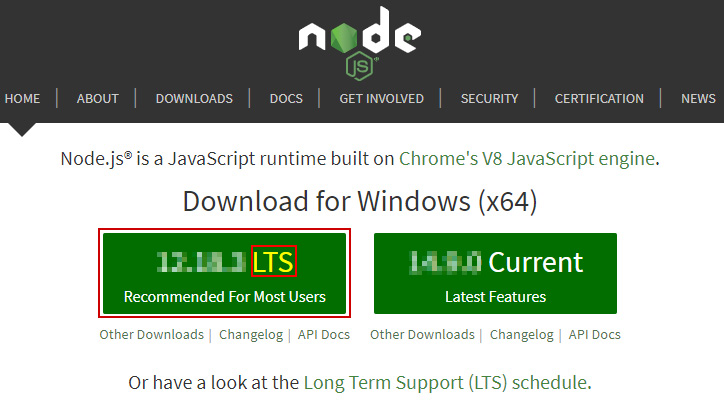
For installation, browse to https://nodejs.org and choose the latest LTS version available for download. Once the file is downloaded, execute it to install it on your machine:

Figure. 1.1 – Node.js download
Once the installation is complete, you can check the status by opening a command prompt and running the npm version command, which should show you the npm version installed on the machine.
TypeScript
Once you have installed these prerequisites, you need to make sure you have TypeScript installed on the machine. To check whether TypeScript is already installed on your machine, open the command prompt and execute the following command:
tsc -v
If the response from the command shows a version number, then you already have TypeScript installed on your machine, but if the response states that the command is not recognized, then you need to install TypeScript on your machine.
TypeScript can be installed through npm using the following command:
npm install -g typescript
-g means it is installed on your system globally so that the TypeScript compiler can be used in any of your projects. Once the installation is complete, you can execute tsc -v to confirm it.
.NET Framework
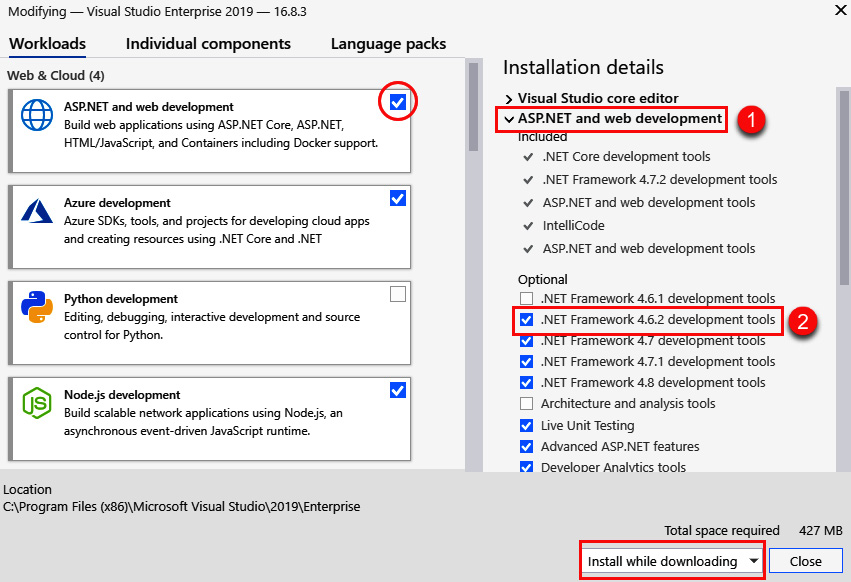
Next, you need to make sure the .NET Framework 4.6.2 developer pack is installed on your machine. To check whether 4.6.2 version is already installed on your machine, do the following:
- Open Visual Studio Installer. If you do not have Visual Studio Installer, then you can download the latest version of Visual Studio from https://visualstudio.microsoft.com/downloads.
- From the More option for the latest version of Visual Studio, select Modify, which will bring up the Installation details window.
- Make sure the ASP.NET and web development option is checked.
- On the right-hand panel, under ASP.Net and web development, confirm that .NET Framework 4.6.2 development tools is checked. If it is not installed, then check the box and click on the Install while downloading button, as seen in the following screenshot:

Figure. 1.2 – .NET Framework 4.6.2 installation
Visual Studio Code
While you can use any preferred integrated development environment, for the development in this book, we are going to use Visual Studio Code.
Visual Studio Code is a free source code editor made by Microsoft for Windows, Linux, and macOS. Its features include support for debugging, syntax highlighting, intelligent code completion, snippets, code refactoring, and embedded Git.
If you do not have Visual Studio Code installed on your machine, you can install it from https://code.visualstudio.com/download.
Power Apps CLI
The most important tool in enabling a developer to interact with PCF and empowering them to create, test, debug, and deploy code components is Power Apps CLI. To download it, browse to https://aka.ms/PowerAppsCLI. Once downloaded, install it on your machine.
Note
Currently, Power Apps CLI is only supported on Windows 10.
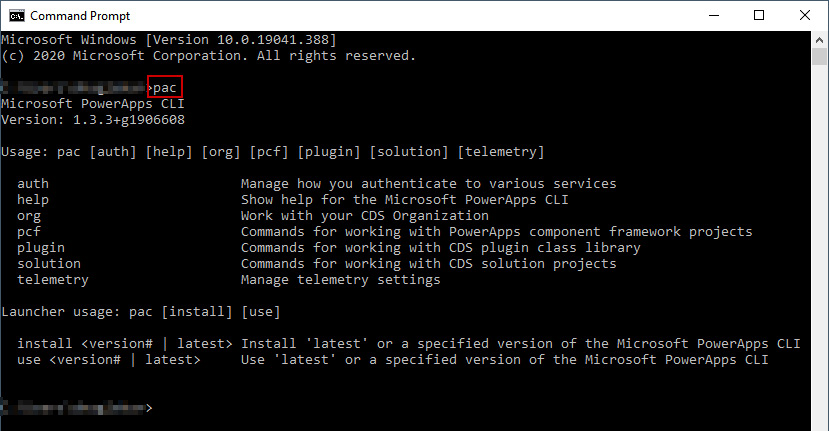
To confirm the installation, open the command prompt and run the pac command. It should show an output as follows:

Figure 1.3 – Executing the pac command
Once your machine has been prepared with all the prerequisites, you need to download the example library.


